Historical Background
After the battle at the Ticinus River, Hannibal soon faced an entire Roman army under the Consul Sempronius. As vain as he was inept, Sempronius wanted a victory to finish our his year as Consul. He took no cautionary advise from the wounded Publius Scipio, but instead sent his army, cold and hungry, through the icy waters of the Trebbia to engage Hannibal's army on the far side. Hannibal had prepared the first of many traps for unwary Romans - he had placed his brother Mago and a picked force of cavalry and infantry out of sight in a ravine. The Romans did not discover them as they passed by. Despite their cold and hunger, the Roman infantry was doing well against Hannibal's main line. Then twin disaster struck. Mago's detachment emerged from hiding and struck the Romans from behind, and the weather turned markedly colder. Assailed from two sides, and now literally freezing to death, the Romans broke. Many died trying to recross the Trebbia. Sempronius's army of two double legions was effectively destroyed.
The stage is set. The battle lines are drawn and you are in command. The rest is history.
 |
 |
 |
 |
 |
 |
 |
 |
 |
|||||||||||
| 3 | 2 | 3 | 2 | 2 | 2 | 2 | 2 | 3 | |||||||||||
 |
 |
 |
 |
 |
 |
 |
|||||||||||||
| 3 | 4 | 3 | 2 | 1 | 2 | 1 |
War Council
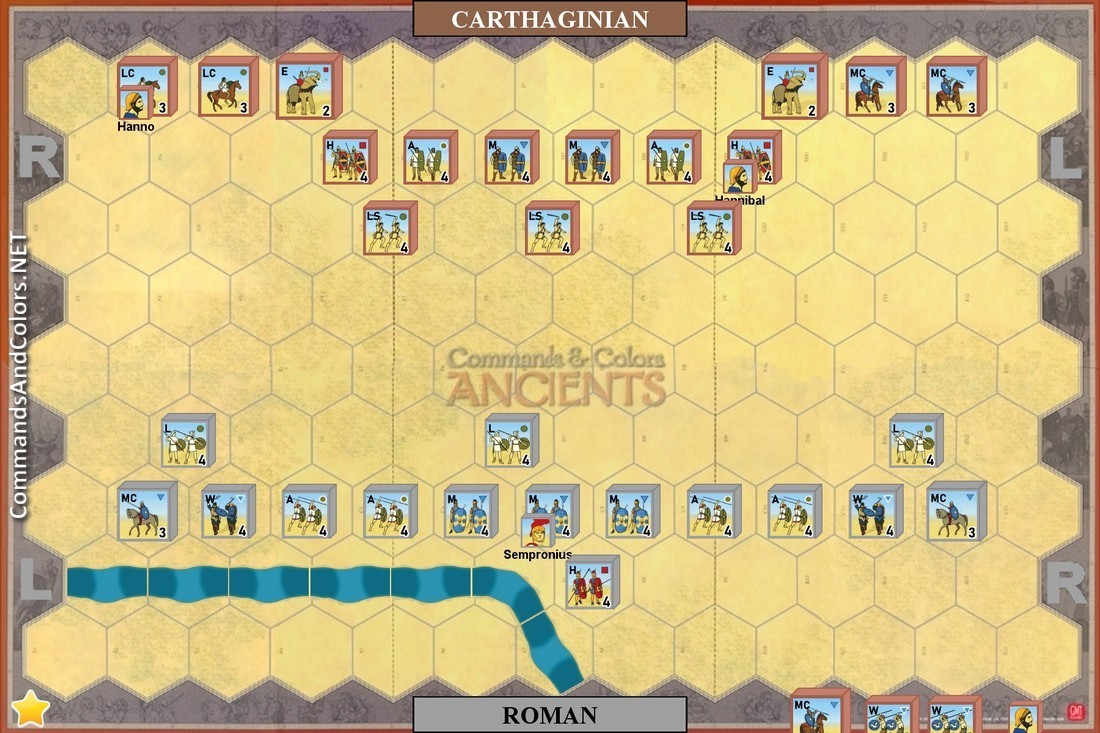
Army: Carthagian
Leader: Hannibal
5 Command Cards ![]()
![]()
![]()
![]()
![]()
Army: Roman
Leader: Sempronius
5 Command Cards ![]()
![]()
![]()
![]()
![]()
Move First ![]()
Victory
7 Banners
Special Rules
The River Trebbia is fordable.
Mago's ambush may be ordered by playing a 'Leadership' card after the Carthaginian first turn.
'Inspired Leadership' force enters in the section as noted, 'Leadership Any Section' the force enters in the section of Carthaginian player's choice. Each of Mago's three units, 1 medium cavalry and the 2 medium warriors, are set onto a baseline hex on the Roman side of the battlefield. Mago may be placed with any of these units. This set on counts
as the first hex of movement for a unit this turn. Should these units have to retreat, they must retreat toward the Carthaginian side of the battlefield.