Victory Results:
 68 %
Record a victory for BOTTOM ARMY  32 %
Total plays 184 - Last reported by Albion on 2024-06-21 12:13:49

Historical Background
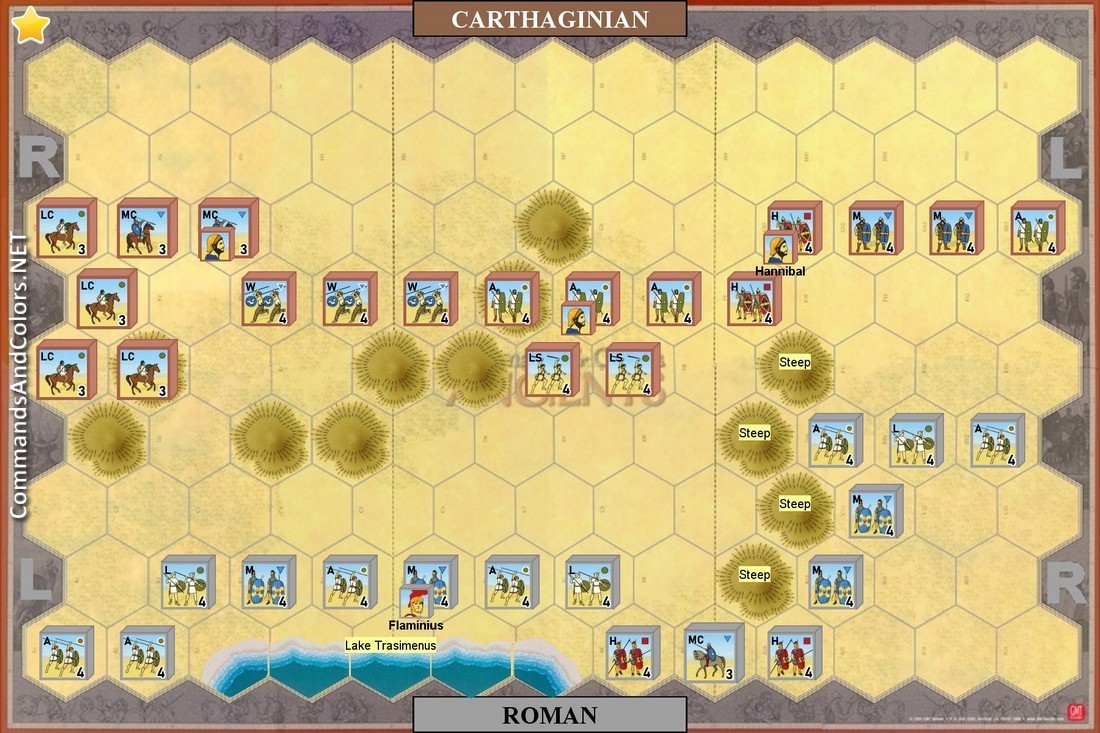
Much of Hannibal’s “genius” for warfare lay in his ability to take the measure of his opponents’ abilities and intentions. His opponent in 217 BC was Roman Consul Gaius Flaminius, a vain and incompetent patrician. Armed with this knowledge, Hannibal determined to set a trap for his opponent by ravaging the countryside to spur Flaminius to action. True to form, Flaminius rushed headlong into pursuit of Hannibal, marching his army through the narrow defile next to Lake Trasimenus where Hannibal’s army lay in wait. Hannibal posted his veteran infantry as a blocking force, hiding his light infantry and cavalry in the hills. As the day of battle dawned, a heavy mist covered the area – Flaminius further aided Hannibal’s plans by neglecting to send out scouts. The Roman vanguard stumbled into the Carthaginian blocking force, and the battle was joined. Almost immediately the ambushing Carthaginians descended from the hills and fell on the Roman column before the soldiers had enough time to deploy. Flaminius died early in the fighting; more than half of his army died along with him, either in the desperate fighting or drowning trying to escape. It was noteworthy that the only portion of Flaminius’s army to escape intact was the vanguard – those soldiers fought their way through Hannibal’s best infantry to do it. It surely was not through lack of bravery that the Roman army met disaster at Lake Trasimenus.
The stage is set. The battle lines are drawn and you are in command. The rest is history.
  Light Sling   Auxilia Medium Infantry     Warriors Heavy Infantry Light Cavalry     Medium Cavalry           Leader  
  2   4 2     3 2 4     2           3  
Light Infantry     Auxilia Medium Infantry       Heavy Infantry       Medium Cavalry           Leader  
3     6 4       2       1           2  

War Council

Army: Carthagian
Leader: Hannibal
6 Command Cards 
Move First

Army: Roman
Leader: Flaminius
2* Command Cards

Victory
6 Banners

Special Rules
Lake Trasimenus is impassable.

The four steep hills hexes on the right side of the battlefield as noted, are impassable terrain.

The Roman player starts with 2 command cards. On turn 1 play one card, draw two cards. Roman player now holds 3 command cards. On turn 2 play one card, draw two cards. Roman player now holds 4 Command Cards     . On turn 3 play one card, draw one card. Roman player hand size stays at 4 Command Cards      for the rest of the battle.

Log in to comment

Kartigan replied the topic:
7 months 3 weeks ago
Not sure where else to post this or who to contact, but note that there is an error in the setup image.

There is supposed to be a Roman Leader attached to the Roman Heavy Infantry in the Roman Right Section. The scenario description correctly lists two Roman leaders, but only shows one of them in the setup image.
Warboard replied the topic:
3 years 5 months ago
6:5 Carthage win, barely. It could have gone the other way. Didn't feel imbalanced, some people complaining about balance should maybe play chess instead. While highly stylised, this system does base itself on historic battles, maybe Hannibal could have warned the Romans and give up on his ambush to make everything fair. In any case, a superb scenario and great fun!
Novak replied the topic:
5 years 8 months ago
2 plays. First Carthage win handily, 6-3 destroying Roman right flank. Roman left and Carthagian right were static for most of the battle while the action happen on the other flank.
Second game went to Rome 6-4; Roman left flank stopped Carthagian cavalry charge and inflicted serious damage there. In ensuing slugfest Rome pulled a (partly) lucky win.
GF1954 replied the topic:
6 years 4 hours ago
2 solo plays: Carthage winning 6 - 2, and the Romans winning the second 6 - 3. In the first, a well timed calvary charge by the Carthaginians on the Roman left flank was the deciding factor. While in the second, the Romans broke through on the right flank and destroyed the Carthaginians units there.
mk20336 replied the topic:
7 years 10 months ago

Dylan Dog wrote: Solo Play: Carthaginian won 6-4. Despite only +2 banners for Carthaginians I find this scenario as heavy unbalanced. Cartaginians are too strong, no evade chances for Roman units and the Roman strong right flank troops never came into play effectively.


That is exactly how that battle looked like. No need for additional Carthage banners - the set-up reflects the real, historiucal Roman disposition and yes, that is very, very weak position...
Dylan Dog replied the topic:
7 years 10 months ago
Solo Play: Carthaginian won 6-4. Despite only +2 banners for Carthaginians I find this scenario as heavy unbalanced. Cartaginians are too strong, no evade chances for Roman units and the Roman strong right flank troops never came into play effectively.
religon replied the topic:
13 years 9 months ago
This scenario is very surprising. It does look hopeless for the Romans, but it is not.

I played a solo game as I am learning the VASSAL program. The game started with both sides pressing forward to respectively avoid the lake and utilize the lake.

The Carthaginians willingly moved the Warriors and Medium cavalry against the Roman left as they player had two "Order Medium Troops" cards in hand. Some dice rolls favorable to the Roman player and a bit of luck as the Romans were holding "Order Left Section" cards, and all 5 medium units were destroyed. The Romans lost 2 light units. A bit of shooting finished off a damaged Slinger and the Romans win 6-2.

I have played this twice before with narrow Carthaginian victories. The difference in this game seemed that the Carthaginian player had access to only one "Line Command" or "Double Time" card early in the game...and the Romans used a "Counterattack" to match it.

The best strategy for the Romans appears to be attacking the Carthaginian left aggressively. The Romans need two banners early or the Command Card difference will cause such a poor position, the game will be decided.

The best strategy for the Carthaginians seems to be to press in the center while protecting the cavalry units.
Anduril replied the topic:
13 years 11 months ago
A complete blowout for the Carthaginians, with the Romans failing to take a single flag. The Roman center first advance, losing Flaminius in the process, then the Roman right advanced but failed to break through. However, while the Carthaginians won decisively, it was a near-run thing - six of its units lost half or more of their strength and if the Romans had been able to push just a little harder it would have been a very different battle.
badweasel replied the topic:
15 years 10 months ago
Solo Play:

This should have been a complete massacre of the Roman army. The opening hand for Carthage included a mounted charge as well as several cards to maintain a sustained attack on the Roman line. It started off strong with the Romans being cut to pieces. It was unclear if the Romans would even manage to get a single banner. Then the tide began to turn. Flaminius led his unit to slaughter several of the cavalry units including their leader. In the end, the Romans were a single block away from victory (they needed one more green hit, but the light cavalry evaded). The Carthaginian left did not fare very well, getting hit hard by a well played Clash of Shields to beat back their attack.

Carthage 6 - Rome 5

The Romans completely dominated this battle thanks to a well played Clash of Shields allowing 8 units to attack at +2 to take four banners for the win. More conflict on the Carthaginian left flank this time, but surprisingly only a single banner earned for each side. This is despite 10+ blocks of damage to each army. The cavalry charge on the right this time proved much less effective. The initial impact did almost no damage requiring four units to finish off an unsupported light infantry unit. Rome most likely would not have lasted too many more turns as they were severely weakened, but they stuck when they needed to.

Rome 6 - Carthage 3
alecrespi replied the topic:
15 years 10 months ago
Eric S. Raymond wrote some comments about this scenario on his webpage. CLICK HERE to read full article.

First time I played this one was as a flip-flop set; the score was 6-3/4-6 and I lost.
In neither game did the Roman right/Carthaginian left see any combat at all. The Romans have to get their units off the lakeshore line or be dispersed by forced retreats. Conversely, the big variable for the Carthaginians is how quickly the warrior infantry can close with the Roman line and what damage they do when they get there.
I think this scenario is (despite its complexity) very well balanced, better so than the Crimissos, Bagradas, or Ticinus River Scenarios. I wouldn't change a thing.