In January 1942, Rommel pushed his panzers forward again in an offensive that started — just like the year before — from his El Agheila positions in Libya. The see-saw battles across North Africa saw the advantage swing back and forth to the side that retreated closer to its source of supplies. Although one side might be initially successful, that very success resulted in units extending their supply line and becoming vulnerable to a counterattack. This is just what happened to the British forces at the beginning of 1942.
Throughout the month of January, the British 8th Army had to choose between running or fighting to try to delay or stop the pursuing Germans. Rommel's advance and the British retreat became a series of local engagements between opposing tank forces. One such encounter is the topic of this scenario.
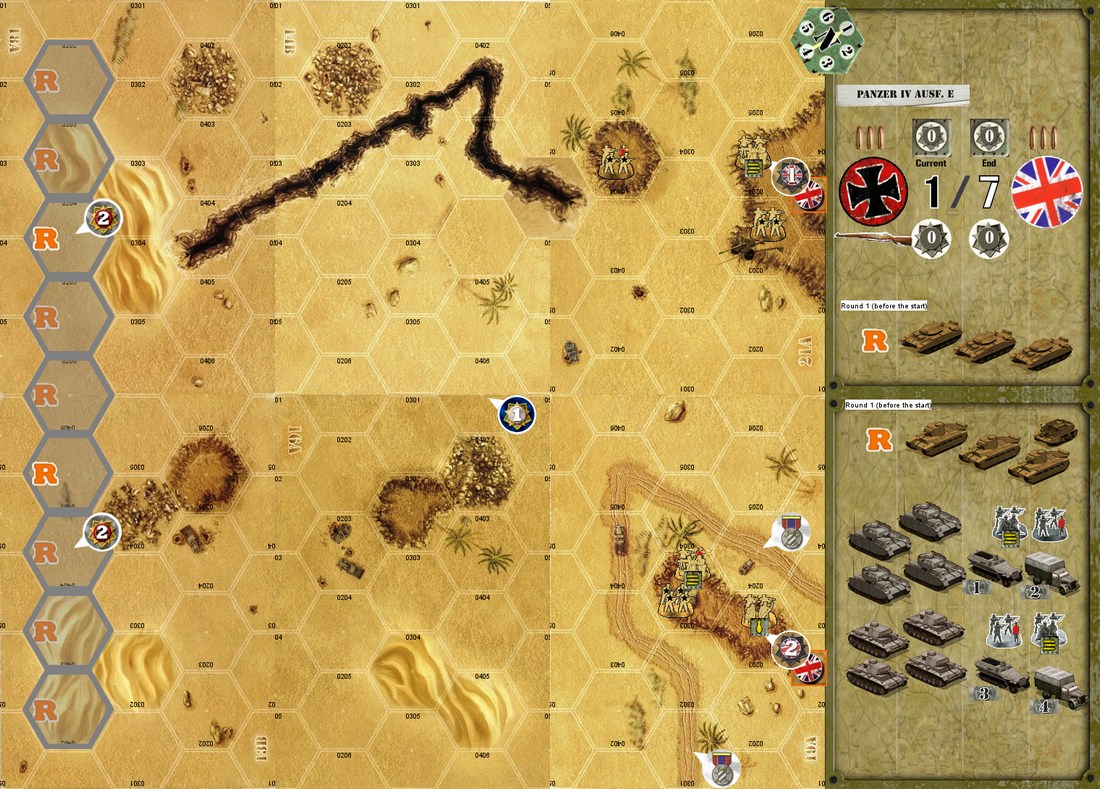
A small British infantry force is holding an important crossroads position while some of their tanks are withdrawing from the advancing German columns. Together with the infantry, the British tanks are ordered to make a tand and delay Rommel.
The reckless manner in which he [Rommel] personally conducted [the Dash] largely contributed to its failure and led almost directly to the defeat of his army. - British General Michael Carver
| British | German | |
| Division 1 |
3 Squad Bases 1 QF 6-Pounder AT Gun |
2 Squad Bases 4 Panzer IVs |
| Division 2 |
3 Squad Bases |
2 Squad Bases 4 Panzer Ills |
| Strategy Decks | Morale 1 Desert Tactics 1 (shared) |
German Air Support 1 Desert Tactics 1 (shared) |
| Starting Strategy Cards | 2 | 2 |
| Operations Cards | - | Panzer IV Ausf. E |
| Deployment Zone | Div. 1: Any Hill hex on map 21A, The AT gun is placed on the northeast Hill hex of map 21A. Div. 2: Any Hill hex on map I 9A. |
No German units start on the map. During the Action Phase of round 2, the German player may move his units onto the board with a movement or move and fire action. His units may enter any hex with a grey border. The units are considered to be moving from a Clear hex. Div. 1: May only enter grey bordered hexes on map 18A. Div. 2: May only enter grey bordered hexes on map 13B. |
| Starting Initiative |  |
|
| Objective |
The British win if the Germans do not control any Victory Objective hexes at the end of Round 7. The game ends in a draw if the Germans control only one of the Victory Objective hexes at the end of Round 7. |
At the end of a round, the Germans win if they control both hexes containing Victory Objective markers. The game ends in a draw if the Germans control only one of the Victory Objective hexes at the end of Round 7. |
| Rounds | 7 | |
| Actions per turn | 3 | 3 |
| Reinforcements |
|
- |
| Special Rules |
|
- |
| HINTS | The British should be willing to sacrifice the slower Matilda tanks to enable their faster Crusader tanks to maneuver for best effect. | The Germans should push as hard as they can using the German Air Support Deck and their superior armor to achieve victory conditions. |
Designer's Note
I wanted to design a scenario that could be set up quickly, did not need too much space, and plays to completion easily in one sitting. Therefore you do not see a lot of terrain features, many strategy cards, or any specialization tokens in this scenario.
In addition, true to the desert war, tanks play the dominant role in Dash to the Wire. The "wire" refers to the line that marked the border between Italian-controlled Libya and British-controlled Egypt.
One interesting dilemma for the German player is to fire with his tanks from long range or try to advance quickly with the accompanying reduction in firepower.
Keep in mind that having the initiative is critically important in this scenario, and most of the time may be more important than spending initiative to get additional strategy cards.
Scenario Notes
The battles in North Africa would shatter many promising careers, and make one heretofore unknown German officer famous even within the Allied home front — Erwin Rommel.
Rommel's incredible ability to continually outfight his more numerous foes earned his British nickname; "the Desert Fox." With just a few German divisions, Rommel would eventually tie down more than 20 Allied divisions — nearly half of Great Britain's operational strength — for more than two years.
In 1940, British forces in the Mediterranean and Middle East were under the command of General Sir Archibald P. Wavell, who had to deal with the buildup of Italian military forces in Libya and East Africa. Wavell also had to protect the Suez Canal in Egypt, a vital sea link to India and the Far Fast, as well as distribute his forces over a huge region to counter all threats.
In September 1940, elements of the Italian 10th Army under Marshal Rodolfo Graziani moved cautiously into Egypt and then set up fortified camps. The wary Graziani put his troops to work improving the roads and building pipelines for fuel.
Graziani told Mussolini that he might be able to renew the offensive against the British sometime in December. Instead, Wavell seized the initiative and launched an offensive first.
Although the total Italian ground units and air force were several times the size of their opponent, the British Western Desert Force commanded by Lt. General Richard O'Connor broke through the Italian fortified camps, then isolated and completely destroyed the Italian host. By early February 1941, O'Connor's soldiers captured 130,000 Italian troops against a loss of 1,928 men. Graziani resigned in disgrace.
In March, Erwin Rommel arrived with the first units of the Deutsches Afrika Korps (D.A.K.) sent by Hitler to rescue his Italian allies from disaster. Finding the British force in front of him to be vulnerable, Rommel immediately attacked. By April 10th, the D.A.K., along with six Italian divisions commanded by General Italo Gariboldi, had advanced more than 300 miles, had captured O'Connor, and were outside of the city of Tobruk.
This unexpected offensive by Rommel shocked both the British, who were reading Rommel's orders through top secret Ultra intercepts and expected him to obey his orders and not attack, and the German high command — who had ordered him not to attack in the first place. Battlefield success, however, prevented Rommel from getting sacked.
Rommel's hasty first assault on Tobruk failed, and he renewed the offensive when he received the 15th Panzer Division as reinforcements. Wavell struck back and the months of May and June 1941 saw hundreds of armored vehicles battling around Tobruk, which remained under siege.
The British attacks were poorly organized, and German tactical expertise and better tanks overcame British superiority in numbers. By July, Prime Minister Winston Churchill had lost confidence in Wavell and relieved him of command.
British Middle East Command was given to General Sir Claude Auchinleck. He built up British and Commonwealth forces in North Africa — now reorganized as the 8th Army and commanded by General Sir Alan Gordon Cunningham — to seven divisions with 700 tanks and 1,000 operational aircraft.
Cunningham, like O'Connor, had tremendous success against the Italians in early 1941, using a daring, fast-moving offensive into Somaliland and Ethiopia to take control of those two Italian colonies, and capture 50,000 Italian soldiers at a cost of about 500 casualties. Also like O'Connor. Cunningham was to discover that fighting Rommel was far more difficult.
Against this huge build up, Rommel received some supplies and replacements, but no fresh divisions (the campaign in Russia was drawing nearly all of Germany's resources).
Rommel was able to form a "light" division out of various small units already in Libya, but the core of the D.A.K. remained his two panzer divisions, the 15th and 21st.
The Germans were assisted by the Italian Ariete armored division (whose tanks were decidedly inferior to their British counterparts), the Trieste motorized division, and four undersized Italian infantry divisions. Rommel had a total of 414 tanks (154 Italian) to face 700, and 320 aircraft (200 Italian) to oppose 1,000.
Although he did not receive massive reinforcements like his opponents, Rommel did, however, get a promotion and a new name for his command — Panzer Gruppe Afrika.
Auchinleck's attack began on 18 November 1941, and the battle lasted two weeks. The British initially achieved tactical surprise, but Rommel reacted quickly. Personally leading some of the counter strikes, he deftly juggled his command's smaller panzer force to meet each of his enemy's armored threats. A series of small, independent actions exhausted British armor and morale. Although the troops inside Tobruk broke through the Italian siege line on 21 November, German troops quickly reestablished the encirclement.
The siege of Tobruk was broken a second time on 27 November.
then reestablished yet again on 1 December after Rommel made an all-out effort to close the ring around the port.
However, it was too little, too late for Panzer Gruppe Afrika.
Worn down by superior numbers, Rommel was forced to end the siege and retreat back to Gazala on 7 December 1941.
The British threatened to envelop Rommel's command there, so the German leader reluctantly ordered a retreat all the way to El Agheila which his men reached at the end of December.
After nine months of fierce combat, Rommel was back at where he had started. This is where Uli begins his scenario.