Victory Results:
 64 %
Record a victory for BOTTOM ARMY  36 %
Total plays 77 - Last reported by Pevans on 2024-09-08 18:20:52

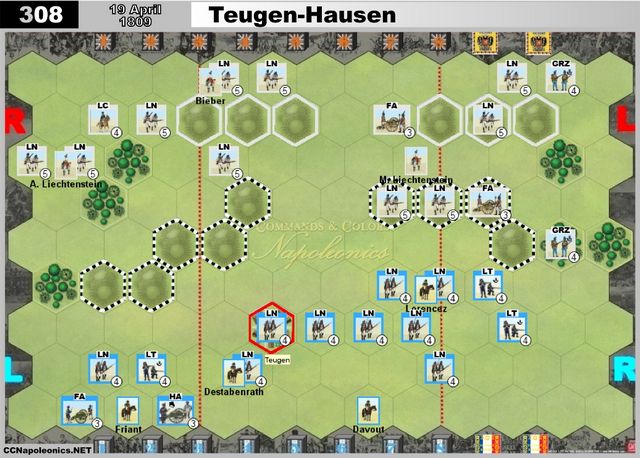
Teugen-Hausen - 19 April 1809

Historical Background
Believing the French armies were tied down in Spain, Archduke Charles advanced into Bavaria, intent on destroying the French army. The invasion caught Napoleon by surprise, but Charles’s advance was slow and it gave the Emperor time to react. Davout’s isolated III Corps was marching to link up with the Bavarians, and Charles planned to destroy it first by massing three of his corps against it. As events transpired, on 19 April, Saint-Hilaire’s division encountered elements of a single Austrian Corps around Hausen. Davout immediately ordered an attack on the Austrians that had taken a defensive position on a series of ridges. Although the initial assault failed, reinforcements arrived and the attack was renewed. The Austrians counter attacked the French after they had gained control of the first ridge, but the attack collapsed. More troops were fed into the fight from both sides. The French finally gained the upper hand with the arrival of Friant’s division and the French artillery. The other Austrian corps in the vicinity did not march to the sound of the guns, giving Davout the victory.
The stage is set. The battle lines are drawn and you are in command. Can you change history?


Set-Up Order

Forest 6
Hill 15
Town 1


Battle Notes

Austrian Army
• Commander: Archduke Charles
• 4 Command Cards
• Optional 3 Tactician Cards

Line Infantry Grenzer Light Infantry Light Cavalry Foot Artillery Leader
10 2 1 2 3

French Army
• Commander: Davout
• 5 Command Cards
• Optional 5 Tactician Cards
• Move First

Line Infantry Light Infantry Foot Artillery Horse Artillery Leader
9 3 1 1 4


Victory
8 Banners

Special Rules
• The nine hill hexes that make up the first ridge line form a Temporary Majority Group Victory Banner worth 2 banners to the side that occupies an absolute majority at the start of its turn (Temporary Majority Victory Banner Turn Start)

• The six hill hexes that make up the second ridge form a Temporary Majority Group Victory Banner worth 1 banner to the side that occupies an absolute majority at the start of its turn (Temporary Majority Victory Banner Turn Start)

• The village of Teugen is a Permanent Victory Banner Objective worth 2 banners for the Austrian player when an Austrian unit occupies the village at the start of its turn (Permanent Victory Banner Turn Start)

Log in to comment

Pevans replied the topic:
5 days 15 hours ago
It's the re-match of this scenario as Evert and I progress through the Austrian expansion. It's my turn to play the French and I followed Evert's example, playing a "Bayonet Charge" to attack the Austrians on the hills right of centre. This attack was as overwhelming as Evert's last time: the French infantry under General Lorencez eliminated two Austrian Line infantry and occupied the hills. This switched the score to 2:1 in my favour.

Evert counter-attacked the hills and took out a French Line, while his Grenzers opened up from the safety of the woods on the right. That's 2:2. My French continued to attack and removed another Austrian Line - 3:2.

In turn, the Austrians removed a French Line on the hills and the Grenzers' muskets proved deadly (or, rather, Evert rolled some good dice) with the loss of a French Light infantry: 3:4.

More lucky dice from Evert alongside a "Bombard" card saw the central Austrian artillery, which had been driven back to the baseline, destroy the last French Line infantry on the hills and kill Gen Lorencez (more good luck for my opponent). 3:6 and I'm in trouble.

So much trouble that I completely forgot Evert would gain two banners at the start of his next turn for holding a majority of those hills. I didn't put a unit on the hills to deny him this and it was all over: 3:8. Oops!

That was just seven turns and less than half an hour's play. And Evert crushed me with an aggregate score of 7:16.

I have also posted this report on my BGG blog (with pictures!): boardgamegeek.com/blogpost/164944
Pevans replied the topic:
3 weeks 3 days ago
Yes, this is the next scenario for Evert's and me and Evert played the French first, as usual. He opened with a "Bayonet Charge", storming the hills on the right with French Line infantry. Some lucky dice took out an Austrian Line and forced the other troops off the hills, depriving me of two banners immediately, so the score's 1:1. Ouch!

I re-grouped on the second line of hills and we traded gunfire across the valley between them. Evert got the banners for the hills, so that's 1:3 to the French.

The French eliminated the Grenzers that were stuck in the woods on the right to make it 1:4. And then advanced off the central end of those hills to remove another Austrian Line, General Liechtenstein surviving to join the artillery behind: 1:5.

I moved Line infantry forward in the centre to try to outflank the advanced French units on the right, which prompted fighting in the centre. However, it was the exchange of fire between the hills on the right that removed my artillery (another bit of luck for Evert) for 1:6.

With only a weak French infantry unit holding the village, I hit it with my Line infantry. My guys eliminated the French troops and occupied Teugen to gain two banners. At the same time (I'd played a "Leadership" card), my surviving artillery killed off another French Line on the righthand hills. So that's 4:6.

My glee was short-lived: a further French onslaught on the right cleared the second row of hills on that side, eliminating an Austrian Line and Grenzers to seal a 4:8 victory for Evert's French.

Wow! And, given the stats showing this scenario to be a 64% Austrian win, wow again! Evert made full use of the string of right section cards he drew to keep pressing his attack on that flank - helped by some well above average die rolls (Mark's implemented some stats in this version of the Vassal module and these showed Evert's hits being 11% above expected and mine 13% below). The rematch looks like an uphill task!

I’ve also posted this report on my BGG blog (with pictures!): boardgamegeek.com/blogpost/164466
Riclev replied the topic:
1 year 4 weeks ago
Played this twice today. In the first game, the French pulled their right flank back from the teeth of the guns of the Austrian ridge position and advanced onto the ridge on the left. However, the advance then stalled against an Austrian line infantry unit in one of the woods hexes, so attention was switched to the centre. Accurate musketry destroyed all in front of it, including the Austrian foot artillery, taking out four units plus a leader for no loss (in terms of banners). Meanwhile, an Austrian advance on their left flank stretched the French right and eliminated a line infantry unit, along with Marshal Davout (yikes!), but a lack of suitable cards prevented their taking advantage of it and destroying the two remaining light infantry units. Soon afterwards, the French took out another Austrian unit and claimed the two banners for occupying the first ridge line for an 8-2 victory.

So to the return. The French opened with a Fire and Hold card, eliminating the grenzer unit in the woods. A French attack on the left was beaten back with the added bonus of killing General Friant, and the French right was held up by the defending Austrians on the ridge. The French marshaled their forces to occupy the first ridge line for two banners, but were forestalled by the Austrians claiming the banner for occupying the second ridge line for an 8-4 victory.

The two sides are very evenly matched in this battle, and in neither game did the French extra command card seem to be significant. The difference in our games was that the winner in both made better use of supporting his troops. This is particularly important for the Austrians as their infantry units retreat two hexes per flag which resulted in a lot of surplus losses which could have been avoided.
LARS replied the topic:
3 years 8 months ago
Austrians win 8-4, losing many more blocks but outlasting the French. Davout could not get an attack coordinated. Although very slow in the advance, the Austrians were relentless.
Stanislav27 replied the topic:
5 years 5 months ago
Bangla (Austrians): 6 victory banners
Stanislav27 (French): 8 victory banners


A very tense and closely-fought battle. The French had very good cards throughout. The Austrians started with stunning dice rolls, which were evened out by the end, and they were plagued by a weak selection of cards for large portions of the battle.

The battle commenced with a somewhat poorly executed French assault on the Austrian left. The Grenzers were halved in strength and send fleeing, but the attack on the ridge proved disastrous. An Austrian First Strike obliterated an entire full-strength French Line Infantry unit in one roll! Afterwards, a French Light Infantry unit was obliterated at point blank range by the Austrian battery, which scored three hits at once. Another French Line unit was reduced to a quarter of its strength. All Austrian units maintained cohesion, though one Line Infantry unit was reduced to a fifth of its starting strength. 5-0

Following this debacle, the French fell back and regrouped on their right, while pushing a few units forward on the opposite flank. The Austrians likewise spent the time maneuvering units into place.

In the subsequent attack, the French managed to destroy the Austrian artillery battery and the first ridge was now ripe for the taking. A French Light Infantry unit seized the extreme right of the hill formation. Soon thereafter, French infantry and horse artillery occupied the left side of the ridge too. The French would not relinquish this strategic objective for the rest of the battle, though it would be hotly contested. 3-3

A lull ensued on the French right, while the Austrians attacked the French left. The French held their ground as their comrades deployed further forward in the centre. A blunder by the French general (who forgot that Horse Artilley cannot fire after moving when reduced to one block!) meant that the valiant French Horse Artillery was destroyed. The French managed to avenge their fallen comrades by finishing off an Austrian Line Infantry unit that had been subjected to a lot of accurate fire from light Infantry and artillery on the far left of the battlefield.

In the next phase of the clash, the Austrians moved fresh units forward on both flanks, while the French strengthened their hold of the left side of the first ridge with two of Destabenrath's line infantry units. The French line infantry units coordinated their attack to destroy Bieber's advanced Line Infantry unit. The subsequent Austrian counter-attack (assisted by light cavalry) cost many French casualties - both on the left and in the centre, but the units did not break. 4-5

This moment of resilience was crucial. The French unleashed a deadly bayonet charge on their next move. On the left, a depleted unit was moved back behind the ridge. On the right, two line infantry units occupied the ridge. And on the extreme right, a somewhat impetuous charge sought to destroy a severely depleted Austrian infantry unit that had withdrawn to the second ridge. This depleted unit was destroyed, while two full-strength Austrian line infantry units were each reduced to two fifths of their initial strength.

Stuck with many commands for the right, but few for the other sections of the battlefield, the Austrian cavalry charged again. It managed to shatter the fragile square of the depleted French infantry unit on the left, but its cavalry breakthrough was not enough to take it to the relative safety of Teugen. On the subsequent turn, the French executed a merciless combined arms attack on the isolated cavalrymen. Surrounded and unable to retire and reform, they were cut down, the field strewn with mutilated men and beasts. 5-7

The Austrian retribution for this slaughter came swiftly. The impetuous French infantrymen on the far right who stood isolated on the second ridge were subjected to an Austrian combined arms attack that left no Frenchman standing. However, the French were able to complete the victory on the very next turn by finishing off one of the weakened Austrian infantry units immediately behind the right part of the first ridge. 6-8