Victory Results:
 58 %
Record a victory for BOTTOM ARMY  43 %
Total plays 40 - Last reported by Riclev on 2023-10-09 17:20:45

Historical Background
On the morning of the 22 April, a thick fog covered the entire valley of the Grosse Laaber. When the fog cleared around 8:00 AM, Austrian General Rosenberg became concerned with the lack of movement by Davout’s troops. He assumed this meant that more French troops were on their way or had already arrived.
French reinforcements had indeed arrived, and Napoleon wasted no time joining his front line. Napoleon ordered Davout to attack the Austrian at Unterlaichling and the woods to the north, and his German troops to capture Eggmühl and the bridges crossing the Grosse Laaber. Davout’s troops under Friant and Hilaire succeeded in pushing the Austrians back, with support of the Bavarian cavalry. Unterlaichling was finally occupied, while the fight for the woods rolled back and forth. On the extreme French right, Gudin’s division attacked Bieber’s brigade and the Austrians were forced to fall back to the woods, where they managed to hold their ground and prevent the French from advancing any further.
Once Eggmühl was secure, French cavalry squadrons crossed the river. Austrian General Rosenberg, ordered what little cavalry he had on hand to counter the French cavalry.
Rosenberg had appealed to Charles earlier in the day for the Austrian Cuirassier Division, but his request was met with no response. In the meantime, Charles decided to withdraw and sent Rosenberg an order to pull back as best he could. About the same time, the French cavalry was now all across Grosse Laaber.
Although outnumbered, Rosenberg ordered his cavalry to charge to buy time for the infantry to withdraw.
The stage is set. The battle lines are drawn and you are in command. Can you change history?


Set-Up Order

Forest Hill Town
23 5 2 1 5

Battle Notes

Austrian Army
• Commander: Rosenberg
• 4 Command Cards
• 2 Tactician Cards

Line Infantry Light Infantry Grenzer Infantry Grenadier Infantry Light Cavalry Heavy Cavalry Horse Artillery Foot Artillery Leader
15 2 4 3 3 1 1 4 6

French Army
• Commander: Napoleon
• 6 Command Cards
• 6 Tactician Cards
• Move First


Line Infantry Light Infantry Light Cavalry Cuirassier Cavalry Foot Artillery Horse Artillery Leader
18 4 6 3 3 1 7

Victory
17 Banners

Special Rules
• Unterlaichling is a Temporary Victory Banner worth 1 banner for the side that occupies it at the start of its turn. The Austrians start with 1 Victory Banner.
• Oberlaichling is a Temporary Victory Banner for the French worth 2 banners when occupied at the start of the turn.
• Obersanding is a Permanent Victory Banner for the French worth 1 banner when occupied at the start of the turn.
• The 6 hexes that make up the Bettelberg Ridgeline, form a Temporary Majority Group Victory Banner worth 1 banner for the Austrian or 2 banners for the French, when that side occupies an absolute majority at the start of its turn. The Austrians start with 1 Victory Banner.
• The French gain 1 Permanent Breakthrough Victory Banner for each French unit that exits the battlefield from any Austrian baseline hex. To exit the French unit must already occupy the Austrian baseline hex at the start of the turn.

Log in to comment

Riclev replied the topic:
6 months 3 weeks ago
Played this with one player per side. The initial action was in the centre, with the French expelling the Austrians from Unterlaichling but not occupying it for fear of the nearby Austrian artillery. The action switched to the French right, but Austrian reinforcements from the centre rendered this a stalemate. Skirmishing on the opposite flank again caused an exchange of banners to make the score 8-7 to Napoleon. The French began to despair as there seemed to be no way through the tough Austrian defences until a determined French attack on the right finally broke the back of the Austrian resistance. A final French assault on Unterlaichling captured this village for a 17-12 victory, but had it continued there was nothing to stop the French cavalry exiting en masse from the Austrian baseline on the right to rack up victory banners. A tough fight and an exciting game. It took the two of us around 4 hours to play.
Hexagoon replied the topic:
2 years 11 months ago
Austrian win 17-11. Bringing up rear units presented a solid line of supported units and attached leaders, against which the French tide wore out. Eventually French heavy cavalry broke through the centre and started wiping out artillery and units which were unable to form square (Austrians down to 2 command cards) but it was too late as Austrian advance on Unterlaiching finally settled it.
Pevans replied the topic:
3 years 2 months ago
Only Mark and I were available for this game - as much a test of Mark's latest EPIC Vassal module as anything else. (That's my excuse.)
A random roll gave Mark the French and me the Austrians. An initial "Forced March" by the French on their right was followed by a relentless stream of right flank cards in the Courier rack. The Austrians tried their best to stem this assault, but a dearth of left flank Command cards limited their response. While casualties were roughly even, the French got four units off the board, taking the score to 8:12.
At the same time, French forces in the centre skirmished with the Austrians holding Unterlaiching. The Austrian line infantry were eventually driven out, but French attempts to occupy the town were thwarted by some brave Grenzers.
Austrian infantry came off the Bettelberg ridge to engage the French infantry around Kraxenhoefen. However, the French cavalry had been moving into position and now charged the ridgeline. Fierce fighting followed between two Austrian cavalry units, supported by line infantry and artillery, and the French light cavalry and cuirassiers. The French cavalry had some success, forcing the artillery to retreat and depriving the Austrians of their majority on the ridge.
Austrian attempts to advance through the woods on their right wing (more brave Grenzers!) were beaten back with casualties and the French finally took Unterlaiching to set the seal on their victory, 8:17.
A terrific back and forth battle, but the French demolition of the Austrian left flank was key.
RiverWanderer replied the topic:
3 years 3 months ago
My three most recent online games (1v1) have re-dressed the balance of stats towards the French. Two of them (MT20 finals) saw the Austrians fairly trounced at 8/9 banners to 17. The one pictured below was a much more even affair, possibly because the two cavalry charge cards in hand at start seduced the French into flinging their cuiraissers at the hill early on.

 
Stanislav27 replied the topic:
5 years 1 week ago
Austrian: 17 victory banners
French: 7 victory banners


---

After a draw of lots, Alexander stepped into Napoleon’s boots (with Mikkel as his junior commander), while I got to be the Austrian C-in-C (with Rasmus as my second-in-command).

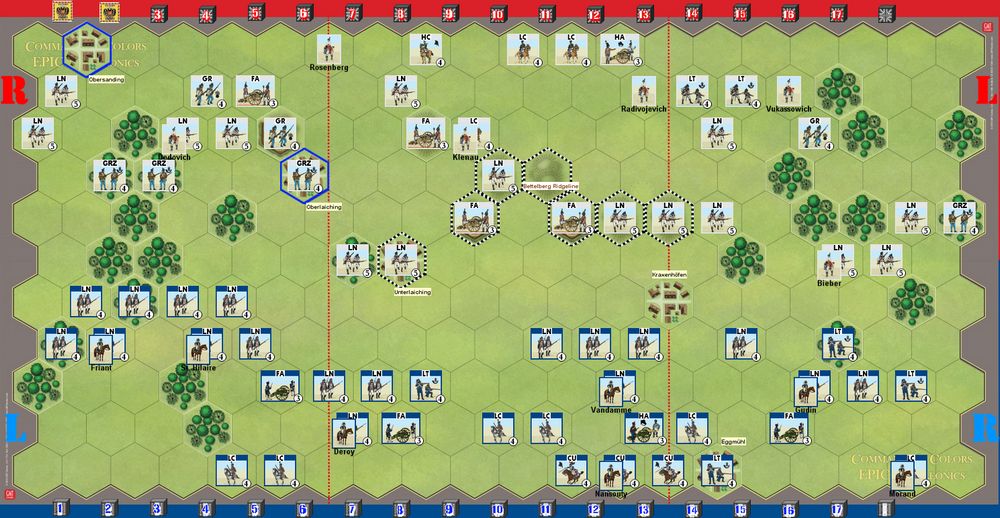
The two sides had set up for battle with multiple objectives to fight over. The Austrians started with control of the village of Unterlaichling and the Bettelberg Ridgeline, netting them two starting victory banners. Aside from these two objectives, the French could win further victory banners on the Austrian right in addition to breakthrough victory banners by exiting beyond the Austrian army’s baseline.

With Napoleon in personal command, the French enjoyed a hand of 6 Command Cards and 6 Tactician Cards. The Habsburg field marshals had to do with 4 Command Cards and 2 Tactician Cards. The Austrians, however, had the advantage of a relatively strong defensive position.

With plenty of interesting options on the Courier Rack, the French generals opted to go for an aggressive start. Using a Force March, Field Marshal Alexander Bonaparte pushed the bulk of the French left wing forward. On their right, the French took some long-distance shots at their counterparts.

The Austrians responded with a devastating Fire and Hold order executed on their right, aimed at the hastily advanced Frenchmen. Opting to concentrate their efforts on that flank, the Austrians simultaneously refused their left wing, withdrawing their units behind the woods, baiting the French to come forward if they so dared.

The French attempted to re-establish their weakened line on their left, but the Austrians kept outshooting them, with the Grenzers distinguishing themselves. An Austrian unit of Line Infantry claimed the battle’s first combat victory banner on the points of their bayonets. The French thrust on their left had been halted, while they advanced slowly on the opposite flank.

Aside from dealing blow after blow to the French on the far right through incredibly effective musket fire, the Austrians had been slowly maneuvering in the centre as well, ensuring maximum support for the Austrian line infantry (which is ever so prone to costly retreats). The French now attempted to shift the point of their attack to the Austrian centre-right, opting to contest the village of Unterlaichling and the adjacent forest. The Austrians deployed their elite Hungarian Grenadiers once the initial defenders had been weakened. The French pushed on dangerously with their Light Cavalry, but the Austrian Line Infantry in the village and the grenadiers in the forest held on desperately.

The French left flank had suffered horrific losses and most of the infantry was being slowly withdrawn. At the same time, Alexander and his (sometimes unwilling) subordinate advanced methodically on their right flank and in the centre-right. The Austrians had withdrawn their left wing, seeking to delay a confrontation and commenced to fire at the advanced French from the ridgeline with some effect (which was later reversed by a good French Rally).


Status after the first phase of the battle: Nine Austrian victory banners to Napoleon’s zero. The French left has been decimated. Austrians maintain tentative hold on Unterlaichling and have successfully refused their left. French have advanced menacingly on their right and centre-right.

Massive French casulaties was sapping the fighting spirit from the Empire’s commanders. Field Marshal Alexander Bonaparte maintained his determination to win, but his subordinate general Mikkel descended into an increasingly defeatist mood. The fight continued, however. The French executed a swift and daring assault upon the hinge that connected the Austrian left with the central formation on the ridgeline. A devastating combined arms attack finally secured a victory banner for the demoralized Frenchmen. As the laws of probability would predict, the Austrian dice luck also turned for the worse at this stage of the battle, and the spirits were lifted in the French camp.

The fighting was now taking place across the entire battlefield. The junior Austrian general Rasmus continued rolling dice like a man possessed on the extreme right, crushing the French foot in that sector. In the centre, the French kept throwing men and horses at the Austrian positions in and near Unterlaichling. The grenadiers held on (but the continued cavalry presence kept tying down 1 of the 4 Austrian command cards). The French managed to gain possession of the village (and its objective victory banner), however.

The Austrian left bore the brunt of the reinvigorated French assault. A series of offensive Grand Manoeuvres, Cavalry Charges and First Strikes forced a total of three units of Austrian Line Infantry into battalion masses. Combined with infantry support, the French claimed numerous casualties. However, the Austrians fought back. A Bayonet Charge proved useful in the confined space even accounting for their slow Line Infantry, and a combination of musket fire and melee attacks ultimately beat back the French assault, including their fearless and highly efficient cuirassiers who had probably advanced a bit too far. The French casualties continued rising at an alarming rate.


Status after the bloody second phase: French finally gain control of Unterlaichling after bitter fighting. The strong, but costly, French attack on the Austrian centre-left has run out of steam. The Austrian right flank continues it slow, but deadly push forward.

With both wings beaten back or in disorder, the French C-in-C decided to make the most out of his breakthrough on the right side of the ridgeline. He ordered his units forward and sideways in an attempt to gain the ridge and push back the Austrian artillery batteries. At the same time, an artillery bombardment of the beleaguered Hungarian Grenadiers finally shattered that resilient unit.

This French success in the centre would prove to be short-lived, however. Even as the Austrians failed to finish off a number of weakened French units, they never lost faith in the ultimate victory. One of the hussars was ordered around the ridge, attacking a French cavalry unit in its rear, while an Austrian artillery battery provided point-blank fire support.

This final attack proved to be the final blow for the battered French army. Charging the centre had been a valiant attempt to salvage some more victory points of honour for the Grande Armée. Yet it proved ultimately futile. The Austrians had won the day, rewriting history.


Final result. The Austrians gain control of the field, as the French withdraw and commence plotting revenge for another day
Bayernkini replied the topic:
5 years 7 months ago

error : austria CU -> HC


fixed
shuri5 replied the topic:
5 years 7 months ago
error : austria CU -> HC