Victory Results:
 70 %
Record a victory for BOTTOM ARMY  30 %
Total plays 81 - Last reported by sushidog on 2024-03-03 19:24:05

Sacile - 16 April 1809

Historical Background
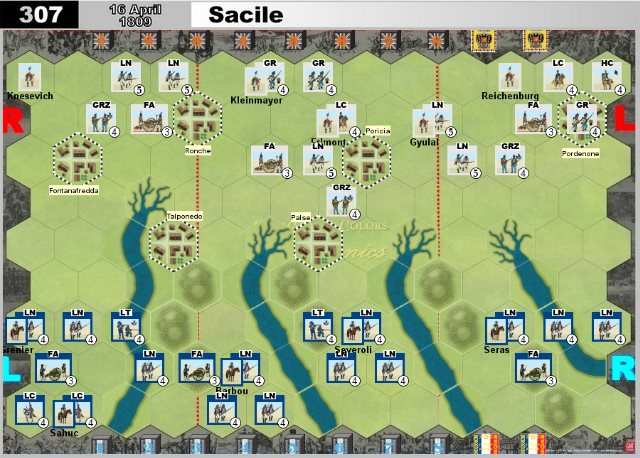
Undeterred by the loss at Pordenone and still believing his French enjoyed a numerical superiority, Eugene attacked the Austrian army east of Sacile. Covered by artillery, the French moved forward around 9:00 AM and started to push the Austrians back in the center. Although the terrain was somewhat unsuitable for cavalry, Frimont still attacked with his cavalry and Severoli was wounded in the action, which brought the French advance in the center to a halt. Barbou joined the attack in the center and Eugene ordered Grenier to advance against Fontanafredda to turn the Austrian flank. The Austrians counter attacked all along the line and although the French infantry withstood two separate attacks, Eugene failed to commit the cavalry and finally ordered the army to withdraw around 5:00 PM. Scholars say that Sacile may have been Archduke John’s greatest victory, but his decision not to rigorously pursue was “one of his greatest blunders.”
The stage is set. The battle lines are drawn and you are in command. Can you change history?


Set-Up Order

Hill 9
River 9
RiverBend 7
RiverEnd 4
Town 6


Battle Notes

Austrian Army
• Commander: Archduke John
• 5 Command Cards
• Optional 2 Tactician Cards

Line Infantry Grenadier Infantry Grenzer Light Infantry Light Cavalry Heavy Cavalry Foot Artillery Leader
5 3 3 2 1 3 5

French Army
• Commander: Eugene
• 5 Command Cards
• Optional 3 Tactician Cards
• Move First

Line Infantry Light Infantry Light Cavalry Foot Artillery Leader
12 2 2 3 5


Victory
8 Banners

Special Rules
• The Austrian player gains 1 Temporary Victory Banner when three or more village hexes are occupied or uncontested at the start of the turn (Temporary Victory Banner Turn Start)

• The French player gains 1 Temporary Victory Banner when three or more village hexes are occupied or uncontested at the start of the turn. Uncontested means a unit occupies or is adjacent to village hex and no enemy unit occupies or is adjacent to the village hex (Temporary Victory Banner Turn Start)

• All streams are fordable.

Log in to comment

jackyyy replied the topic:
8 months 1 week ago
Impressive battles! Your detailed account showcases the intense strategic decisions and the ebb and flow of the engagements. It's fascinating to see how the French and Austrian forces maneuvered and adapted. In the first battle, the French secured villages and repelled cavalry charges, leading to their victory. In the return game, the Austrians countered effectively, resulting in their own victory. The battles lasted over two hours each, allowing for immersive gameplay. Well done!

 
Riclev replied the topic:
9 months 2 weeks ago
Played two hard-fought battles of this today. The first was an 8-5 French win. Musketry destroyed the Austrian artillery in the centre, allowing the French to occupy the villages of Palsa and Talponedo. An Austrian attack, spearheaded by three (that's right, three) cavalry charges nearly eliminated the French right flank, but they were saved by judicious use of the short supply tactician card on the Austrian heavy cavalry unit. Meanwhile, on the opposite flank a French cavalry charge swept all before it, and La Grande Manoeuvre brought up supporting forces, causing the Austrian position to collapse and the French to gain a victory banner through controlling three villages. The elimination of a further Austrian unit in the centre gave them victory.

In the return game, the French attacked down their left again, but this time they were held and would have been annihilated but for two consecutive plays of rally, recovering nine (yes, nine) blocks. On the Austrian left, the cavalry and artillery destroyed all four French units on this flank, including General Seras, and a couple of French lunges in the centre in desperation were fought off for an 8-3 Austrian victory.

Each game lasted over two hours. They were enjoyable and were long enough for each side to get their teeth into it. Reference has been made below to the restrictive nature of the terrain, making it difficult for either side to use forced marches or bayonet charges in the centre effectively. Hence, most of the actions was on both wings.

A great scenario!
LARS replied the topic:
3 years 4 months ago
The most exciting scenario thus far. Each side had opportunities to win and failed on the rolls or cards. By the end the French right ceased to exist, as did most of the Austrian Army. The French needed one more move to occupy Palse for the win, but Gyulai achieved victory first. Austrians win 8-7.
Bangla replied the topic:
8 years 5 months ago
I should have added that the terrain really does slow any French development on forces. The Austrians can move reserves fairly freely by comparison. I would think this is a good scenario for a newbie to take the Austrian against a more experienced French player, but otherwise the imbalance is too great if the Austrian can use his advantages..
Bangla replied the topic:
8 years 5 months ago
PLayed this last week. Lost 3-8 as the French. I did manage to gain a temporary victory point at one stage, but that was short-lived. Towards the end I should have nabbed another couple of concolation banners but the dice deserted me.
The Austrians do seem to be everywhere, but for me the killer arer the three cavalry units. My opponent brought them forward and then launched them into a cavalry charge which pinned three of my infantry units in square. Having seen the danger I did position the infantry so he'd get no dice in combat after I formed squares. But I was then down to two cards and the only cards in the centre and right were whisked away by the dquares. For the next few turns I only had two cards with orders for the left wing. I realised that his cavalry could waltz away, attack other infantry units, and they wouldn't be able to form square because my other squares couldn't form back for lack of cards. This is highly ahistorical! The regimental/battalion commanders would know to form back when the cavalry danger was passed. I've always felt this an imbalance in favour of marauding cavalry, but in this scenario it made me realise a well timed cavalry "feint" can paralyse the opposition and then the same cavalry units can begin to pick off other infantry units when they can't form square. Has anyone else found this in any of their C&CN experiences?
Fortunately for me, my opponent didn't realise the opportunity he had and eventually I was able to get back my cards (two only after those units were destroyed). Otherwise he played very well and deserved his victory, but man was it frustrating from my side?
Bayernkini replied the topic:
8 years 11 months ago

First of all, one piece of errata. On the VASSAL edition, there is a French leader missing that should be attached to one of the two light cavalry units.


Thx, i will replace the scenario pic asap and the vassal setup with the next major update.
TheMP replied the topic:
8 years 11 months ago
First of all, one piece of errata. On the VASSAL edition, there is a French leader missing that should be attached to one of the two light cavalry units.

As for the battle itself, I'm pleased to say that I won this game as the French yesterday in an 8-7 banner score and as the score suggests, it was an extremely tight affair and a stimulating game. Will have to see how I get on playing it as the Austrians next time round.
Achtung-Panzer replied the topic:
10 years 1 month ago

Michalxo wrote: Seems like a hard scenario for French to win.. too much of Austrian units everywhere... :)


Scenario stats support this view.
Michalxo replied the topic:
10 years 1 month ago
Just finished a very long game with "TheRailrodder". 8-5 for Austrian, French managed to kill one Leader in the heat of the battle, so 8-4 is more precise. Seems like a hard scenario for French to win.. too much of Austrian units everywhere... :)
General-Eble replied the topic:
10 years 1 month ago
Played this twice today against Master Chief. Both games went to the Austrians (8-5, 8-4). Austrians never lost their hold on the towns in both games. Each game played quite differently, the first becoming a drawn out affair that used at least 2/3rds of the deck before an Austrian play of the Elan card got the 8th banner. French had some luck with getting a banner or 2 with lucky rolls to wipe out Austrian units easily, while the Austrian kept rolling just 1 short of totally eliminating French units.

2nd game went much more quickly as aggressive French moves in the centre and right put them into the Austrian firing line early and they got hammered. Prudent use of the central Light cav by the Austrian also helped as it forced reduced French infantry into square then hit French artillery without support (heavily reduced or in square).

Finally getting the message that being aggressive in this game comes at a price - dead units!