HISTORY DETAILS
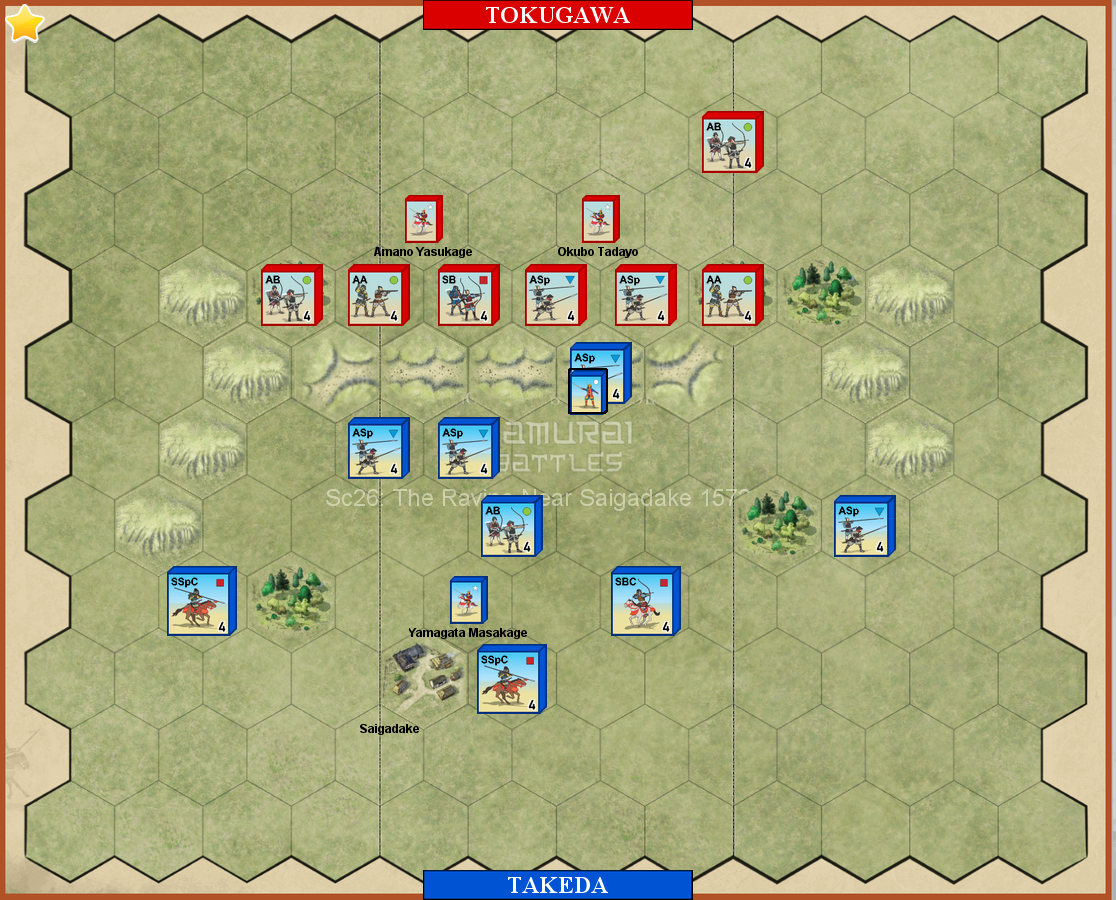
After his retreat to Hamamatsu castle, the Takeda army leaders suspected a trick and did not attack the castle, when they saw the open castle gate, light of the fires and heard the Tokugawa drums. The army, instead, pulled back and set up camp near Saigadake. That night, a volunteer Tokugawa force was gathered and attacked the Takeda camp.
After a short exchange, the volunteer force retired as planned. The Takeda soldiers followed, but not knowing the area were led to a deep ravine and onto a dummy bridge covered in cloth. Scores of Takeda soldiers fell into the ravine and were cut down.
The stage is set, the battle lines are drawn, and you are in command. Can you change history?
 |
 |
 |
 |
 |
| 1 | 5 | 7 | 3 | 2 |
Tokugawa Samurai Army (Red)
Move First


 |
 |
 |
 |
 |
| 2 | 2 | 2 | 1 | 2 |
Takeda Samurai Army (Blue)
 |
 |
 |
 |
 |
 |
| 4 | 1 | 2 | 1 | 1 | 1 |
Victory
4 Banners
* 1 Victory Banner for each unit or leader eliminated.
* 1 Victory Banner is gained for each Takeda unit that crosses the ravine and occupies a hex adjacent to the ravine on the Tokugawa side of the ravine, at the start of the Takeda player's turn. The Victory Banner is retained as long as the Takeda unit remains on the hex.
Special Rules
* All hill hexes are impassable.
HISTORY DETAILS
By 1572 Takeda Shingen was at the height of his power largely due to his superb Samurai cavalry. Although Tokugawa Ieyasu was not his greatest threat, Ieyasu would not grant the Takeda army right of passage to attack elsewhere. Shingen marched to the high ground at Mikata-ga-Hara and deployed his army in the classic fish-scale formation, which supposedly would entice Ieyasu to attack. Outnumbered, Ieyasu gambled that a quick strike might catch the Takeda army by surprise, but the Takeda soldiers held firm and counterattacked violently. The Takeda cavalry rode down the Tokugawa Teppo and Ashigaru in the open. Ieyasu's escape was made good only by the sacrifice of a number of brave generals.
The stage is set, the battle lines are drawn, and you are in command. Can you change history?

 |
|
|
| 1 | 4 | 8 |
Tokugawa Samurai Army (Red)
Move First
Command Cards 5
Dragon Cards 3
Honour 5
|
|
|
|
 |
 |
 |
 |
|
| 4 | 2 | 1 | 2 | 2 | 1 | 1 | 3 | 2 |
Takeda Samurai Army (Blue)
|
|
 |
 |
 |
 |
|
|
|
|
 |
| 4 | 2 | 1 | 1 | 3 | 2 | 1 | 2 | 5 | 2 | 1 |
Victory
7 Banners
* 1 Victory Banner for each unit or leader eliminated.
* If your unit occupies the enemy's Command Tent hex at the start of your turn, the camp hex is removed from the battlefield. The capture of the enemy Command Tent is worth 3 permanent Victory Banners. When your command tent is removed, you must discard one of your Command cards at once, selected at random.
Special Rules
* None
HISTORY DETAILS
Catching the Hojo totally unprepared, the Takeda invasion was swift and the Hojo base at Odawarra was surrounded. The enemy, however, refused to fight outside the fortress and Takeda Shingen, not ready for a siege, ordered a retreat. Hojo Ujikunia was very aware that Shingen would have to retire through the Mimase pass and prepared an ambush. Shingen found out about the enemy plans and divided his army and moved to attack the Hojo Commanders. The Hojo vanguard was hit in the flank by the fierce Takeda attack and the rest of the Hojo army could not recover, enabling the Takeda army to continue its withdrawal.
The stage is set, the battle lines are drawn, and you are in command. Can you change history?

|
|
| 8 | 10 |
Hojo Samurai Army (Red)
|
|
|
|
|
|
|
|
| 6 | 2 | 1 | 1 | 2 | 2 | 2 | 2 |
Takeda Samurai Army (Blue)
Move First
|
|
|
|
|
|
|
| 4 | 1 | 1 | 2 | 2 | 3 | 3 |
Victory
5 Banners
* 1 Victory Banner for each unit or leader eliminated.
Special Rules
* None
HISTORY DETAILS
By midday Kosaka's flanking force was across the Chikumagawa and charged into the rear of the Uesugi army. Caught between Kosaka from the rear and Shingen, who had reformed the Takeda battle line, to their front, the Uesugi army began to fall back. Nobutaka's "Operation Woodpecker" plan had turned what looked like a defeat into a Takeda victory.
Both sides had suffered an incredible number of casualties, and a lot of heads were to be viewed in Shingen's triumphant head-viewing ceremony.
The stage is set, the battle lines are drawn, and you are in command. Can you change history?

|
 |
 |
|
|
 |
 |
| 1 | 1 | 1 | 5 | 2 | 2 | 1 |
Uesugi Samurai Army (Red)
Move First
|
|
|
|
|
|
 |
| 3 | 2 | 1 | 2 | 1 | 1 | 1 |
Takeda Samurai Army (Blue)
|
|
|
|
|
|
|
|
| 7 | 3 | 1 | 1 | 2 | 1 | 2 | 2 |
Victory
6 Banners
* 1 Victory Banner for each unit or leader eliminated.
Special Rules
* The Chikumagawa River is impassable except at the shallow fords.
HISTORY DETAILS
Through the night, the flanking force of "Operation Woodpecker" under the command of Kosaka had ascended Mt. Saijo only to find that the Uesugi troops had abandoned the position. Hearing the sound of battle, Kosaka quickly moved to the ford of Amenomiya, which was guarded by Amakasu Omi-no-kami Kagemochi, one of Kenshin's most reliable generals, and a small detachment of men.
The fighting was fierce as the Uesugi rearguard was almost wiped out trying in vain to stop the crossing. When Kosaka and his men did cross the Chikumagawa the stage was set for a dramatic turn of fortunes, for Kansuke's "Operation Woodpecker" plan would surprise Kenshin and his army.
The stage is set, the battle lines are drawn, and you are in command. Can you change history?

|
|
|
|
|
|
| 1 | 2 | 8 | 6 | 8 | 2 |
Uesugi Samurai Army (Red)
|
|
|
|
|
|
|
| 3 | 2 | 1 | 1 | 1 | 2 | 1 |
Takeda Samurai Army (Blue)
Move First
|
|
|
|
|
|
|
| 6 | 2 | 1 | 2 | 1 | 1 | 2 |
Victory
6 Banners
* 1 Victory Banner for each unit or leader eliminated.
* At the start of the Takeda player's turn, each Takeda unit, excluding leaders, that is on the Uesugi side of the Chikumagawa River will count as 1 Temporary Victory Banner. As long as the unit remains on that side of the river, it continues to count .If the unit is eliminated or retreats onto the river or back to the Takeda side of the river, it no longer counts.
Special Rules
* The Chikumagawa River is impassable except at the river fords.