Victory Results:
 38 %
Record a victory for BOTTOM ARMY  62 %
Total plays 188 - Last reported by Evilmunki on 2024-04-10 14:05:04

Quatre Bras - 16 June 1815

Historical Background
Napoleon Bonaparte’s surprise march placed his army squarely between Blucher’s Prussians at Ligny and Wellington’s Anglo-Allied army assembling around Brussels. Napoleon concentrated most of his strength against Blucher, but ordered Ney and the II Corps to capture the vital crossroads of Quatre Bras to deny Wellington the chance to reinforce Blucher. Ney procrastinated and his attack did not get underway until two in the afternoon. The delay allowed Wellington to bring fresh allied troops to support the Dutch-Belgians and the Nassau Brigade that were thinly deployed south of the crossroads. The initial French advance was greeted with musket volleys, but the outnumbered Allied troops were forced back. The Allied units in the wood, however, managed to hold. Facing three infantry divisions and a cavalry brigade, the Allied situation was fast becoming desperate, but additional troops kept arriving and Wellington, now in command, directed them to key positions on the battlefield. Ney realized that the numerical balance was shifting in favor of the Anglo-Allies and that he could only capture and hold Quatre Bras by a desperate move. He ordered General Kellermann to lead his cuirassier brigades forward and break through Wellington’s line. The cuirassiers managed to reach the crossroads, but were driven back by close range artillery and musket fire. The arrival of the British Guards Division late in the day gave Wellington sufficient strength to launch a counter-attack that forced the French to give up all of their hard fought territorial gains.
The stage is set. The battle lines are drawn and you are in command. Can you change history?


Set-Up Order

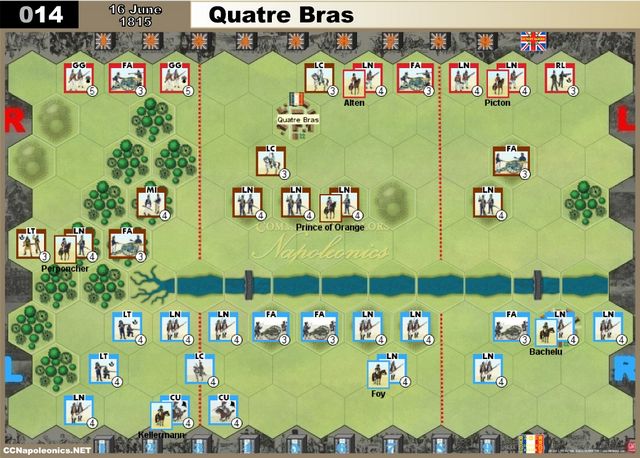
Forest 12
Hill 12
River 7
RiverBridge 2
RiverEnd 1
Town 2


Battle Notes

British Army
(Use brown Portuguese blocks for the Nassau, Hanover and Dutch units. Also use the Portuguese National Unit Reference card for the Allied troops with one exception: line infantry units will retreat 2 hexes for each flag.)
• Commander: Wellington
• Optional 6 Tactician Cards
• 6 Command Cards

Line Infantry Rifle Infantry Guard Grenadier Infantry Foot Artillery General   Line Infantry Light Infantry Militia Infantry Light Cavalry Foot Artillery General
3 1 2 2 2   5 1 1 2 2 2

French Army
• Commander: Ney
• 5 Command Cards
• Optional 4 Tactician Cards
• Move First

Line Infantry Light Infantry Light Cavalry Curassiers Foot Artillery General
9 2 1 2 3 3

Victory
9 Banners

Special Rules
Quatre Bras is a Victory Banner objective hex for the French player. If a French unit occupies the objective hex at the start of the French player’s turn, the French player gains a Victory Banner. As long as the unit remains on the objective hex it will count as a French Victory Banner. If it moves off or is eliminated, it no longer counts
(Temporary Victory Banner Turn Start)

The entire stream is fordable. In addition, a unit or leader’s movement is not stopped when moving onto a stream hex.

Log in to comment

Pevans replied the topic:
2 years 1 day ago
Time for the return match between Evert and me - and my turn to take the French. Could I do as well as Evert did last week?

The French army got the battle under way by opening fire on what was within range. The British artillery in the woods on the left of the battlefield suffered, as did the Dutch-Belgian infantry on the hills opposite the French artillery. Prince William* retired to the village of Quatre Bras with his Line infantry unit. {With enemy troops in range, "Fire and Hold" seemed a good way to start}

The advanced Dutch-Belgian units in the woods moved forward to take on the French Light at the edge of the trees. The French infantry responded with interest, General Perpoucher surviving the near destruction of the Line infantry with him. The Dutch-Belgians continued the fight, eliminating the Light infantry that was their original target. {First banner to Evert: the score's 0:1}

This success was short-lived: musketry from the nearest French Line infantry put paid to Perpoucher's Line, the General retreating to the shelter of a different unit. {1:1}

Fire from the remaining units at the edge of the woods forced back a French Line infantry, while the French artillery again pounded the hills opposite. Another Dutch-Belgian Line fled its exposed position after taking heavy casualties. Then another took a battering, while British troops moved forward on their centre left.

Suddenly the Dutch-Belgian Light cavalry appeared through the gap between the woods and hills to attack a French Line unit behind the river, putting themselves under the muzzles of the French guns. Having stood up to the horsemen, the depleted infantry retired, allowing the French Light cavalry to attack its counterparts - with support from the artillery. One Dutch-Belgian cavalry dissolved and there wasn't much left of the other. {2:1}

Under cover of artillery fire from the woods - completing the destruction of a French Line {2:2} - the remnant of the Dutch-Belgian cavalry retreated, joining other remnants around Quatre Bras where the Prince was taking his ease. The French Lights gave pursuit, charging over the hills to finish off their opposite numbers and then putting a half-strength Line infantry into square. {3:2} Despite the problems of attacking into the woods, the French Cuirassiers charged the Allied troops still on the treeline on their left. {Ah, I do like a "Cavalry Charge"}

Taking casualties, the Allied troops retired into the woods, pursued by revitalised French Light infantry. {I had a "Rally" card, but only got infantry back} The Dutch-Belgian Light infantry had a charmed life, escaping the French Lights to the hills on the left edge of the battlefield.

Despite the French cavalry that was looking for a decent target (and damaging the infantry under Gen Perpoucher), the Prince of Orange emerged from Quatre Bras, leading what was left of his infantry in the centre back onto the hills. All three French cavalry units promptly charged these positions. His troops obliterated, Prince William himself fled back to Quatre Bras, occupied by another battered unit. The surviving Dutch-Belgian infantry on the hills survived by forming square, as did Gen Perpoucher's boys. {Yep, my second "Cavalry Charge" and the score's 4:2}

Time for the Grenadier Guards (on the Allied right)! The two Guards units hurried forward, one into the woods and the other to relieve the squares, pushing back one, under-strength, Cuirassier unit. At the same time, two British Line (their left and centre) under Gen Alten charged up onto the hills to damage the retiring French Light cavalry. {Evert's "Bayonet Charge" wasn't too successful.}

In response, the full-strength Cuirassier unit swung onto the hills to attack Gen Alten's men while French line advanced from the bridge to have a go at the Dutch-Belgian square on the hill. The thinly-manned square collapsed, allowing the French infantry onto the hill. Gen Alten's men formed square, but then took a pasting from the French artillery. {5:2}

The Guards pushed the French infantry back off the hill, bit other French Line units advanced on the other end of the hill and eliminated the square - Gen Alten escaping to his other unit and marching back up the hill to get his revenge, but not quite succeeding. At the same time, the Prince of Orange trotted out of Quater Bras to join the Guards on the hills. {6:2}

Suddenly, there was action on the right side of the battlefield, Gen Picton leading his British Line out of the woods here to open fire on French Line opposite. However, the main action continued in the centre, a fresh French Line under General Foy destroying Gen Alten's men for the second time. The General made good his escape, joining the few Dutch-Belgians in Quatre Bras. {7:2}

On the right, Picton's men kept up their fire on the French Line, only to find it returned by all the French units there. The British unit disappeared under this hail of lead, Picton retreating safely through the woods. {"Fire and Hold" saw the score to 8:2}

British artillery completed the job Picton had started, while the Guards' muskets finished off the remnants of a French Line infantry unit in the centre. {8:4}

Gen Kellerman led his Cuirassiers onto the hills in the centre to take on the Guards. Scorning to form square, the Guards took casualties, but fought back, killing Kellerman. {I'd made the mistake of mentioning to Evert that we hadn't seen a Leader killed for several games: 8:5}

The French artillery destroyed what was left of the Guards, leaving the Allies with virtually no forces in the centre of the battlefield. {9:5}

And that was another decisive French victory, the Allied forces split in two and the road through Quatre Bras open. It felt more even than the scoreline suggests, both sides having some battered units scattered across the battlefield while retaining significant full-strength units. I was surprised Evert had left the Rifles on the baseline, but this was a deliberate ploy, he said, knowing that they're quite brittle and would be a prime target if they joined in the battle. Be that as it may, killing Gen Kellerman gave Evert the banner that swung the aggregate score his way - 13:14. Well, on to Waterloo!

* My view of the Prince of Orange may be coloured by Bernard Cornwell's characterisation of him in "Sharpe's Waterloo".
Pevans replied the topic:
2 years 2 days ago
Evert's and my progress through the base game scenarios is getting close to its climax. But first, Quatre Bras.

My first thought was that the Allied forces have the upper hand in this battle. They have more units than the French, including Rifles and the Grenadier Guards, although the British units are mostly on the baseline with the Dutch-Belgians to the fore. I would soon find out as Evert took the French first.

The two French Light infantry on the French left advanced into the woods in front of them to take on the Dutch-Belgian infantry and British artillery already there. With the guns hampered by the trees, the Allied units fell back. The French Lights pressed forward, inflicting casualties on first one and then another opposing Line infantry. The Dutch-Belgians had the last laugh, though, eliminating one of the French units. {This makes the score 1:0 to me}

British troops moved forward in the centre and their left, attracting long-range fire from the French artillery. The first casualty was the Rifles, who responded by pushing back a French Line infantry that had advanced into the river on the righthand end of the French forces, only to be overwhelmed when hit by two Line units. A French Line joined the surviving Lights in the woods on the left to take out a Dutch-Belgian Line unit. {A "Bayonet Charge" from Evert and the score's 1:2.}

The infantry on the Allied left charged the advanced French infantry, avenging the Rifles by removing one of these units and severely damaging the other. {I had a "Bayonet Charge" of my own and it's now 2:2.}

While the French artillery on the right did some damage to the Dutch-Belgian infantry in front of them, the French infantry in the woods on the left finished off the British artillery. {2:3}

Musketry from the advancing Guards pushed back the French Line in the woods, but some sharp shooting from the French Lights alongside them eliminated the Dutch-Belgian Light infantry on the hills at the edge of the battlefield. {2:4}

Time for the French cavalry to get moving. As they advance centre-left, the British Guards on the far side of the wood fired on the French Lights in the woods to good effect. Then the two Cuirassiers attacked the closer Guards unit. At first the Guards stood their ground, inflicting casualties on the Cuirassiers, but taking a battering in return. They formed square to fend off the second attack. {My "First Strike" wasn't successful enough.}

The French continued to push forward through the woods on the left, the Light infantry engaging the Guards' square and inflicting further damage. Fire from across the Allied line was the response, the battered Cuirassiers suffering in particular. Then the second Cuirassier unit trotted forward and took on Dutch-Belgian infantry on the hill, who formed square, while the Lights finished off the Guards' square. {2:5}

The Dutch-Belgian Light cavalry saw their opportunity to gang up on the Cuirassiers, only to be all but destroyed by the men in breastplates. {2:6} The French Light cavalry joined in, putting more Dutch-Belgian Line infantry on the hill into square.

A salvo from the French artillery took out another Dutch-Belgian Line infantry, leaving a gap on the hills in the centre, {2:7}

With things looking bad for the Allies, the second Grenadier Guards unit moved into the woods on the British right, trying to cover the retreat of a mangled Dutch-Belgian unit. However, the French infantry moved through the trees to take out the Dutch-Belgians, though the French Lights then fell to the Guards. {3:8}

As French infantry moved into musket range of the Dutch-Belgian squares, the British artillery centre-left finished off a battered French infantry, General Foy escaping to join another infantry remnant. {4:8}

Sheltering in the woods, the Grenadier Guards took on the French Cuirassiers, but they retired without casualties. They moved on to maul a French Line unit, but French infantry continued to damage one of the squares. Then the French cavalry exploited that gap on the hills and took out the British artillery. {4:9}

Phew! That was a tough fight (37 turns by my count), both sides having one- and two-block units scattered across the battlefield. The score suggests a decisive victory for the French, but I'm not sure why the Allies did so badly. Possibly I'm getting too cautious. But what will happen in the return match?
Mark-McG replied the topic:
3 years 10 months ago

Chapman wrote: Do all the units deploy at the start or is there staggered deployment as pre real battle?


set up units as indicated on map. Picton and Alten at the rear will take time to move up and join the battle. Design for effect.
Chapman replied the topic:
3 years 10 months ago
Do all the units deploy at the start or is there staggered deployment as pre real battle?
Sringoot replied the topic:
8 years 10 months ago
Good analysis. The GG in the woods are indeed almoast unbeatable in the forest unless you can use the lights to put a dent into them before they retaliate. If you manage to hurt the french lights with the allied forces, the french lose their offensive capabilities on that flank.
TheMP replied the topic:
8 years 10 months ago
Yes, in both our games, the Dutch moved behind the centre hills pretty quickly. Both of our QB games that were played these last two weeks or so have been decided by the results of the French cavalry. If the Cuirassiers can be saved and used for an almighty punch in a weakened area, they can really grab some useful banners (against Dutch light cavalry and artillery batteries). The light cavalry can support them too by pinning down nearby enemy infantry in square.

We have also found that the fighting around the Bossu woods is quite intriguing and both players have had to manage their resources in that area. The Grenadier Guards are of course useful here, but then again, the French player can nab an advantge if he can bring his light infantry to come down on them (as they can battle after moving in woods but the Guards cannot) before they suffer any significant losses.

This is a good scenario with both sides able to win it.
Sringoot replied the topic:
8 years 10 months ago
I believe key to winning as the British/allied is withdrawing your allied infantry on the first turn, behind the center hills. If you don't do this, french double cannon can just blast your infantry to death. Or they can wait for a double move card with their infantry and kill you off that way. It's just too easy for them to kill your main central force if you don't withdraw them.

The British flanks are pretty well defended. On the left the RL + cannon make it a deathwish for an infantry advance, and on the right a single GG in the forest stops whatever french units have left after killing the allied forest force.

With strong flanks and a center that falls back, french central advance can be harassed from the flanks. Making it a dangerous business.

All in all very well balanced scenario. But I do feel that if you play as the french are you are extremely patient, you can not really lose. And with that I mean waiting and waiting untill the good cards are available. Since France has much more troops, and are in better defensive positions, you can afford to wait for good cards. Brits can't attack much unless they want to lose fast.
TheMP replied the topic:
8 years 10 months ago
Well I played this one twice over Skype and VASSAL with my mate Tony Reynolds from Belgium.

As the Allies I lost 7-9. My start was assisted with a Grand Manouvre card that got my British units up quick, but despite that, Tony played a canny game with his Frenchmen and ran out the 9-7 winner in a tense, close finish that featured a lot around Le bois du Bossu in the latter turns. The French curraissiers carrying the win for Tony.

In the re-match played yesterday, it was my turn as the French, and this time, the day was carried once more for the Frenchmen as I won this time 9-5. The British did not get forward fast enough and the Dutch-Belgians and Brunswickers had to take the brunt of the French attack. This came mainly in the centre with the French Cavalry carrying the day JUST!! They had almost run out of gas before they got the last two banners which included occupying Quatre Bras.

Although the French won both games with our plays, I think we both feel there is a chance of Allied wins (as shown by stats), but overall seems slightly slanted towards Les Bleus :)
Kramaric replied the topic:
8 years 10 months ago
British won with 9:8. French opened the battle with the bayonet charge against Dutch troops in the woods. The attack was successfull and only artillery survived. Wellington intervened with his light cavalry but French cavalry countercharge destroyed the opposing cavalry and inflicted serious losses to Allied infantry. Dutch artillery in the woods repelled all the attacks on itself while in the meantime French artillery in the centre cleared the ridge in front of itself.

French cuirassiers attempted to destroy remnants of Dutch infrantry but was destroyed around Quatre Bras. The secon cuirassier attacked Dutch artillery on the ridge with the support of French artillery but failed to score with 14 dice. In the desperate counterattack Dutch light cavalry got four "horses" on four dice and the battle went towards Allies.

British soon increased their lead to 7:4 with successful battles on their left flank. French refused to go down quietly and with some desperate infantry charges equalised the score on 8:8 but British played Elan and finished the battle.
Sringoot replied the topic:
8 years 10 months ago
9-8 win for France.

Game deciding moment was a failed charge by the allied infantry, who had initially withdrew behind the center hills. After the french advance they counter charged, but totally failed to put a dent into the french line. Rolling 4 vs 4 in melee against the french line, they did less damage with 4 units going first vs 3 french units.

Also the flanks have some units who are in a real difficult position to use offensivly for the allied player. The RL on the left and the allied Line on the right for example.

Still good fun scenario.
alecrespi replied the topic:
10 years 8 months ago

apergis1@verizon.net wrote: There should be two Allied (Portuguese) LC not one.

Thank you!
Just fixed it.
apergis1@verizon.net replied the topic:
10 years 8 months ago
Discovered error in the Battle Notes for this scenario. There should be two Allied (Portuguese) LC not one.
apergis1@verizon.net replied the topic:
10 years 8 months ago
Just finished playing six times at wargame club session. Three victories for French, three for British.
Bayernkini replied the topic:
11 years 10 months ago
If you mean the sequence with the reference sheet,
only the "brown blocks" Allied troops
use the Portuguese National Unit Reference card, the britsish units use
their British sheet as normal.
Pevans replied the topic:
11 years 10 months ago
Hi all,

When this scenario refers to "Allied" troops, does it mean (as I suspect) the Dutch-Belgians (i.e. the forces allied to the British) or is it referring to all the troops (the Allies)?

Cheers,