Victory Results:
 0 %
Record a victory for BOTTOM ARMY  0 %

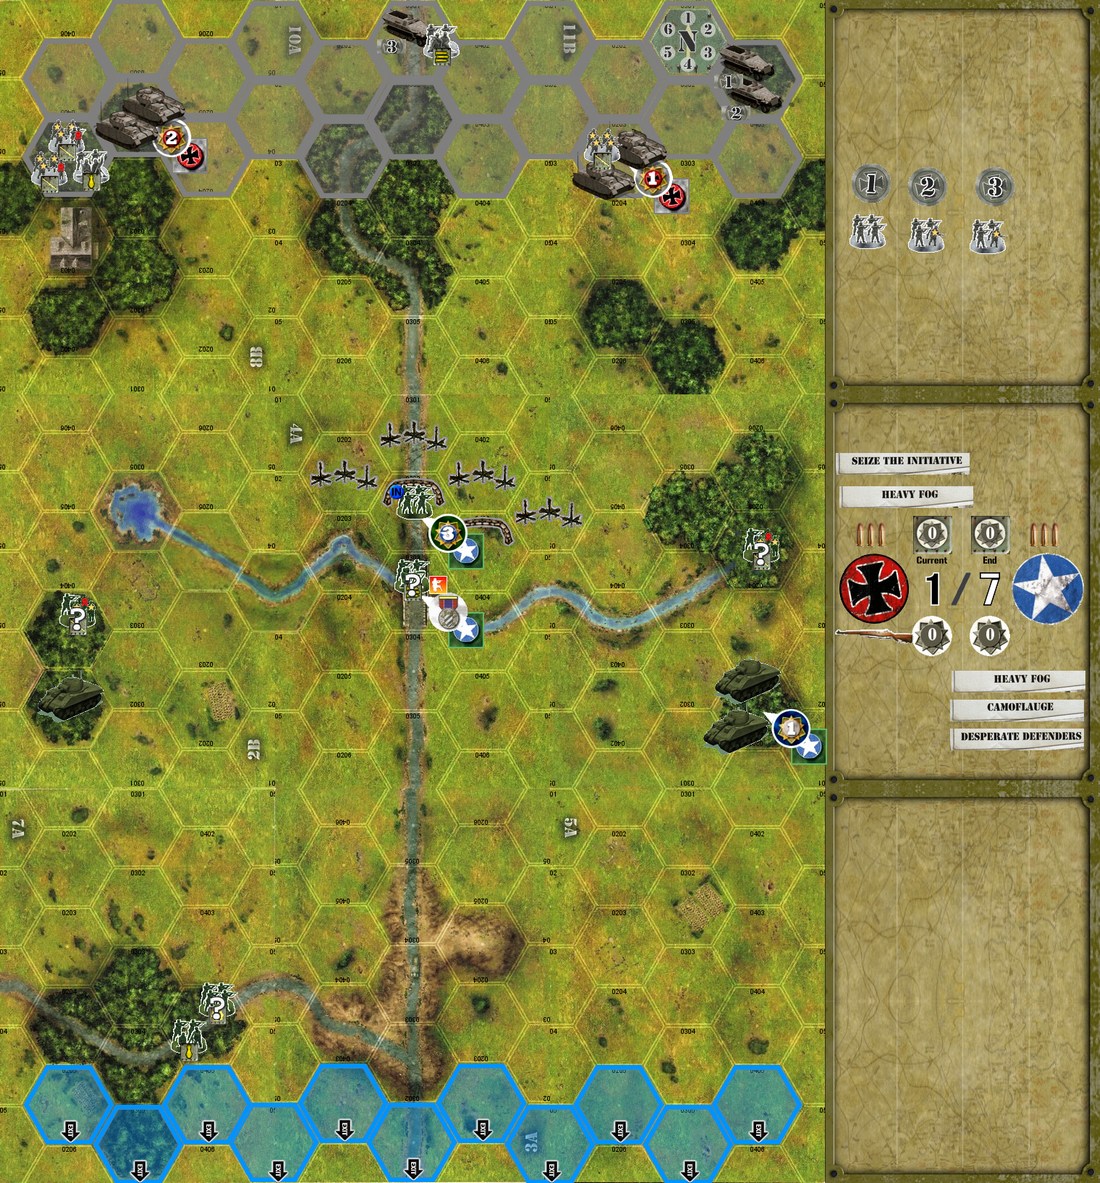
As German troops poured into the Ardennes, Lt.-Col. William McKinley, grandson of the former president, formi his depleted lst Battalion, 9th Infantry Regiment, 2nd Infantry Division facing the 12th. SS "Hitler Youth" Panzer Division. The 9th Infantry had seen heavy fighting in previous weeks and had been transfered to this "quiet" sector to rest and refit before re-joining the action. Instead of rest, McKinley scrambled to position his troops to withstand the SS onslaught, with both sides determined to control the Lausdell crossroads just outside the village of Krinkelt.
This was the northern shoulder of the German offensive, and the 6th Panzer Army was determined to break through the American line of Rocherath-Krinkelt, an action that would become famous as the "twin villages." The official U.S. Army history of the battle noted: "The failure to break through at the twin villages on 18 December and so open the way south to the main armored route via Biillingen had repercussions all through the successive layers of German command on the Western Front.
...The direction of the German main effort, as a result, would shift, substituting an armored thrust against the flank for the battering-ram frontal attack against the now well-developed defenses in the area of Krinkelt-Rocherath."


  American German
Division 1

6 Squad Bases
- 14 Regular Infantry
- 4 Elite Infantry
- 2 Officers
- 1 Machine Gun Crew
- 1 Mortar Crew

1x Engineer
2x AntiTank
4x Concealed Concealed

4 Panzer IVs
Division 2

3 Sherman M4A1s

8 Squad Bases
- 14 Regular Infantry
- 12 Elite Infantry
- 2 Officers
- 1 Machine Gun Crew
- 1 Mortar Crew

3 SdKfz 251 Half-Tracks

3x AntiTank

Strategy Decks Artillery 1
Artillery 2
Command 1
Starting Strategy Cards 4 (1x "Increased Priority" card from Artillery I) 2
Operations Cards - Desperate Defenders
- Camouflage
002 Heavy Fog (shared)
- Seize the Initiative
002 Heavy Fog (shared)
Deployment Zone Any hexes on maps 2B, 4A, 6A, 7A, 3A, and 5A. Any grey bordered hexes.
Starting Initiative   Initiative Token
Objective The Americans win if the Germans are unable to fulfill their objective by the end of round 7. At the end of a round, the Germans win if they control the bridge hex and if at least two Panzer IVs and/or German Squads have exited the board from the blue shaded hexes.
Rounds 7
Actions per turn 3 3
Reinforcements - -
Special Rules The blue shaded hexes on 3A. 5A and 7A are the exit hexes for the German units (1 movement point cost).
Terrain Features The stream is Shallow.
HINTS The Americans should consider not defending with too many units forward initially, but hold hack tanks until the win Germans reveal their attack focus. The Germans should aggressively attack the forward American positions and not worry initially about esiting the game hoard.


Log in to comment
Discuss this article in the forums (2 replies).
alecrespi replied the topic:
10 months 3 days ago
Grand Stone (Jun 17, 2011)

I played Twin villages with a friend a few days ago. And it was a good balanced scenario. The main reason I wanted to test this scenario was to test artellery.

I played versus a player which have never played ToI so the first round was more of a learning round where I guided him what I tought he should be doing etc. I then released I did a big big mistake. I should have made my MG squad hidden infront. With the camuflage op-card I could have fired a few shot and kept it concealed. It would have been significant more difficult to take me. He destroied my MG squad, and in only a couple of rounds he suddenly assulted my position on the bridge and I had very little to answere. I lost the 3point command objective. He had also drawn the two cards which gave him two extra command towards initiative. (3 in total with the seeze the initiative op card) From round 3 and on I totaly gave up on even trying to take the initiative. The few command I actually had was spent on top priority barrage. I placed it on the bridge, but it scattered. Luckily down one hex to to hex containing two other of his units. And yes, a well placed artellery attack can be quit handsome. I lightly damaged 2 of his halftracks, one of his panzers and took one of his squads. Later, I got two other increased priority which basicly gave me free use of all artellery cards I had. Then I called in another one in the exact same position and he took quit a few cassulties. Basicly killing his forward troops, and suddenly there was hope. He managed to wipe me of the board (with the artellery still comming in), but he did it slightly to late. Thus I actually managed to block him from exiting with two units.

A well orginized, well balanced scenario. Had I played versus a slightly more experienced player, or he had looked at the victory conditions more carefully slightly earlier, he would have won easily. But, geting my MG squad stupidly destroyed by not seting him up as concealed was a big misstake. With the camuflage op card, an concealed MG troop would have been far more troublesome to remove.

So basicly, the german has more AND better troops. 4 panzers versus 3 shermans, 2 extra squads wich half-track support. But the US has artellery and camuflage. And the us ha an engineer. Building an entrenchments in a forrest was fun. Plus the US is defending and has a few natural benefits that way. Thus, the scenario is balanced and fun. Maybe I feel like the defender is slightly to static, but maybe thats not uncommon.

But this scenario and experience tells me something about the system.

1) This illustrates, that if you do an mistake in the setup as the defender, its very little you can do to fix it afterward. An attacker is more mobile and is not that critical dependent on setup. However with a standar attacker defender scenario, this is very very difficult to improve. Thus, this is the way it is.

2) Artellery:

At one point it seems to random. If you get increase priority early it makes a huge difference
The suppressive forms often does not make much sense for the defender. If the attacker has the initiative, (which is often the case at the end) pinning squads which he already has used is not much use.
With some (in my case three) increased priority cards, the command cost of the card is irrelevant and the only thing which matters is the number of cards you have available.
Thus, it would have been fun to have an artellery deck which is

ordered so that you get an increased priority round 2 and round 5 (or whatever)
an artellery attack which allows you to pick between supressive and normal damage
At round 1 you get an card which allows you to draw 2 artellery cards each turn.
But a well placed artellery attack can be very powerfull.

3) Command points

In this spesific situation command points had no value, atleast in the end of the scenario. He had the initiative regardless of how many command he spent on it, and he had enough command to use all cards he had drawn. For me it was useless to try to get the initiative, and when I got the three increased priority I could also use all my cards for free.
alecrespi replied the topic:
2 years 2 months ago
Posting here some comments found online.
www.boardgamegeek.com/geeklist/37980/tid...1-player-comments-ba
  • Interesting scenario that is quick to get into.
  • An aggressive play by the Germans can force an American surrender.
  • This is a fun and fast paced scenario that is a challenging puzzle for the US player. Good use of the artillery is critical for the US player.
  • The first few turns can be a nightmare for the Germans and then it's hell for the USA.