Historical Background
Slowed by having only one bridge to cross, Napoleon had less than a third of his army across the Danube, when Charles attacked. The Austrians were formed into five attack columns with the Grenadiers and the majority of the cavalry in reserve.
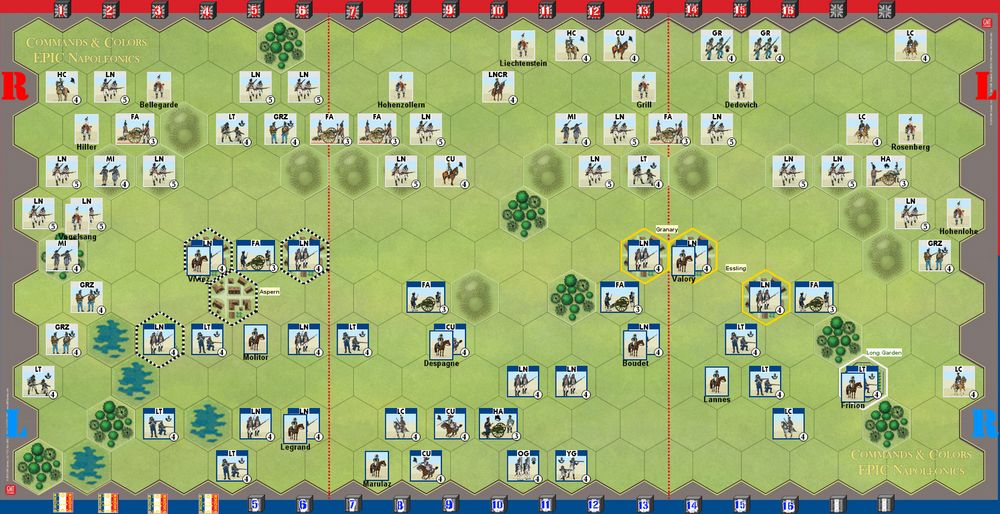
The battle started with the attack by the first and second Austrian columns against Aspern. The French, under the command of Molitor, were already deployed in the village and repulsed the first attack. The second Austrian attack briefly entered the town before being thrown back. French reinforcements were needed to repulse a third attack. By this time, some of the Austrian cavalry had moved forward along with the third column. Napoleon, concerned the village might fall, ordered Marulaz to charge. The battle for control of Aspern swung back and forth and at the end of the day, both Austrian and French infantry occupied the town. Meanwhile, in a series of uncoordinated attacks, the infantry of the Austrian fourth column could not take the granary in Essling, a massive bastion, and pulled back. The fifth column, having the greatest distance to march, was now in position around 8:00 PM and launched its attack. Using both the granary and the Long Garden as key defensive positions, Lannes skillfully deployed and redeployed his outnumbered French troops to these critical points to maintain control of the village. After this final attack of the day, Rosenberg ordered his Austrians to retire and wait for the Grenadiers and the rest of the Austrian cavalry reserve to arrive.
The stage is set. The battle lines are drawn and you are in command. Can you change history?
Set-Up Order
| 8 | 14 | 1 | 1 | 4 | 6 |
Battle Notes
Austrian Army
• Commander: Charles
• 5 Command Cards
• 3 Tactician Cards
• Move First![]()
![]()
![]()
![]()
![]()
![]()
 |
 |
 |
 |
 |
 |
 |
 |
 |
 |
 |
|
| 15 | 3 | 4 | 3 | 2 | 3 | 1 | 2 | 2 | 1 | 4 | 9 |
French Army
• Commander: Napoleon
• 6 Command Cards
• 6 Tactician Cards![]()
![]()
![]()
![]()
![]()
![]()
 |
 |
 |
 |
 |
 |
 |
 |
|
| 12 | 7 | 1 | 1 | 2 | 3 | 4 | 1 | 9 |
Victory
16 Banners
Special Rules
• The four town hexes of Aspern (3 town hexes and church) form a temporary Group Majority Group Victory Banner Objective worth 2 banners to the side that occupies an absolute majority of the town hexes at the start of its turn.
• The three town hexes of Essling form a temporary Group Majority Group Victory Banner Objective worth 2 banners to the side that occupies an absolute majority of the town hexes at the start of its turn.
• The French starts with 4 Victory Banners.
• The Long Garden is a Temporary Victory Banner for the Austrians worth 2 banners when occupied at the start of the turn.
• The two side by side town hexes in Essling represent the Granary. The Granary has all the effects of a town, in addition, a unit on each Granary hex may ignore one flag.
