Victory Results:
 60 %
Record a victory for BOTTOM ARMY  40 %
Total plays 237 - Last reported by Albion on 2024-06-21 12:14:12

Historical Background
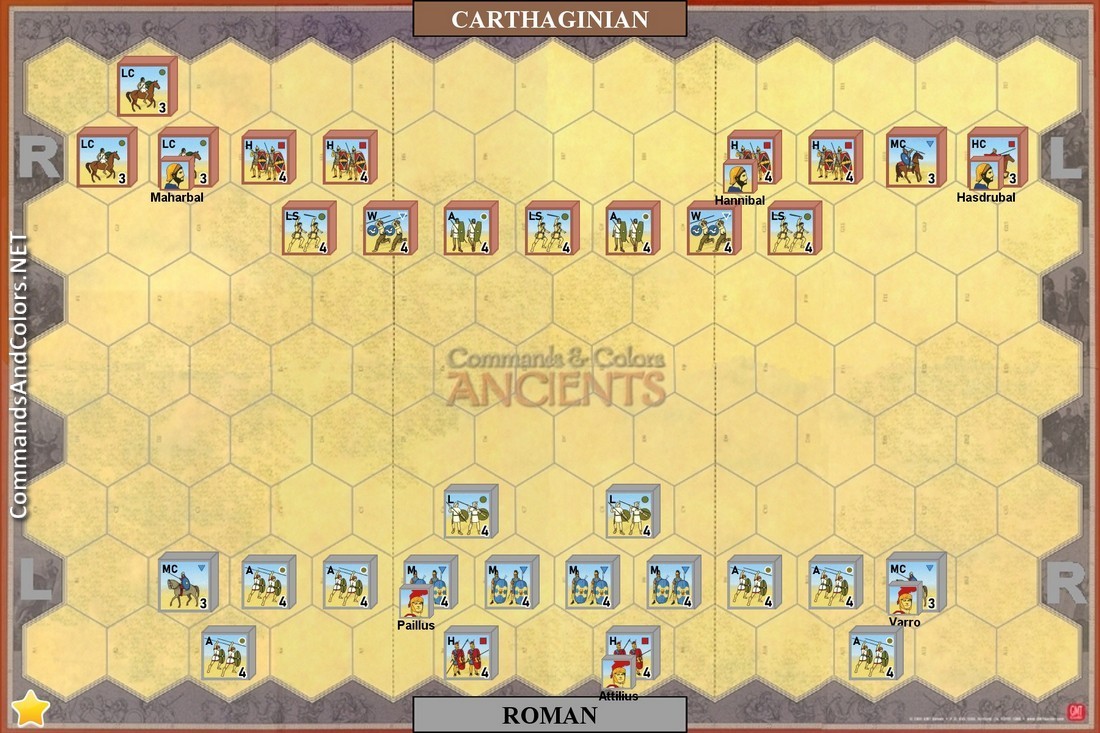
Now, fully aware of the threat posed by Hannibal, the Romans assembled a truly large army, perhaps up to 80,000 strong, led by two consuls and two pro-consuls. Unfortunately, on the day of battle, the incompetent consul Varrus held command and determined to attack Hannibal, who had posted his army in a location that negated the Roman advantage in numbers – bluffs on one flank and the Aufidus river on the other. Undeterred, Varrus simply packed his legions one behind the other into the constricted area and launched the mass headlong at the Carthaginian center. They advanced into yet another trap. Hannibal had deployed his excellent cavalry and heavy infantry on the wings, leaving his medium infantry and Celt levies in the center. The Roman advance did indeed push the Carthaginian center back and inflict losses, but in the meantime the Carthaginian cavalry had routed the Roman cavalry on both flanks and closed in on the rear of the Roman army while the heavy infantry advanced on both Roman flanks. Surrounded and unable to maneuver, the Roman soldiers were slaughtered by the thousands, and the army was destroyed. Cannae was Rome’s greatest military defeat, and Hannibal’s greatest victory.
The stage is set. The battle lines are drawn and you are in command. The rest is history.
  Light Sling   Auxilia       Warriors Heavy Infantry Light Cavalry     Medium Cavalry Heavy Cavalry         Leader  
  3   2       2 4 3     1 1         3  
Light Infantry     Auxilia Medium Infantry       Heavy Infantry       Medium Cavalry           Leader  
2     6 4       2       2           3  

War Council

Army: Carthagian
Leader: Hannibbal
6 Command Cards 

Army: Roman
Leader: Varro
4 Command Cards     
Move First

Victory
7 Banners

Log in to comment

Dionysius of Omaha replied the topic:
1 year 10 months ago
First game, Varro won. This AAR is for the second game...

Turn 3: Consul Gaius Terentius Varro moves up his forces on the right. Skirmishing occurring in the center. Hasdrubal orders a Mounted Charge and nearly wipes out Varro’s personal corps of medium cavalry. The Roman commander is compelled to retreat.

Turn 5: Varro, undaunted, Counter Attacks with a Mounted Charge of his own and eliminates a Carthaginian cavalry unit. But Hasdrubal sees an opportunity to surround and slay Varro and Counter Attacks with his remaining horsemen. On the Roman left flank, General Maharbal does the same against another Roman cavalry force. Varro’s cavalry are eliminated but he manages to escape. All tied at one banner each.

Turn 6: Maharbal’s Numidians surround and liquidate the last of the Roman cavalry. Carthage 2, Rome 1.

Turn 7: The encirclement begins. Hannibal’s heavy infantry march against the Roman center-right; two Roman units are destroyed. Romans stoically continue to move forward in the center. Carthage 4, Rome 2.

Turn 8: Ferocious melee on the Roman right as Varro urges his auxiliaries to withstand the surge of Carthaginian heavy infantry. The light troops rise to the occasion and nearly eliminate a Punic heavy infantry unit. Romans haven’t given up yet… Carthage 4, Rome 3.

Turn 9: Romans move up their medium troops to reinforce the line. Hannibal throws down I Am Spartacus! (And everyone wonders who he’s talking about…). But lady luck cheats the Carthaginians as not a single useful die roll turns up! A wasted turn for Carthage…

Turn 10: On the faltering Roman left, Maharbal leads the Carthaginian heavy infantry against General Lucius Aemilius Paullus’ medium infantry. Carthage 5, Rome 4. Not looking good for the Romans…

Turn 12: The end comes quick. Varro and Paullus are short on options as their army is surrounded. They try to move up reinforcements into the center, but it is too late. In a simple Coordinated Attack unleashed by Hannibal, Varro and his decimated auxiliary unit are both destroyed by, of all things, persistent but accurate Balearic Island slingers! Carthage wins 7 to 4.
wayneschuster replied the topic:
1 year 11 months ago
I absolutely love playing the Romans in this scenario. My primary strategy is to move the light infantry and a medium infantry to the flanks. I actually try to bait the Carthaginian’s into attacking my auxilia with his cavalry if I can get medium cavalry and perhaps a medium infantry up I can usually do well. I don’t rush the center until he commits his heavy infantry. I do feel that R Borg does tend to give the historical victors a slight advantage.
TomKnight3 replied the topic:
2 years 7 months ago
A fantastic game filled with ups and down. I took the Romans so was at a disadvantage but had more experience playing the game. Carthage used its Cav. Units well taking out my left Cav. Unit on his first turn. In fact, Hasdrabul was so aggressive he had his Cav. Units killed from under him twice, but lived to tell about it. Carthage cleared out most of the Roman lights, racking up a 5-3 lead. A Rally card also allowed them to lick their wounds a bit and recover a warrior unit from a one block to a three blocks. However, Rome had a first strike and a clash of shields which helped to blunt Carthage’s force. Some good solider work and a line command brought the Roman mediums into the battle. The Romans came back to make it 6-5. It was really getting tense as the Carthage heavies move up. Carthage used a unit of slingers to soften up a medium getting two hits, and followed up with a heavy destroying the unit to make it 6-6. Carthage then rolled a helmet to win on the leader causality check. It can’t get better than this. Carthage wins 7-6, but what a fantastic game.
GF1954 replied the topic:
3 years 11 months ago
I just played this solo once again, with Carthage winning 7 - 5. This though, I tried the solo method of giving one side all their cards, and the other only one. It was a surprisingly even contest with the Romans had their chances,
Novak replied the topic:
6 years 8 months ago
Two games, two Carthagian wins. In the first one, two "Order Heavy Troops" command cards for Carthage sealed the deal on both wings. Also, Carthagian light troops had some great dicerolls in softening up the legions. It wasn't even close, 7-2

In the second game, slugfest in the middle (troops were somehow sucked in there due to such command cards) went a bit better for Carthage. Much closer game, but still comfortable Carthagian win.

Overall, 2 command cards for Carthage is huge.
Valvorik replied the topic:
7 years 3 months ago
Solo Play, close game with Carthage winning 7:6 in the end.

Both sides managed some effective moving into place for strategic effect but battlebacks and a well-timed Mounted Charge turned things for Carthage, two mid-game line commands once things were in place were also sweet. That said the last two moves were "it's anyone's game".
Dylan Dog replied the topic:
7 years 10 months ago
Solo Play

The game started very bad for the Romans with the Cartagiian pushing well on the right flank. Even if the banner advantage for the Cartaginian was not high the Roman losses were so high I almost wanted to stop playing, but then the Romans Medium Infntry clashed back the Cartaginian Heavy Infantry (clash of shield card!) and the game slowly turned to the Roman advantage which started to collect banners and after 15 turns the right Cartaginian flank was back in the base hexes and the lost the game.

Roman 7 Cartaginian 4
Anduril replied the topic:
13 years 10 months ago
A Roman win! On both flanks the Carthaginian cavalry quickly racked up flag after flag, taking six flags for two, but couldn't quite close the deal when the Roman center pushed back. The Romans were able to pull their most badly damaged units to safety while pushing forward for the win.

Rome 7 Carthage 6
The-Admiral replied the topic:
14 years 4 months ago
Looking at Don Clarkes' results site plus the above shows the following:
Carthaginians 21 wins and Romans 8 wins.

So it appears from that to be a 2.5:1 win ratio in favour of Carthage.
King-Billy replied the topic:
14 years 4 months ago
Played this yesterday. It does I think favour the Cartheginians. It was a very cautious battle with both of us spending a lot of time getting our battle lines in order.

The heavy units are obviously the best advantage the Cartheginians have, but if they are not used wisely the Romans can win. I took Marhabul from the light cavalry and put him with heavy infantry. He is far more useful there I think.

I won 7 flags to 4.

The Romans need to use their Auxilia as light infantry as much as possible, targeting the Catheginian heavies with ranged attacks. They also need to make sure that their heavy infantry get into the battle at the right time.

I watched a second game after I played my match. It come down to the last die roll, with the Cartheginians stealing a victory by wiping out a full strength medium cavalry unit in a single attack back by medium infantry when it was 6 flags all

Catheginians 7, Romans 6.
badweasel replied the topic:
15 years 9 months ago
Solo Play:

The initial movement of the armies very closely matched the historical events with the Romans trying to close in the center and Carthage trying to attack the flanks. Unfortunately, repeating the historical process wound up with almost the same result. There were some highpoints: such as Rome defeating the Carthaginian right flank and the initial light ranged fire managed to eliminate a block from the Warrior units. The Carthaginian left crushed the opposing Roman forces effectively disintegrating the enemy forces. It was several turns before they could try and finish off the lone units, but Rome decided to force march and try to eliminate the heavy units and beat them back. Victory was not to be as a full strength Roman heavy unit was wiped out in a battle back to seal the outcome.

Carthage 7 - Rome 3

Very close battle. Rome almost battled there way into a victory, but they just could not quite do it. Carthage pushed their center forward to meet with the Roman line, but after the initial attacks it kind of stalled out with only the Roman units attacking. The bulk of the Carthaginian success again came on the left wing as it very effectively crushed the Roman units. The heavy push forward is quite effective against the auxilia and medium cavalry. Rome's chance at victory would have came if on the final attack against their Atilius led heavy infantry did not have to retreat. This allowed a follow up attack that eliminated the unit. The following turn Rome had two auxilia in position to advance and eliminate two single block units.

Carthage 7 - Rome 5
alecrespi replied the topic:
15 years 9 months ago
Eric S. Raymond wrote some comments about this scenario on his webpage. CLICK HERE to read full article.

I think this scenario is quite unbalanced in favor of the Carthaginians. Between their cavalry superiority, 2 more command cards, and their lights' ability to evade, they will normally be able shape the battle pretty much to their liking; the fact that they almost controlled that shape anyway even with my three lucky Line Commands is the best possible evidence for this. The designers set out to force something not far from the historical movements and results and succeeded quite well.

To rebalance this, you could give the Romans competent command (5 cards). But it's probably best to play it as a flip-flop set and give the win to the player with fewest total losses.