Victory Results:
 61 %
Record a victory for BOTTOM ARMY  39 %
Total plays 41 - Last reported by Pevans on 2026-01-01 22:34:01

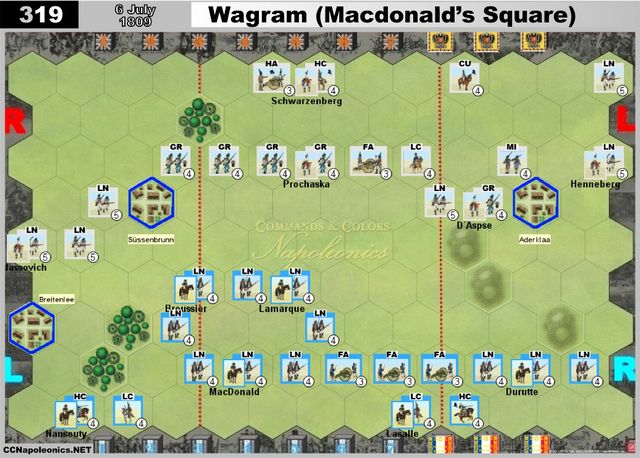
Wagram - 6 July 1809 (Macdonald’s Square)

Historical Background
The Austrians had repulsed the French late day attacks on July 5th but Charles knew he was still outnumbered. He chose the audacious course of an early morning double envelopment attack to defeat Napoleon before the superior French numbers made Austrian defeat inevitable.
Coordination, the Austrian Achilles heel, again bedeviled Charles. Rosenberg’s attack against Davout failed, and even though the attack against the French left came very close to succeeding, Napoleon contained it without using his reserves. Now, with Davout advancing inexorably against the Austrian left, Napoleon knew the time had come to split the Austrian center and crush the Austrians once and for all.
Napoleon ordered Macdonald to attack the Austrian center, supported by a massed French battery that had already inflicted massive Austrian losses. Although the French giant hollow square attack formation was somewhat unusual, it slowly gained momentum, even though the Austrian artillery and infantry responded by laying down an intense fire against the advancing infantry. Charles then ordered the Austrian cavalry to attack Macdonald’s flank, but the French cavalry rode forward to counter. Massive casualties reduced the 8,000 man hollow square to 1,500 men by the time they closed with the Austrian Grenadiers at bayonet point, Although Macdonald’s infantry could not break the Austrian battle line, it did prevent Charles from reinforcing his own attacks or supporting Rosenberg against Davout. Seeing his left flank was lost, Charles knew the battle had turned against him and ordered his army to withdraw. The exhausted French army could only follow, rather than stage a strong pursuit.
The stage is set. The battle lines are drawn and you are in command. Can you change history?


Set-Up Order

Forest 3
Hill 3
Town 3


Battle Notes

Austrian Army
• Commander: Charles
• 5 Command Cards
• Optional 3 Tactician Cards

Line Infantry Grenadier Infantry Militia Infantry Light Cavalry Heavy Cavalry Cuirassier Heavy Cavalry Foot Artillery Horse Artillery Leader
6 5 1 1 1 1 1 1 5

French Army
• Commander: Napoleon
• 6 Command Cards
• Optional 6 Tactician Cards
• Move First

Line Infantry Light Cavalry Heavy Cavalry Foot Artillery Leader
11 2 2 3 6


Victory
7 Banners

Special Rules
• The infantry units in Macdonald’s formation, when in adjacent contiguous hexes to Macdonald, are all ordered when any of the units in the formation are ordered.
Regardless of the Command Card played, units in the formation may only move one hex. Regardless of the number of MacDonald infantry units ordered, only the number of MacDonald infantry units equal to the number on the Command card may battle. A unit may not be ordered to break away from the formation. However, if a unit is forced to retreat and is no longer in an adjacent contiguous hex, it is no longer considered part of the formation. Any unit ordered to form square is no longer considered part of the formation.

• The French player gains 1 Victory Banner at the start of the turn for each town hex occupied (Temporary Victory Banner Turn Start)

Log in to comment

Pevans replied the topic:
3 weeks 1 day ago
Evert and I wanted to have another go at this scenario. This time, the French advanced slowly and the 'square' flattened out into a line, while the Austrians organised themselves into a defensive line. Then the French left flank launched an assault, cavalry hitting the end of the Austrian line while the infantry hit Süssenbrunn town, taking out the Grenadiers holding it. 0:1 to the French.

The Austrian muskets quickly exacted revenge, eliminating a French Line infantry. And General MacDonald. That's 2:1 to the Austrians. More intriguingly, that seems to destroy the 'square'. [Since infantry units are only part of it while contiguous with MacDonald, that clearly can't happen now, so bang goes the special rule.]

Fighting continued around Süssenbrunn for some time with both sides taking heavy losses. The Austrians lost two more Grenadiers and Line infantry, while removing two more French Line. That's 4:4 and the French cavalry on the left flank is behind the Austrian lines. The other cavalry then attacks centre-right, eliminating the Austrian Cuirassiers to make the score 4:5.

The Austrian horsemen responded by taking out the French Heavy cavalry (5:5). The French cavalry then finished off the Line infantry they'd been toying with (5:6). And General Vudassovich failed to escape through their ranks: 5:7 and a French win.

I think Evert made better use of the 'square' initially, but the loss of MacDonald early on meant that it didn't last long. That was a good fight that lasted 23 turns in all and took 90 minutes or so.

Swapping sides a week later saw an early success for Evert's Austrians, removing two units from the 'square' with the first exchange of fire (lucky dice from Evert).

I regrouped the 'square' as a compact group and continued pushing forward and left towards Süssenbrunn. The French infantry took out an Austrian Line infantry while cavalry occupied Breitenlee town on the left: 2:2. The Austrian Grenadiers promptly eliminated another French Line for 2:3.

The 'square' pushed on, taking Süssenbrunn only for General MacDonald to fall (again!) with his infantry. That's 3:5.

The score evened up when the French infantry continued to advance on the left and removed a Line infantry and Grenadiers. And destroying the rest of the Austrian right flank (left on the board) gave the French another win 7:5.

That was a faster game at 19 turns taking just over an hour. And we had two French wins, both 7:5, which means the aggregate score is 12:12 and a draw!

I’ve also posted this report on my BGG blog (with pictures!): boardgamegeek.com//blogpost/181776
Pevans replied the topic:
3 months 5 days ago
I pushed MacDonald's formation forward to attack and occupy Süssenbrunn (a "Force March" card helped). Meanwhile, the French cavalry kept the Austrian infantry on the left in Battalion Mass. But first blood went to the Austrians, taking out a Line infantry even as I gained the banner for holding the town. However, Evert was quick to re-take the town with Austian Grenadiers. The score's 0:1.

MacDonald's troops evened up the score by eliminating one of the Austrians in Battalion Mass (1:1). Then they took the lead by removing a Grenadier unit in the centre (2:1).

Evert promptly used our favourite card, "La Grande Manoeuvre", to shift artillery and infantry across from the right to confront MacDonald's force.

The French removed one of those infantry in the centre (3:1), but the now-bulky Austrian force retaliated by eliminating two French infantry and General Broussier. This makes the score 3:4.

The French took out an Austrian Grenadier; the Austrians got another French Line: 4:5. I retreated the battered remnants of MacDonald's Square - apart from the unit that was in square after some Austrian cavalry got to them. I sent some French cavalry against the Grenadiers threatening the square and then moved all my artillery into the attack, centre-right (using the movement option of a "Bombard" card).

The massed artillery removed the Austrian militia next to Aderklaa (the town on the right) - 5:5. However, Evert attacked across the board to eliminate that French infantry unit in square and take out another remnant of MacDonald's formation with a combination of Grenadiers and Horse artillery. 5:7 and a second Austrian victory.

This was slightly longer than our previous game - 20 turns in 75 minutes - but just as intense a battle. I did a bit better than Evert as the French, so the aggregate score is in my favour: 12:10.

I’ve also posted this report (with pictures!) on my BGG blog: boardgamegeek.com/blogpost/179262
Pevans replied the topic:
3 months 5 days ago
Initially my Austrians held firm in the face of the French advance, the Heavy cavalry on the left taking Breitenlee (the town on the left edge of the battlefield). Austrian muskets destroyed the Line infantry on the front left corner of MacDonald's square, General Broussier falling with his men. A "Fire and Hold" card makes the score 2:0.

Leaving the town, the French Heavy cavalry put some Austrian infantry into Battalion Mass. French infantry promptly took them out: 2:1. Gen Vudassovich escaped the attack, only to be chased off the battlefield by the French cavalry.

Despite the cavalry behind their lines, the Austrian infantry continued to attack MacDonald's square, the formation compressing as another Line infantry unit - and Gen Lamarque - bit the dust. That's 4:1.

French infantry moved forward on the right while the units in the square regrouped and Light cavalry moved into Breitenlee: 4:2.

The French advance on the right removed the Grenadiers outside Aderklaa (the town on the right) for 4:3.

The Austrian artillery then opened up (thanks to a "Bombard" card), the Foot eliminating French Line in the centre while the Horse finished off the French Heavy cavalry lurking behind Austrian lines on the left. That's 6:3 and I need one more banner.

MacDonald's command massed for an attack on Süssenbrunn, taking out an Austrian Line infantry, but vacating Breitenlee lost Evert a banner, so it's still 6:3.

The French cavalry retired into Breitenlee, but the coup de grâce came on the right as the Austrians around Süssenbrunn massed to remove another Line infantry. Final score: 7:3.

That was a brisk 16 turns in an hour's play and a pretty intense battle.

I’ve also posted this report (with pictures!) on my BGG blog: boardgamegeek.com/blogpost/179123
LARS replied the topic:
5 years 5 days ago
A very unusual battle. Macdonald moved left oblique to protect his left flank and utterly destroyed the Austrian left and center. The Austrians had abysmal cards. The game was only close due to a productive charge by some Austria light cavalry. French win 6-4... 7-4 if one counts Prochaska who fell on the last roll.
kostas63 replied the topic:
5 years 9 months ago
Vittoria Austriaca 7-3. Lo scontro inizia bene per i francesi: la fanteria di Durutte avanza fino al paese di Aderklaa sbaragliando ogni resistenza austriaca meno la milizia che resiste con accanimento. Anche il "quadrato" di McDonald avanza con fierezza e conquista Sussenbrunn ma la risposta dei granatieri austriaci si fa sentire subito pesantemente. La battaglia volge ben presto in favore degli austriaci e la stessa morte del gen. McDonald pone fine allo scontro.
Bayernkini replied the topic:
6 years 7 months ago

of course but the scenario needs to be change.


Scenario notes fixed.
anaxam replied the topic:
6 years 7 months ago
of course but the scenario needs to be change.
g1ul10 replied the topic:
6 years 7 months ago
It's temporary, according to the FAQ.
anaxam replied the topic:
6 years 7 months ago
The scenario says

Permanent Victory Banner Turn Startl

but the FAQ says

It´s a Temporary Victory Banner Objective Hex

.
Mark-McG replied the topic:
10 years 7 months ago

Superman wrote: 2) If Macdonald’s unit is short supplied is the entire formation also short supplied? If only Macdonald’s unit is sent back to the base line then I take it the formation no longer exists.


I concur with Bayernkini's post, with this addition;
MacDonald's square relies upon the existence of MacDonald, so if McDonald (and attached unit) are short supplied, then for the purposes of considering his Square, it is calculated from MacDonald's location.

So in this instance, if MacDonald moved to the base line, all other units might be detached, but other adjacent LN might join the new square. So the square still 'exists' as long as MacDonald does, even though it may have 0 units.
Bayernkini replied the topic:
10 years 7 months ago
1. Units may take ground only if the basic rules allow it, so only this unit, which battles a successful melee.
Scenario specific: The unit, which want take ground, may not break/leave the formation voluntary with this additional movement. So the unit may only take ground here, if it´s still in formation after that move.

2. Only one unit may short supplied. If MacDonalds own unit is short supplied, then the formation of the other units is broken, until MacDonald (and/or his unit) move again into formation.


And the complete MacDonald rule is indeed a unlucky one, makes to much troubles ;)
Superman replied the topic:
10 years 7 months ago
Two questions came up during play concerning Macdonald's formation that I did not see addressed in this forum. 1) taking ground and 2) short supply.

1) Can units in the formation take ground after a successful battle? If so, do all the other units in the formation also get to move again at this time?

2) If Macdonald’s unit is short supplied is the entire formation also short supplied? If only Macdonald’s unit is sent back to the base line then I take it the formation no longer exists.
Michalxo replied the topic:
11 years 9 months ago
Ok, that makes perfect sense now, after Mark's explanation. Exactly as I understood previously.
Thank you Mark and Bayernkini :)
Mark-McG replied the topic:
11 years 9 months ago
My view is that it is better to consider that the cards only order units as normal.

If a MacDonald's square INF is ordered, all the other units may move. They are not ordered for any other purpose.

The units that were ordered may battle normally.

So was Boussier able to be ordered? No. Because it was not a Centre unit.
Ergo, Boussier cannot battle.

If Lamarche was ordered, he could battle, but even being in the centre, if not ordered.. then no battle.
Bayernkini replied the topic:
11 years 9 months ago
No, only the number of units, which the command cards shows, can battle.
So far, all battles, which i saw, are been correct :)

But you are right, this rule is unlucky :S
Michalxo replied the topic:
11 years 9 months ago
I got lost now.
It was all clear, and now after reading

A: In regard to battling, any ordered unit may battle. The section a unit starts in or ends in or remains in does not restrict what units may battle.


What? So any unit from McD can battle? Ignoring sections??
So can Broussier attack or no?
Bayernkini replied the topic:
11 years 9 months ago
3. Ordered by Forced March, can only the units in one section battle?
(RB) Yes, only units in one section may battle.

4. Can units out of section be considered ordered for battle purposes?
(RB) No, only ordered units on the Command card section may battle.
For a Coordinated Advance and Recon in Force Command card played, units each section of MacDonald’s formation could battle.


To make this rule/FAQ more clear (because of a similar situation in a tournament game), i got still another additional answer from Richard :)

[IMG


[IMG


MacDonalds formation was ordered by a Attack Center, so complete formation was ordered and can move with the initial center card. That´s no problem :)
The question was,

Q: Can the left French unit with Leader (Broussier), which startet on left section, move into Center section and battle. Or can only the Units battle, which started on Center, because of the Initial Center card?

A: In regard to battling, any ordered unit may battle. The section a unit starts in or ends in or remains in does not restrict what units may battle.
Richard Borg


This makes it more clear now. General a nice rule, but in game it makes sometimes worries, with which cards, which units can ordered and how many may battle in which sections :dry:
Bayernkini replied the topic:
11 years 9 months ago
If you give only 1 order of the Elan result (INF in this case) to the MacDonalds formation, then the complete formation is ordered and may move, BUT only the inital number of orders which you apply to the formation, may battle, in your example only 1 INF.

It´s similar as the number 6 of the FAQ answers (see post above from Alessandro) says about a Leadership cards.
Michalxo replied the topic:
11 years 9 months ago
What about for example elan card?
Imagine I roll XSW, CAV, INF, ART, XSW, INF. That means that I could order 1 INF unit in McD, another 1 unit somewhere else on map and ART + CAV. That's clear. Now that solo INF moves, and whole McD moves, thank's to that single INF, and CAV + ART.

Now I have question, does it mean, that 4 any units from McD may battle? + 1 solo INF unit somewhere else on map, CAV and ART. Do I understand it correctly?
alecrespi replied the topic:
12 years 2 weeks ago
Hi Mark,
just received from Mr Borg an official answer to your questions... here they are.

1. If MacDonald is killed?
(RB) Note, the formation is only maintained while infantry units are in an adjacent contiguous hexes to the MacDonald block.
If MacDonald is eliminated the formation is no longer maintained.
Also note, an infantry unit that forms square or is forced to retreat and is no longer part of the formation, may rejoin the formation when the unit comes out of square or moves and it is again in an adjacent contiguous hex to the MacDonald block

2. Can the formation stretch into a line?
(RB) Yes, the formation could be stretched into a line.

3. Ordered by Forced March, can only the units in one section battle?
(RB) Yes, only units in one section may battle.

4. Can units out of section be considered ordered for battle purposes?
(RB) No, only ordered units on the Command card section may battle.
For a Coordinated Advance and Recon in Force Command card played, units each section of MacDonald’s formation could battle.

5. If MacDonald’s unit forms a square, does the whole formation fall apart?
(RB) This is an interesting question, and probably somewhat of a “so what would happen if” type question.
Although the infantry unit with MacDonald attached is technically not in the formation, infantry units still in an adjacent contiguous hexes to the MacDonald block are still part of the formation.

6. Leadership cards, orders all formation?
(RB) When MacDonald is ordered by a Leadership Command card, the infantry unit he is attached to and infantry units in an adjacent contiguous hexes to the MacDonald block are ordered. Only the infantry unit with MacDonald attached may battle.

7. May MacDonald be ordered to break away from the formation?
(RB) No, like an infantry unit in the formation, the MacDonald block may not be ordered to break away from the formation.


I hope everything would be clearer then.
Regards
Alessandro
Mark-McG replied the topic:
12 years 3 weeks ago
So my understanding of the way the rule is intended to work is that units are ordered normally, and if one or more of the units are part of MacDonald's formation, then the whole formation can move (only). When moving each LN unit was remain adjacent to 1 other unit in the formation such that a continuous line of LN units can be traced to MacDonald.

So a line could be formed by this movement, the formation is flexible. However, no unit can voluntarily detach.
Mark-McG replied the topic:
12 years 3 weeks ago
Many questions about MacDonald's formation when things happen as follows;

1. If MacDonald is killed?
2. Can the formation stretch into a line?
3. Ordered by Forced March, can only the units in one section battle?
4. Can units out of section be considered ordered for battle purposes?
5. If MacDonald's unit forms a square, does the whole formation fall apart?
6. Leadership cards, orders all formation?