Ama no Rokuro of Awaji Province transferred his loyalty from the Taira to the Minamoto. He loaded two large vessels with commandeered rice and arms, and sailed for the capital. Taira no Noritsune pursued with a fleet of smaller craft, which Rokuro turned to face off the coast near the town of Nishinomiya. Noritsune’s assault was so fierce that Rokuro was forced to retreat to the port of Fukehi.
The stage is set, the battle lines are drawn, and you are in command. The rest is history.

Taira (Red)
> Move first

H&F 6
Rebels (Yellow)
H&F 5
Victory
5 Banners
1 Victory Banner for each Leader or Unit eliminated
(See the Supply Ships special rule)
Special Rules
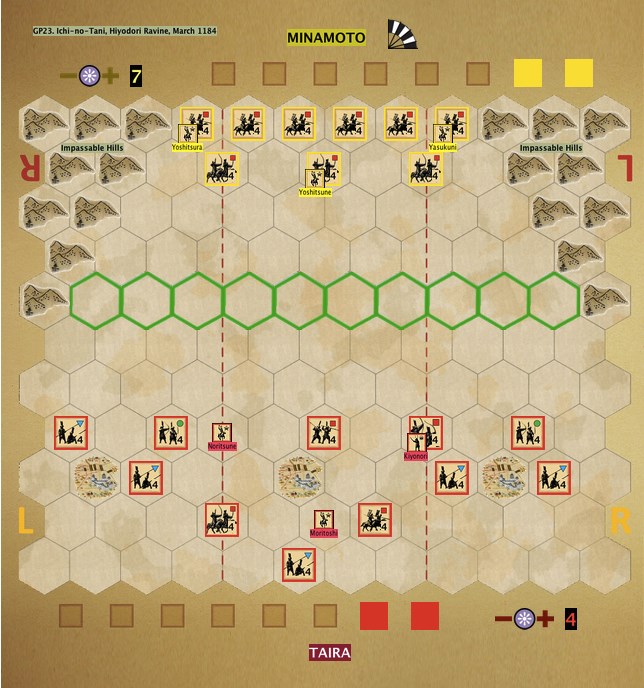
After destroying the Taira garrison at Mikusa, Minamoto no Yoshitsune divided his force. 7,000 men under his senior lieutenant Doi no Jiro Sanehira made a diversionary attack against the western wall of Ichi-no-Tani while Yoshitsune led 3,000 cavalry into the steep hills that formed the northern border of the fortress, and which the Taira had believed were impassable. With the aid of a local guide, Yoshitsune discovered Hiyodori Ravine, a precipitous, treacherous defile that cut through the cliffs directly into the unprotected rear of Ichi-no-Tani. Confident despite the reservations of his men, Yoshitsune ordered a reckless charge down the ravine, and reached the bottom successfully. The Minamoto attacked the surprised Taira and set fire to the camp buildings.
The stage is set, the battle lines are drawn, and you are in command. The rest is history.
Taira (Red)
H&F 4
Minamoto (Yellow)
> Move first
Command Cards 6
Dragon Cards 3
H&F 7
Victory
6 Banners
1 Victory Banner for each Leader or Unit eliminated The Minamoto may not win unless they have 3 units on non-ravine hexes at the same time as they have 6 Victory Banners
(See the Burning Ichi-no-Tani special rule)
Special Rules
Taira no Tomomori led the eastern defense of Ichi-no-Tani against the attack of the main Minamoto army. The Taira were strongly positioned both on the wall and in advance shield wall and abatis fortifications in Ikuta Wood. Individual Minamoto samurai first attacked these positions in demonstrations of personal courage. Minamoto no Noriyori’s senior commander, Kajiwara Kagetoki, then ordered the general assault, led by his sons. In furious fighting, some Minamoto samurai penetrated the fortress but in numbers insufficient to press the attack, and were driven back by determined Taira resistance. With neither side able to gain an advantage, the fighting around the wall and in the wood ground into a bitter, bloody stalemate.
The stage is set, the battle lines are drawn, and you are in command. The rest is history.

Taira (Red)
Dragon Cards 1
H&F 4
Minamoto (Yellow)
> Move first
H&F 4
Victory
6 Banners
1 Victory Banner for each Leader or Unit eliminated.
The Minamoto may not win unless they have at least 2 units on the Palisade hex line or on the Taira side of the Palisade hex line at the same time as they have 6 Victory Banners.
Special Rules
The Minamoto moved south from the capital to attack the Taira fortress of Ichi-no-Tani. Noriyori advanced on Ichi-no-Tani from the east with the main army while his brother Yoshitsune force marched a smaller flanking force of 10,000 to attack from the west. As night came on, Yoshitsune’s division reached the village of Onabara between Ichi-no-Tani and a Taira forward post of 3,000 beneath the western slopes of Mount Mikusa, commanded by Taira no Sukemori. Unwilling to wait and risk the possibility that the smaller Taira detachment might be reinforced, Yoshitsune chose to make a night attack. To light their way, he ordered Onabara set on fire, and all the trees and grassland along their line of march. The Taira vanguard wasstationed to the west, where they expected the Minamoto assault, and the unprepared Taira rearguard were resting in anticipation of battle the following day. With the advantage of surprise and superior numbers, Yoshitsune won a quick victory.
The stage is set, the battle lines are drawn, and you are in command. The rest is history.

Taira (Red)
Dragon Cards 1
H&F 5
Minamoto (Yellow)
> Move first
H&F 8
Victory
5 Banners
1 Victory Banner for each Leader or Unit eliminated
The Taira Command Tent is worth 3 Banners to the Minamoto if eliminated
Special Rules
Knowing that the end was near, Minamoto no Yoshinaka sought out his foster brother and chief lieutenant, Imai Kanehira, hoping to fulfil a childhood pledge that the two friends would die together. Yoshinaka charged down the Kamo River, crossed it and drove through the Eastern Minamoto forces opposing him. Whittled down to half a dozen companions, among them the famous onna-bugeisha, Tomoe Gozen, Yoshinaka met up with Kanehira where he was retreating from the rout at the Seta crossing. Gathering the last of their scattered men at Awazu by Lake Biwa, Kanehira held off the enemy to give Yoshinaka time to escape to a nearby stand of pine trees, where he could commit seppuku. In the fading winter evening light, Yoshinaka’s horse stumbled through the thin ice covering a rice paddy and became mired in the mud beneath. Trapped, Yoshinaka was slain with a single arrow fired by Ishida no Jiro Tamehisa, who took his head as a trophy. Seeing this, Kanehira put his katana in his own mouth, dived from his horse and impaled himself, following his lord in death.
The stage is set, the battle lines are drawn, and you are in command. The rest is history.

Northern Minamoto (Red)
> Move first
H&F 4
Eastern Minamoto (Yellow)
H&F 9
Victory
5 Banners
1 Victory Banner for each Leader or Unit eliminated
(See Death in the Pines special rule)
Special Rules