Victory Results:
 46 %
Record a victory for BOTTOM ARMY  54 %
Total plays 186 - Last reported by LtCol_Theodora_Fusilier on 2024-04-17 19:25:13

Bussaco (Ney's Assault) - 27 September 1810

Historical Background
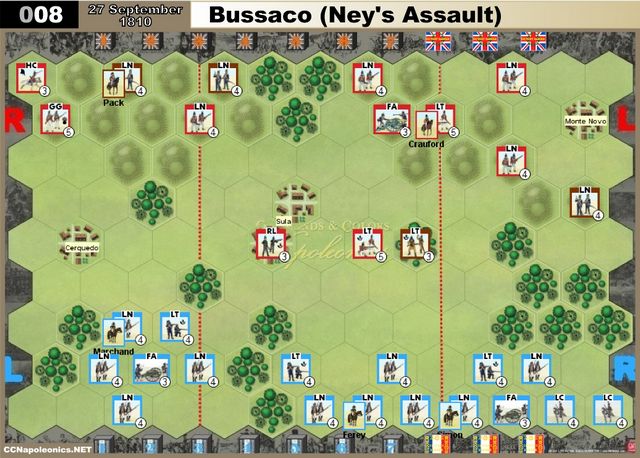
Uncertain how his army of 50,000 troops, composed of equal portions British and Portuguese, would deal with another open clash with the larger French army, Wellington had deployed most of his forces on the reverse slope of Bussaco ridge and awaited attack. Marshal Andre Massena did not let his uncertainty of the Allied position deter him from attacking. He planned a two-phase attack, first with Reynier’s Corps on what Massena believed was the British right flank, followed by Ney attacking the left after Reynier met with success. Massena kept Junot’s corps in reserve, to exploit success wherever it happened. Reynier’s disjointed attacks were beaten back, but hearing the heavy gunfire, Ney assumed Reynier’s men were enjoying success and ordered his attack. Just after 8am, Ney sent Loison’s and Marchand’s divisions against the British left. Loison’s Division forced back a stubborn enemy skirmish line and then advanced to capture a troublesome British battery. Two concealed British light regiments (the 43rd and 52nd) awaited the French. As the French neared the battery, Crauford ordered these troops to stand and pour murderous volleys into Loison’s columns. Within minutes, Loison’s Division was streaming back down the hillside in full retreat. Meanwhile Marchand’s Division had advanced to the foot of the ridge, but after several unsuccessful assaults up the hillside, Ney called off Marchand’s attack. Massena accepted the futility of making any further attempts to storm the ridge and withdrew. Massena’s cavalry subsequently found a road leading past Wellington’s army and when Massena advanced along it, Wellington resumed the retreat to the fortified Lines of Torres Vedras.
The stage is set. The battle lines are drawn and you are in command. Can you change history?


Set-Up Order

Forest 17
Hill 20
Town 4


Battle Notes

British Army
• Commander: Wellington
• 6 Command Cards
• Optional 6 Tactician Cards

Line Infantry Light Infantry Rifle Infantry Guard Grenadier Infantry Heavy Cavalry Foot Artillery Leader   Line Infantry Light Infantry Leader
4 2 1 1 1 1 1   3 1 1

French Army
• Commander: Massena
• 5 Command Cards
• Optional 5 Tactician Cards
• Move First

Line Infantry Light Infantry Light Cavalry Foot Artillery Leader
10 3 2 2 3

Victory
7 Banners

Special Rules
none.

Log in to comment

Riclev replied the topic:
1 month 3 weeks ago
7-3 to the French this time. The British made the mistake (not obvious at the time) of putting the GG into square on the map edge by the village of Cerquedo. The problem was that they couldn't be rescued because of the map edge, and three further units died in an unsuccessful attempt to rescue them. We live and learn.
Riclev replied the topic:
1 month 4 weeks ago
This is a tough battle. The French won 7-5, but it was close. The opening skirmishes saw the British advanced light units scattered - the rifles in full retreat, the Portuguese light reduced to one block and in full flight, and the British light destroyed in exchange for French General Simon.

Meanwhile on the British right flank, the guards, Portuguese line and heavy cavalry all advanced unhindered by the French due to a lack of cards on the left. Most French cards were in the centre so they advanced and destroyed the rifles, the British lights and a line unit and forced General Crauford to scurry off the map. A French cavalry charge eliminated the artillery, making the score 6-4. The guards eliminated another French line unit on their left but French sharpshooting destroyed the remaining Portuguese line unit, scoring the required 4 hits from 8 dice - a little lucky. The game could have gone either way. Our group will definitely play it again.
Pevans replied the topic:
2 years 8 months ago
This week Evert and I reach scenario 8, Bussaco (Ney's Assault), in our play-through of the base game scenarios. I take the French first, faced with another line of British and Portuguese units on the reverse slope of the hills on their side of the battlefield and a long slog acros the board for the French forces. At least there are a few advanced Allied units to enliven the early stages.
So the French start their advance. An initial success was some Light infantry moving into the woods left of centre. Their shooting pushes the Rifles back in the town of Sula. However, this leaves room for the British Light that was in the open to sprint into the town. A second British Light infantry moves up to support the Portuguese Lights in the wood right of centre.
The French Lights demonstrated their marksmanship again, damaging the British Lights now in Sula. Good job they weren't in the open.
The British advance their left wing [Assault Left] towards the woods that separate the two armies here. The French respond [Counter-attack] by advancing their own troops, getting some of their Light cavalry onto the battlefield. One British Line infantry goes a bit too far and is devastated by more accurate fire from French Light infantry. The remnant is lucky to escape the following cannonballs of the French artillery. This prompts the British left wing to retire back to the hills.
A French advance right of centre sees two Line infantry push the Portuguese Lights out of the woods, starting a continuing engagement. This ends with a French Line infantry eliminated, the other retreated and British Lights occupying the woods. [0:1 to the Allies]
Left of centre, more accurate shooting from the French Lights chases the badly damaged British Lights out of Sula to the woods behind.
A more concerted French advance in the centre [Force March] sees two more Line join the exchange right of centre with the unit already there taking the woods from the British Lights. Left of centre, the French Light infantry moves towards Sula and forces another forward British unit to retreat.
The engagement centre right continues with the French Light cavalry now joining in. Musketry finishes off the Portuguese Lights. The British Lights scatter in front of the cavalry and are ridden down. The cavalry charges on to force a French Line into square. [2:1]
However, this puts the cavalry under the muzzles of the British artillery and they are blown away. [2:2]
A lull sees both sides re-group, enlivened by the Rifles' long-range sniping. However, they run out of ammo and have to fall back to find more. [Short Supply]
The French right wing advances a bit further, while the Grenadier Guards and Heavy cavalry get into position on the British right.
A British Line moves forwards in the centre and damages an already battered French Line infantry. The Brits provide a target for the second French Light cavalry, but the horsemen bounce off the square that forms. The infantry comes out of square to drive off the cavalry with musketry, but they return straight away and the infantry goes back into square, taking no casualties from the French Line that moves into range.
An artillery duel starts on the right, then the French Line lets go a full volley [Fire & Hold] at the square, destroying the entire unit [5 dice, 4 hits!]. [3:2]
French infantry advances further on their extreme right, looking to outflank the Allies on the hills.
Then the British Heavy cavalry charges [Cavalry Charge] the massed French infantry in front of them (extreme left of the French lines). Taken by surprise, the unit that they attack fails to form square, but survives the attack to inflict some damage on the cavalry. Then they move left into the woods, allowing three infantry units and the artillery to open up on the cavalry. They have some effect, but what's left of the cavalry is able to retire into the village of Cerquedo behind them and then retreat further.
Musketry from the French left of centre pushes some Portuguese infantry back while the artillery duel continues. Then the French artillery runs out of ammo and pulls back. [Short Supply again]
The French launch the right flank attack, a Line infantry marching up onto the hills and wiping out [5 dice, 4 hits ... again] the Portuguese infantry they meet - the suppporting units have nothing to shoot at. [4:2]
A half-strength British Line attacks the victorious Line unit, causing hefty casualties, but being eliminated by the counter. [5:2]
The Grenadier Guards finally move into the action on the Allied right, only to take heavy casualties from French fire. The French Light infantry in Sula finish off the British Light behind the town and the French Lights on the extreme right remove what's left of a British Line sheltering in the village of Mondo Novo. [7:2]
It was a tougher fight than that scoreline suggests, leaving the French forces scattered across the battlefield and the Allies battered. How will the return match go?
LARS replied the topic:
3 years 2 months ago
Pack’s attack with the Guards routes Marchand. A major triumph for Wellington 6-1.
Valvorik replied the topic:
4 years 9 months ago
We played twice, as British I beat French 7:1 and as British my friend beat French 7:6

I was quite lucky first time, the Light Foot dominated the centre of field to great effect, and French were mostly defeated there. The second game was more even across flanks with the British Guard Grenadiers coming up via La Grand Manoeuvre, So overall I came out ahead across the games.
General-Lebrel replied the topic:
7 years 9 months ago
Good scenario, balanced and with chances for both sides. Chronicle of the game: batallitasrobervictor.blogspot.com.es/20...lt-27-september.html
Pevans replied the topic:
9 years 2 weeks ago
Played this scenario against John Mitchell on 25th March 2015.

I played French first. Pushing forward in the centre forced the Allies out of their advanced positions - and a lucky die roll gave me my first banner. The two armies manoeuvred into pretty much two lines across the battlefield. The French now advanced both flanks. On their left, the Grenadier Guards countered and were beaten back. The Heavy Cav advanced and came under musket fire that damaged them, but put a unit into square. The British counter on the French right chased off the cavalry, but took casualties. The French countered, taking out the infantry and allowing their cavalry out. They forced some British inf into square, but got mauled. A French attack on the left took out a unit and a leader, but the Brits rallied. A final flurry in the centre saw the French win 7:5, the battlefield strewn with damaged units.

Reversing the roles, the scenario again started with a French advance in the centre, removing the advanced Allied units - not least because I chose to retire. A French advance on their left got a bloody nose from the Grenadier Guards. A strong advance in the centre saw the French destroy the British artillery, but take some damage themselves. More manoeuvring followed with the final skirmishing on the French left giving them the win 7:4. This time, however, both sides had plenty of full-strength units and had retained their formations. And John won the encounter 12:11, damn his eyes! ;-)
General-Eble replied the topic:
9 years 11 months ago
This was one of the closest games of CCN I have ever played!
Final result was a French win 7-6 after the Allies got an early 4-0 lead.
Early French advances in the centre were shredded by musket and rifle fire from the Allied light troops.
Slow advances on the French left got similar treatment and a timely Rally draw and play by the Allies made it harder for the French to finish off depleted units. The Allies then got a fifth banner before the French finally "got off the mark".

Timely First Strike cards by the French helped stave off defeat when the Allies had isolated units ripe for the picking.
A couple of closely played French Bayonet Charges then evened the score and then gave the French the lead 6-5.

Despite some counters by the Allies poor musketry let the French off the hook (6-6) and they finally overwhelmed the centre of the Allied line to get the win (7-6).
Mark-McG replied the topic:
11 years 2 months ago
Ladder #6 match
14 matches played
6 French wins
8 Allied wins

Recently Played

Map NamePlayed onUser
109 Talavera - Spanish Flank (28 July 1809) 2024-04-29 13:59:23 Mark-McG
512 Gohlis (17 October 1813) 2024-04-28 01:15:34 GG
403 Jena - Early Morning (14 October 1806) 2024-04-27 21:23:17 LtCol_Theodora_Fusilier
402 Saalfeld (10 October 1806) 2024-04-27 21:23:14 LtCol_Theodora_Fusilier
107 Alcañiz (23 May 1809) 2024-04-27 20:42:11 ReadyFreddie
401 Schleiz (9 October 1806) 2024-04-27 01:12:06 LtCol_Theodora_Fusilier
211 Borodino - Village of Borodino (7 September 1812) 2024-04-26 22:03:24 RiverWanderer
605 Austerlitz (2 December 1805) Russian Guardsmen 2024-04-26 03:14:39 GG
206 Eylau - 8AM to Noon (8 February 1807) 2024-04-25 21:20:31 LtCol_Theodora_Fusilier
EPIC12 Laon (9-10 March 1814) 2024-04-25 10:55:46 Hawkmoon