Victory Results:
 44 %
Record a victory for BOTTOM ARMY  56 %
Total plays 178 - Last reported by LtCol_Theodora_Fusilier on 2024-04-17 19:25:08

Bussaco (Reyner's Assault) - 27 September 1810

Historical Background
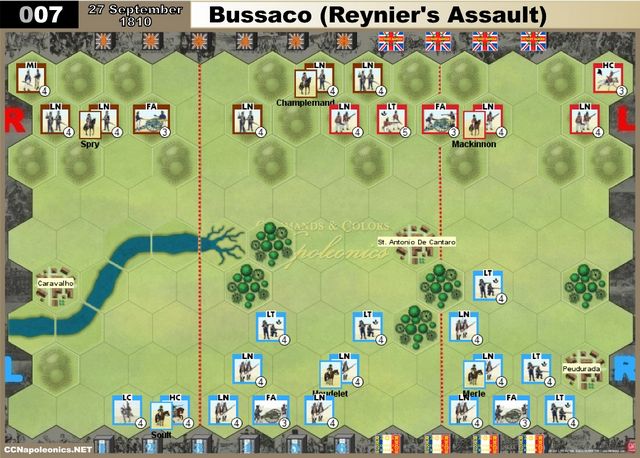
Retreating towards Torres Vedras, the Duke of Wellington’s army of 25,000 British and the same number of Portuguese halted at Bussaco to make a stand along the crest of Bussaco Ridge and check the advance of Marshal Massena and the French army of Portugal. As Massena’s army of 65,000 approached the British position, he was uncertain of the exact disposition and strength of the enemy, for Wellington had adopted his favorite tactic of hiding his true strength from the enemy by deploying his forces on the reverse slope of the ridge. Massana’s army was deployed on the 26th with Ney’s Corps on the right, Junot’s Corps in the centre and Reynier’s Corps on the left. Massena, rather than avoid battle, ordered Major-General Jean Reynier’s II Corps to attack the centre of the ridge, which he mistakenly believed was the British right flank. Once the II Corps attack showed some signs of success, Massena planned to launch Ney’s corps at the British left while Junot’s Corps stood in reserve, ready to exploit. Reynier’s troops moved forward in the early morning mist of the 27th. Heudelet’s Division was the first to come into contact. Before long, they were brought to a standstill from Anglo-Portuguese infantry fire, supported by artillery. Merle’s Division, veering away from Heudelet in the mist, had early success and occupied part of the ridge, but the French came under flanking fire, and were then thrown back by the shock of a British infantry charge. The fighting in this sector of the battlefield was effectively at an end. Hearing gunfire, Ney assumed Reynier’s men were enjoying success and ordered his attack.
The stage is set. The battle lines are drawn and you are in command. Can you change history?


Set-Up Order

Forest 5
Hill 28
River 3
RiverBend 2
RiverEnd 1
Town 3


Battle Notes

British Army
• Commander: Wellington
• 6 Command Cards
• Optional 6 Tactician Cards

Line Infantry Light Infantry Heavy Cavalry Foot Artillery Leader   Line Infantry Militia Infantry Foot Artillery Leader
3 1 1 1 1   5 1 1 2

French Army
• Commander: Massena
• 5 Command Cards
• Optional 5 Tactician Cards
• Move First

Line Infantry Light Infantry Light Cavalry Heavy Cavalry Foot Artillery Leader
7 5 1 1 2 3

Victory
6 Banners

Special Rules
The stream is a fordable.

Log in to comment

Pevans replied the topic:
2 years 8 months ago
And now the return match between me and Evert and my turn to take the Allies. I'm rather in favour of Wellington's strategy of sitting on the reverse slope of the hills and letting the enemy come to me. Of course, it does depend on having the right cards at the right time (or orders getting through to subordinates who then obey them in Wellington's case).
The battle was slow to start - the French forces need time to move forward en masse. Evert flung some French Light infantry into the village of San Antonio de Cantaro and the woods in the centre. In response, British Light infantry moved forward and drove the French out of the village with some accurate musketry.
A swift British re-deployment ["La Grande Manoeuvre"] saw their artillery into the centre of the line with Portuguese infantry joining their British comrades behind.
The French advance continued in the centre and on their right, while the Allied artillery shelled the advanced Light infantry in the central woods, eventually eliminating it [a "Bombard" card helped]. [1:0 to the Allies]
Another French Light unit moved forward on the right wing, came under fire from the British Lights and took cover in the village. Further shooting pushed what was left of the unit back out of the village towards the centre.
The French forces were now nicely positioned on the right wing with General Heudelet's troops advancing in the centre. This brought both French artillery units into play and they battered the British artillery. [Evert's turn for a "Bombard"] However, the guns had the last laugh, finishing off the French Light infantry by the village. [2:0]
More French infantry moved into the village as their cavalry occupied the woods left-of-centre. The British guns retired, though still with a line of sight to the cavalry.
Time for the French push on the right: infantry moved forward and engaged the British troops on the hills. The British Heavy cavalry took casualties and retired, but returned to engage the French with the support of British Line and Light infantry under General Mackinnon. The French infantry refused to form square and destroyed the cavalry [some lucky dice]. In return, one French Light infantry took heavy casualties and retreated into the woods. [2:1]
The French stood their ground and a full volley, with artillery support, destroyed one British Line unit and damaged another. [2:2]
Having worked their way into the centre of the battlefield, the French Light cavalry stormed into the hills to finish off the British artillery and put a Line unit into square. [2:3]
The Allied infantry closed in to deny the cavalry any retreat and blew them away. [3:3]
There was a lull in fighting as the French continued to advance on their right while what was left of the British left retired.
General Heudelet led the French forward in the centre, provoking a similar advance by Portuguese forces under General Champlemand and a desultory exchange of fire. Until the French artillery moved forward and was promptly removed by the British Light infantry and the Portuguese. [4:3, my lucky dice]
As the French continued to advance on the right, Champlemand finally brought the Allies off the hills to attack in the centre, taking out a French Line. [5:3]
The French response included the Heavy cavalry under General Soult. The Portuguese Line hit by the cavalry went into square only to be finished off by the French infantry. [5:4]
Robust attacks from the Allies pushed the French back, allowing room to manoeuvre. Clear shots from the hills further depleted the French Light infantry sheltering in the village where their destruction was completed by the Portuguese under Champlemand. [6:4]
It was a tough, attritional battle, but almost nothing happened on the French left/Allied right - I had virtually no right flank cards and Evert very few on the left (though he was able to get the French cavalry into the centre early on). Evert also suffered from a plethora of "Scout" cards, reducing his options.
Pevans replied the topic:
2 years 9 months ago
Time for Evert and me to play scenario 007 As has become traditional, I took the French first.
It was a slow start to the battle. The French moved their artillery forward, supported by Light infantry, while the Allies moved troops to the front of the ridge line.
The first action saw the French artillery in the centre force a British Line infantry to pull back.
A lull followed until the British Heavy cavalry, now at the front of the hills on the extreme left of the Allied force, spotted the advancing French infantry and charged. Taken by surprise, the French Light under attack failed to form square and were routed. [5 dice, 4 hits - lucky!] Even worse, General Merle, who had taken command of the Lights as they advanced, was killed [more luck]. (0:2 to the Allies.) The British cavalry continued their charge into the middle of the French infantry, but were halted by a Line unit forming square.
The French infantry and artillery opened fire on the exposed cavalry, but the British horsemen retired in good order, taking refuge in the village of San Antonio de Cantaro.
The Portuguese troops on the Allies' right wing had been gradually advancing and General Spry led a Line infantry up to the brook. Time for the French cavalry to charge but Spry's men quickly formed square as the horses splashed through the water towards them.
Back on the Allied left flank, General Mackinnon ordered his two Line infantry forward to support the cavalry in the village. The French infantry double-timed forward [Force March] to engage Mackinnon's force with their muskets and inflicted substantial damage on one unit. Mackinnon's men returned the favour, equally damaging a French Line. The remaining French fixed bayonets and charged [Bayonet Charge], eliminating the battered British Line and forcing Mackinnon back to the hills with his remaining men. (1:2)
On the French left their cavalry attacked again. The Lights routed the Portuguese militia on the extreme right of the Allies' positions, while General Soult led the Heavies against an exposed Portuguese Line infantry towards the centre. The experienced troops quickly went into square to hold off the cavalry. (2:2)
Musket and artillery fire from the other Allied troops on their right flank inflicted casualties on the French Heavy cavalry. In return, the Heavies all but destroyed the Line infantry under Spry and the Lights did the same to the last Portuguese Line on the Allied right.
The French Heavy cavalry retreated under cover of the muskets and cannon of their Light infantry and artillery in the centre, but didn't move fast enough to escape the Allied fire. At the same time, advancing British troops in their centre left removed the forward French Line infantry threatening Mackinnon's position [5 dice, 4 hits. Again]. (2:4)
The French Light infantry that had covered the retreating Heavies eliminated the Portuguese Line responsible for the cavalry's demise. (3:4)
Clever manoeuvring [La Grande Manoeuvre] allowed a mixture of British and Portuguese infantry to swing from the centre behind the advanced French Light infantry engaging Mackinnon to attack the below strength French units at the rear of the French right.
However, the British tactics failed to take account of the French artillery which, with the battered Line infantry, eliminating the British Light infantry among the attackers. On the French left, the Light cavalry engaged what was left of the Portuguese Line they'd hit earlier. The infantry formed square, but still fell to the attacking sabres. And, in the centre, more musketry from the successful French Light infantry destroyed what was left of the Portuguese Line infantry under General Champlemond. (Suddenly 6:4 and a French victory)
That was a tough fight and an enjoyable game. The return match will follow.
LARS replied the topic:
3 years 2 months ago
Heudelet wins the laurels. A surprising 6-1 (actually 7-1) French win. A very careful approach by the French using artillery and terrain. Two consecutive Bayonet Charges by the French finished the day with four Banners falling on the last card.
megavolt replied the topic:
4 years 3 months ago
Played, pretty close game 6-4 french. Managed to cut off the left forces from being effective.
Valvorik replied the topic:
4 years 9 months ago
We played again, and this time again, French 6 British 5 (having switched sides so it's a tie as a contest of players).
Valvorik replied the topic:
4 years 10 months ago
French win 6:5 - the battle resolved mostly on the French right/British left, whittling back and forth until the French brought up troops and managed to Bayonet Charge. An early British cavalry charge did take out the French right flank artillery, at the cost of the British Heavy Cavarly.
Valvorik replied the topic:
5 years 2 weeks ago
Two very close fights (a friend and I, switching who plays what). British won 6:5 and then 6:4. One battle it was all on the French right flank (mostly against the British) and second time almost all on the French left flank against the Portuguese - who stood up well enough.

Could have been anyone's game on the 6:5 and on the 6:4 I got luck being attacked by a heavy cavalry unit of 1 remaining block of Portuguese foot while in square (1 block), taking out the heavy cavalry and then also taking out the leader with them.

We are loving this game
LNAGary replied the topic:
7 years 7 months ago
A well balanced and interesting scenario, however if you're playing with a beginner, it's probably best he plays the French as the coalition player has a lot of manoeuvering to do, from what I've seen in the last game I've played.
GG replied the topic:
7 years 11 months ago
Last played with a french attack in the middle with most of iNF regrouped plus 2 Forced March and a Bayonette charge but the dice didn't want: French lost 1/6 ... !
Pevans replied the topic:
8 years 2 months ago
Played this on 27th January with my regular sparring partner, John Mitchell.
Playing French to begin with, I spent some time moving the troops forward slowly, especially putting the artillery where I could pepper the British positions. Demonstrations with the cavalry on left (I had some left flank cards to work through) kept the Portuguese in place on the British right, though I took some casualties from their artillery. Once my guns were in position, they opened up and battered the advanced British infantry unit on my right. With this out of the way, a rapid advance (aka the Grand Manoeuvre card) put several French infantry units on the hills in its place. A sustained attack (two Forced Marches and a Bayonet Charge, plus a pause for a Stand and Fire) demolished the British left and half the centre for a 6:1 victory.
Swapping sides saw John launch an initial French attack on his left with the cavalry. This took out the Portuguese artillery in exchange for the heavy cavalry. The French then advanced in the centre where allied troops had moved to the front of the hills. A bayonet charge pressed the attack home and removed the British artillery. The French took casualties, but were able to retreat several battered units in the face of the British counter attack. Back on the British right, the French cavalry took out the Portuguese militia, but eventually fell to the guns of the remaining Portuguese unit. French forces moved up in the centre and the artillery started shelling the British and Portuguese, forcing then to fall back. The French infantry could then move up unmolested. A redeployment of the Portuguese across the river on the right allowed them to take on the few French units holding the French left. This was too late, though, as a fierce French attack on the centre punched through the remaining British to take the win 6:5.
Two out of two for the French and an overall win for yours truly 11:7.
Mark-McG replied the topic:
11 years 2 months ago
Ladder #5 match
12 matches played
8 French wins
4 Allied wins