Victory Results:
 58 %
Record a victory for BOTTOM ARMY  42 %
Total plays 173 - Last reported by RiverWanderer on 2024-09-03 10:42:29

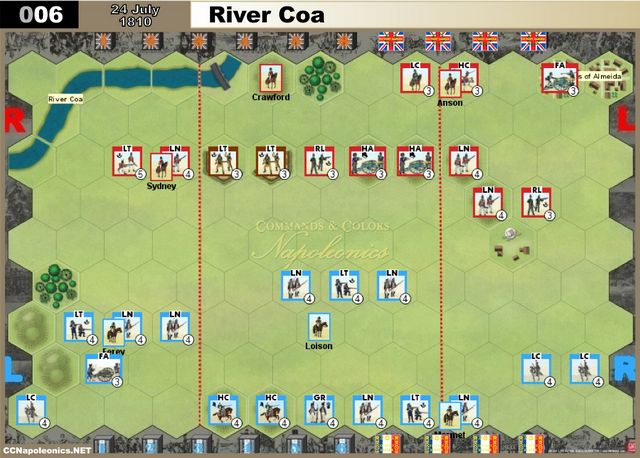
River Coa - 24 July 1810

Historical Background
After eliminating the garrison at Ciudad Rodrigo, Marshal André Masséna ordered Marshal Ney’s 6th Corps to advance on the fortress of Almeida. Rather than retreat and cross the river as ordered by Wellington, Crauford courted disaster and chose to hold his bridgehead. Crauford and the French both wanted to control the narrow stone bridge which was the only way to cross the Côa for several miles.
In the early hours of July 24th, Ney pushed forward his entire force against Crauford’s outnumbered Anglo-Portuguese Light Division. The first French attacks by Loison’s Division were checked by intense musket and rifle fire. As the fight in the center raged, French light cavalry braved the fire of the guns of Almeida and charged forward, routing the left flank of Crauford’s line.
With his line in danger of being rolled up, Crauford ordered an immediate retreat to the bridge. The Portuguese Cacadores and guns were first to cross the bridge while several British battalions held the French at bay. Soon these British units also fell back in good order across the river. Desiring a complete victory, Ney launched three disastrous assaults across the stone bridge, but all attempts failed to dislodge the British. That night Crauford withdrew toward Pinhel, leaving Masséna to lay siege to Almeida.
The stage is set. The battle lines are drawn and you are in command. Can you change history?


Set-Up Order

Entrenchments 2
Forest 2
Hill 9
River 3
RiverBend 2
RiverBendBridge 1
Town 2
TownWindmill 1


Battle Notes

British Army
• Commander: Crauford
• 4 Command Cards
• Optional 4 Tactician Cards
• Move First

Line Infantry Light Infantry Rifle Infantry Light Cavalry Foot Artillery Horse Artillery Leader   Light Infantry
3 1 2 2 1 2 3   2

French Army
• Commander: Marshal Ney
• 4 Command Cards
• Optional 4 Tactician Cards

Line Infantry Light Infantry Grenadier Infantry Light Cavalry Heavy Cavalry Foot Artillery Leader
6 3 1 3 2 1 3

Victory
6 Banners

Special Rules
Any ordered Anglo-Portuguese unit (regardless of strength) that exits the battlefield from the bridge hex will count as a Victory Banner for the British army. Exited leaders do not count for British Victory Banners.

Anglo-Portuguese units cannot exit off the bridge hex when forced to retreat due to ranged or melee combat. Units must halt or remain on the bridge hex and lose one block for each retreat hex that cannot be taken. If the unit is eliminated, the French player receives one Victory Banner.

The River Coa is impassable except at the bridge.

The Fortress of Almeida is treated as a town. In addition, Anglo-Portuguese units on a Fortress of Almeida hex may ignore one flag.

Log in to comment

The Iron Duck replied the topic:
6 months 1 week ago
I played this scenario with my wargaming partner at my Wargames club. First time round I played the allies. The French infantry in the centre rapidly advanced with a bayonet charge and pushed back the Portuguese light infantry while the French infantry closed on my right assaulted my British light and line infantry. Despite some damage to my units I was able to stem the French tide and managed to extract a couple of units over the bridge. The French then swept round my right flank and won the day 6 to 3.

Playing the same scenario as the French, I launched an assault on my left with my infantry as all my order cards were for that flank. I had good cards throughout the game and good dice rolls and pushed back the British Line and light infantry who with their backs to the river lost additional stands due to retreat flags. I also annihilated a British horse artillery battery that had come off the hill to challenge my infantry in the centre. I did significant damage with two fire and hold cards, then played an elan card which wiped out the British units on my left as well as the Portuguese light infantry in the centre. The allied units fought back heroically but failed to do much damage and soon I was winning 5 victory flags to 0 over the allies. Victory was then sealed when my French light cavalry on my Right flank charged and caught the British rifles unit near the windmill out in open ground - the rifles lost one stand but also retreated allowing my cavalry to take ground and attack again finishing them off. Final score was 6 / 0. Vive l'France. Vive l'Emperuer, Hail Marshal Ney!

Contemplating the games both me and my gaming partner agreed that for the British to win they need to hold off and defeat assaults by the two nearest French infantry forces (those in the centre and on the British left) - this would buy vital time to enable the allies to evacuate units off the bridge as the bulk of Ney's forces are on the French base line and will take time to close on the British. In both our games though, through having good command and tactic cards, the French in the centre and on the British left flank were able to seize the initiative and close with the allies swiftly pushing them back and causing additional losses when the allies could not retreat due to the river/other allied units or the British base line. Cards like bayonet charge and force march play important roles in this game where both sides are in a race against time (The allies to leave the board via the bridge and the French to stop them.)

One point of contention when we were discussing a retreat was whether the bridge could be entered from an adjacent hex - we decided that the bridge hex can only be entered from the hex that the bridge leads on to. If anyone can clarify this would be appreciated.
Pevans replied the topic:
3 years 1 month ago
Time for my return match with Evert and my turn to be the Allies.
The first action was some gunnery ("Hold & Fire") from the British centre-left that pushed back the advanced French units in front of them.
The French advanced their left flank to engage the British right with some musketry while one of the Portuguese Light infantry deserted the field works to be first to escape the battlefield. 1:0 to the Allies.
Counter-volleys from the British right were met with a Bayonet Charge that battered the British Light infantry while the Line sent their attackers packing. A French Line on their right wing also charged and annihilated the Rifles on the British left. 1:1
Musket volleys from the British right missed completely and the French charged again (another "Bayonet Charge"!) to finish off the Lights and force the other Portuguese unit out of the field works. 1:2
While the Portuguese escaped, the British Heavy cavalry (which had worked its way across the battlefield) attacked the French unit occupying the field works and took casualties for its pains (Evert had a "First Strike"). 2:2
The French infantry polished off the Heavy cavalry only to fall to the combined fire of the Rifles and Horse artillery as a British Line escaped across the bridge. 4:3
On the French right, a Line infantry and Light cavalry combined to destroy a British Line infantry unit while French Lights occupied the bridge. 4:4
The soldiers on the bridge took a pasting from the Rifles as the British Light cavalry moved up. However, French Light cavalry smacked into the British horsemen, forcing them back into the woods and finishing them off amongst the trees. 4:5
The Rifles completed their demolition of the French troops on the bridge and then made their escape: 6:5
That was another tough fight as the exiting Allied units weakened the flank that needed to defend the bridge - and the French just kept pushing forward on their left to attack it. It was a win for the Allies both times, with the aggregate score tied 11:11.
Pevans replied the topic:
3 years 2 months ago
Evert's and my progress through the base game scenarios reached this one this evening with me taking the French.
An initial advance on the British left put the Rifles into the windmill, from where they then shot up the closest French Line infantry to good effect.
The French moved up their heavy cavalry in the centre and then charged, the Heavies hitting the end of the British right flank while the Lights attacked the Rifles in the windmill. The plucky Brits stood their ground, leaving three battered units that then attacked, forcing the cavalry back.
The French Light cavalry finished off the Rifles in the windmill, only to be chased away by advancing British Line infantry. 1:0 to the French.
A second attack by the French Heavy cavalry on the battered infantry at the end of the British right flank forced them both into square. Musketry from the Portuguese Light infantry and the central Rifles inflicted casualties on the cavalry and drove them off.
The French started bringing up their main force in the centre only to find the Portuguese Light infantry coming to meet them. French line units took on the Portuguese, damaging one and finishing off the other at the same time as superb shooting [4 hits in 6 dice] from the British Line in the windmill destroyed a French Line infantry. 2:1 to the French.
The second Portuguese unit bit the dust, their attacker then forced back by the Rifles. 3:1
The two right-flank British infantry finally came out of square, the more damaged Light unit retreating while the Line advanced to finish off a French Line while another one disintegrated under fire from the British Horse Artillery in the centre. 3:3
This finally provoked some activity from the French left flank under Ferey, making a Bayonet Charge on that advanced British Line unit. It survived and retired into the fieldworks while the Horse Artillery continued to Bombard the French centre.
Ferey pressed his attack, storming over the field works to finish off the British Line unit, General Sydney falling with his command. 5:3
What was left of the British right flank Light infantry scampered over the bridge to leave the battlefield. 5:4
The two French Light cavalry that made up the whole of the French right flank charged the British artillery that had gradually worked its way forward from Almeida, but completely failed to inflict any damage. They were attacked by the British Heavy cavalry, eliminating one unit, while the British infantry in the windmill combined with the artillery to drive off the other. 5:5
A second Bombard from the Horse Artillery provided the coup de grace for a quarter-strength French Line infantry in the centre to win the battle for the Allies 5:6.
This was a tough battle, not least because Evert only realised he could earn banners for exiting units late in the game - while my handicap was the preponderance of all-but-useless right-flank cards in my hand. I look forward to the return match.
RiverWanderer replied the topic:
3 years 4 months ago
The Vassal module, up to Version v3.42, has an error, turning the centre French LT (as shown in the official scenario and on this page) into an LN.
LARS replied the topic:
3 years 7 months ago
A bizarre scenario which ended with the British Horse Artillery chasing down the last block of Loison’s debacle of an attack. Only two Portuguese blocks made it off the board for 1 Banner and only 5 British infantry blocks were not eliminated, yet the British win 6-5.
Pevans replied the topic:
3 years 10 months ago
For my latest day of games with nephew Tom we added in the Generals, Marshals & Tacticians expansion, so we could use the Tactics cards and the expanded Command deck. I drew the French for our first play. My initial move was to attack with the Light Cavalry on my right flank. The intention was to force some of the British infantry into square, reducing Tom's options (players lose a Command card for each unit in square). However, Tom declined to form square and the cavalry finished off two infantry units (including one of the rifles that I was particularly concerned about). Though this did leave them in front of the British artillery...
Tom decided that the way to win was to get units across the bridge and used a "Bayonet Charge" card to evacuate his first - and start a traffic jam on the approach to the bridge. I played "Forced March" to move up the main French force in the centre, starting to damage the British units even as they disappeared behind the hills towards the bridge.
The British cavalry moved up on my right, their Heavies taking out one of my Light Cavalry units. At the same time, Tom got another two units off the board - that's 4:2 to the Allies. A "Grande Manoeuvre" card let me shift several units onto the now empty hills overlooking the bridge. But Tom used a "Leadership" card to get two more units over the bridge to win 6:2. It felt closer than that scoreline suggests, though.
Re-playing as the other side saw my British manoeuvre with a "Bayonet Charge", shifting units closer to the bridge, while the French attacked on my right. I managed to get one unit off the board while my light infantry tried to hold up the French advance on the right, despite being forced into square by the French cavalry. They fell, but I was able to use "Grande Manoeuvre" to get the two Portuguese infantry off the board with British line infantry taking their place in the fortifications.
The French continued to advance, with a "Bayonet Charge" starting a pitched battle in front of the bridge. However, the score was still 3:1 to me at this point.
But the fighting went in favour of the French and they siezed the bridge before finishing off enough units to win 6:4. And that's 12:6 to Tom in total. Oops! (Full report - with photos - on BGG: boardgamegeek.com/blogpost/109906 )
Napoleons Triumph replied the topic:
7 years 1 month ago
Here is a Battle Report
kirkoa replied the topic:
7 years 8 months ago
Used this scenario to teach oldest daughter how to play the game. I was the British and my first card I fired the Rifles in the center at her light infantry, taking one down and forcing them to retreat. Her next move she moved a line inf over and fired at the RL, rolling 4 inf hits on the dice. Needless to say, I lost 6-2 but she liked the game. Lost the battle but won the war!
ozzie replied the topic:
8 years 4 months ago
The French got a fantastic hand and rolled over the British lines without losing a unit. The British got one unit off the board whilst the rest just stood around or got beaten up. A terrible run of cards for the British whilst the French had a card to counter everything they played.
howlingfang replied the topic:
10 years 5 months ago
Played solo today. British victory 6:2. Brits drew bayonet charge and forced march which allowed them to exit three units in two turns. I think I was surprised to hear the number of French victories reported as I felt it was unbalanced in favour of the Brits. I think I'm still not very good at attacking so this is probably why I felt it was a tough slog for the French.
knightfiend replied the topic:
10 years 8 months ago
played this on line last night on Vassal.
British victory 6-5 but very exciting. La Grand manoeuvre was the French downfall
along with a final British Cavalry charge - off the map to exit 2 units for the win!
David :)
General-Eble replied the topic:
10 years 9 months ago
Played it twice tonight, once as each side against the same opponent. 2 French victories, first won 6:3 the second 6:4.
The second game was much closer with the British ready to exit 2 units for victory when a French cavalry charge against one of the ready to exit units forced it into square and stopped it.
Brits could have exited the other unit to make the count 5:5 but used the move to try and force the cavalry off from the square. The plan worked but then the French had a card that kept the attack in the centre going and they took the last banner to win.
Seems pro French to me. In the 2 games LGM only came up once and that was for the French. They used it to surround the Rifles near the windmill and threaten Almeida.
An LGM for the British in the middle of the second game would certainly have given them victory early!

B)
RovinJosh replied the topic:
11 years 4 months ago
Played this last night, as the British, and was intrigued by scenario - unfortunately Le Grand Maneouvre Card spoiled what was looking like an interesting challenge - Brits won at a canter.

My advice - remove LGM, or make the Brits use the alternative use if they draw it.
Mark-McG replied the topic:
11 years 6 months ago
Ladder #1 match
8 games played
5 French wins
3 Allied wins
Mark-McG replied the topic:
12 years 3 months ago
Played this one this evening. British drew LGM is opening hand and had 3 units off map (i.e. 3 banners) before the French even played a card. LGM wins this scenario for the British, and enhances my view that withdrawing Exit VP don't work well in C&C.

:angry:
Achtung-Panzer replied the topic:
13 years 4 months ago
I played this scenario solo twice today. The first was a French victory (6:4) thanks to an attack on their left and then centre whcich forced 2 British generals to escape the battlefield!

The second was a British victory (6:3) where the centre HA units destroyed the advanced French infantry and two Cavalry Charge cards swept the French LC from the field.

Both games were great fun and I really like this scenario where the small hand of cards make squares very important.