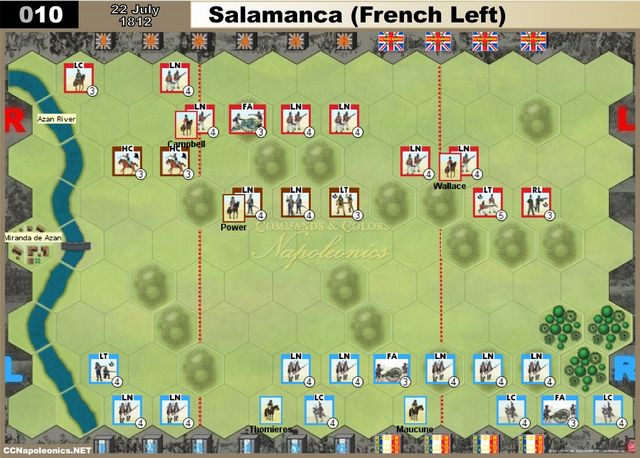
SALAMANCA (Attack on the French Left) - 22 July 1812
Historical Background
Following the capture of Badajoz and Ciudad Rodrigo, Wellington advanced into Spain where Marshal Marmont’s Army of Portugal awaited him. The two armies sparred for position, each looking to catch the other at a disadvantage. When Marmont threatened the British supply lines, Wellington began a retreat, but still looked for an opportunity. On July 22nd, Marmont found a British force in plain view on a ridge and great clouds beyond the hills to the south. Thinking this was just a rearguard, Marmont made a fatal mistake. He extended his army to try and flank the defenders and catch up to what he thought was Wellington’s fleeing main body. It turned out the “rear guard” was the left flank of Wellington’s army (the clouds were from the baggage train) and Marmont’s army became badly strung out and vulnerable before the hidden allied main body. Wellington gave a “whoop” of delight and set several combined arms counterattacks in motion, starting with an attack by his brother-in-law, Edward Packenham’s 3rd Division against Thomiere’s lead division. Still in march order, Thomiere’s troops were quickly routed. Two additional British divisions joined the attack and the two remaining left flank French divisions also retired in disorder. With Marmont wounded, command fell to General Clausel, who organized a truly effective combined arms attack that shattered Cole’s British Division. British reserves, however, were close at hand and soon Clausel’s forces were also in retreat. The stage is set. The battle lines are drawn and you are in command. Can you change history?
|
|
Set-Up Order
|
Battle Notes
British Army
• Commander: Wellington
• 6 Command Cards
• Optional 6 Tactician Cards![]()
![]()
![]()
![]()
![]()
![]()
 |
 |
 |
 |
 |
 |
 |
 |
|||
| 6 | 1 | 1 | 1 | 1 | 2 | 2 | 1 | 2 | 1 |
French Army
• Commander: Marmont and Clausel
• 5 Command Cards
• Optional 4 Tactician Cards
• Move First![]()
![]()
![]()
![]()
![]()
![]()
 |
 |
 |
 |
|
| 7 | 1 | 3 | 2 | 2 |
Victory
6 Victory Banners
Special Rules
• The Azan River is impassable except at the bridge.

