Victory Results:
 86 %
Record a victory for BOTTOM ARMY  14 %
Total plays 7 - Last reported by sushidog on 2022-10-07 18:21:58

HISTORY DETAILS
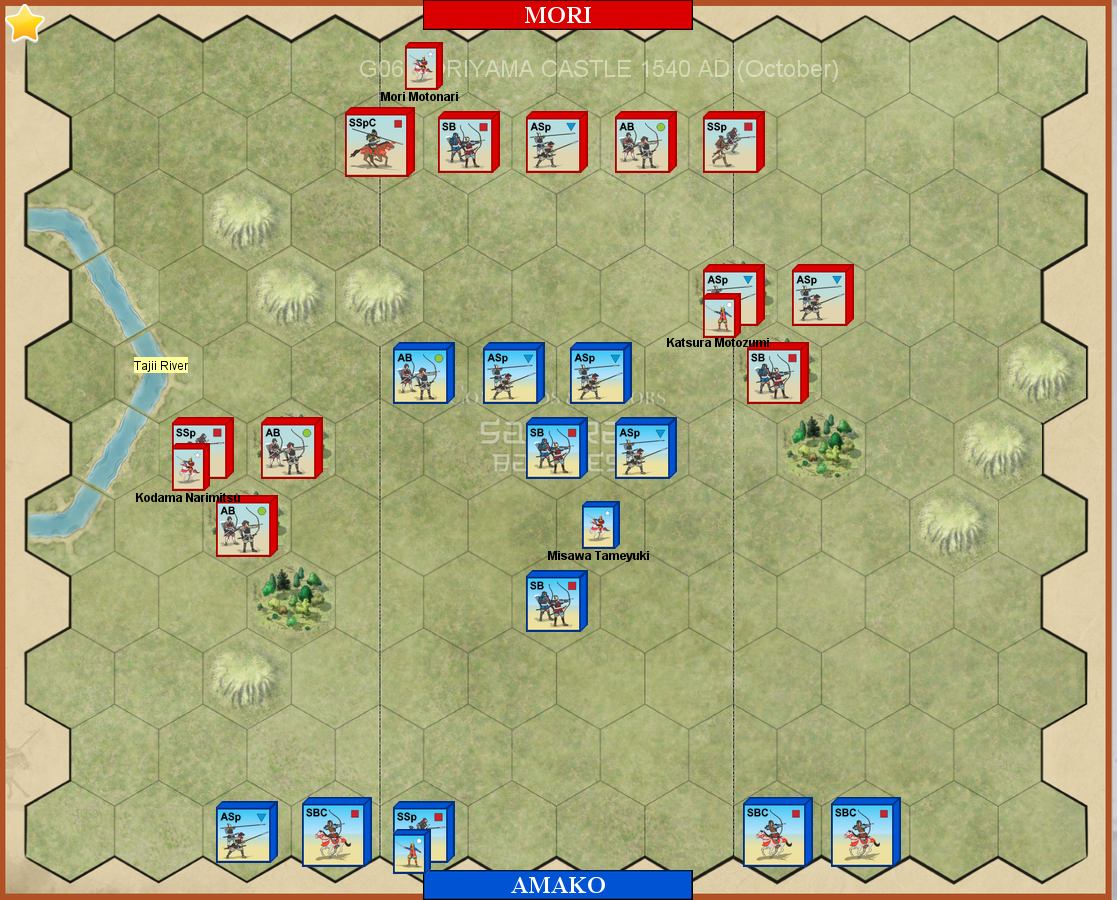
In October, although rebuffed on a number of occasions, Akihisa renewed the offensive, burning the remaining buildings outside the castle. Mori Motonari still believed he could prevail and decided to risk a general engagement, but before he marched out he sent a small force to each side of the valley to set up an ambush. The Amako army under the command of Misawa Tameyuki advanced straight at Motonari. When the two forces met, the ambush force was given the signal and emerged from hiding and the Amako army broke in panic.

The stage is set, the battle lines are drawn, and you are in command. The rest is history.


Forest Hill River River
6 7 2 3


Mõri Samurai Army (Red)
Move First
Command Card Command Card Command Card Command Card Command Card Command Card
Dragon Card Dragon Card Dragon Card
Honour & Fortune Honour & Fortune Honour & Fortune Honour & Fortune Honour & Fortune

Ashigaru Yari Ashigaru Bowmen Samurai Bowmen Samurai Spearmen Samurai Spearmen Cavalry Infantry Leader Cavalry Leader
3 3 2 2 1 1 1

Amako Samurai Army (Blue)
Command Card Command Card Command Card Command Card
Dragon Card Dragon Card
Honour & Fortune Honour & Fortune Honour & Fortune

Ashigaru Yari Ashigaru Bowmen Samurai Bowmen Samurai Spearmen Samurai Bowmen Cavalry Infantry Leader Cavalry Leader
4 1 2 1 3 1 1

Victory
5 Banners
* 1 Victory Banner for each unit or leader eliminated.

Special Rules
* The Tajii River is impassable.


Log in to comment

Pevans replied the topic:
1 year 2 weeks ago
Nephew Tom is between jobs for a couple of weeks, so we took the opportunity to play some games. For our first session, we picked up where we left off 18 months ago with this scenario.

As we were playing with the physical game (rather than on Vassal), I don't have a turn-by-turn record of what happened, so this account will be more of a summary. I drew Amako first. The advanced Amako force may well be outnumbered, but my reinforcements could even things up.

The trap is sprung as the Mori archers open up on the foremost Amako troops from both sides. Then mounted Samurai spearmen led by Kodama Narimitsu attack the Amako front lines and start demolishing the hapless Ashigaru spearmen. Amako's horsemen on the flanks trot forward to support the centre. {The score's quickly 0:3 as I have no centre cards to respond to the initial attacks.}

However, Mori's samurai are unsupported and exposed to Amako's archers who take them out. {And I get on the scoreboard 1:3} Mori throws more troops at the Amako centre, one unit at a time. They take out the last of the Ashigaru spearmen, only for the bowmen to take revenge. {2:4, but Tom only needs one more banner for a Mori win.}

By now the Amako forces were lined up across the valley, facing the line of Mori troops. But the Amako troops were almost all armed with bows. As the Mori samurai tried to close in, arrows took out unit after unit to win the battle. {5:4}

That was quite a comeback. Tom's initial attacks went well, but this pushed back my centre and left space between the two armies. My bowmen did the rest.

A quick re-set and it was Tom's turn to be ambushed. My opening hand contained an "Infantry Onslaught" and three Centre cards. So I attacked in the centre. And attacked in the centre. And attacked in the centre.

The Mori centre simply destroyed the Amako centre without losing a single unit - though several of them were pretty battered. {That's a score of 5:0 and an aggregate of 10:4.}
RiverWanderer replied the topic:
2 years 4 months ago
Close game that looked like blue had it in the bag at 4:2 after destroying red's centre assault with an Ambush and First Strike combination. This was after blue's main leader was dispatched in personal combat only for his counter-part to fall in the subsequent melee.

Red scraped back in to win 5:4, largely thanks to keeping blue's archers at bay and gaining a straight wipe-out of a blue SBC as the left side of the board came to life.

Played on Vassal. The module has got the Victory conditions incorrect (stating 2 banners per leader).
NightOwl3 replied the topic:
2 years 8 months ago
Judd and I moved on to scenario #6. It favors Red (Mori). I was Blue. I came in hoping to pull back towards the bottom left of the map and try to combine to take our Red’s three units on my left. Judd opened strongly, and I was only partially able to fall back. By being limited to four cards, it is dicey to pull off. Things were not too bad till his samurai Cav unit hit and I lost my mounted leader in a casualty check. At that point his left was on me in the center. I elected to take out his Cav, but in doing so did not pull back the rest of my men. He got several good attacks in and about 3 VPs in a row. I did not recover. I hoped to come back with a Shogun card but rolled three swords out of hour. It was over at that point. This is one we should play again for sure.

Good game Judd!