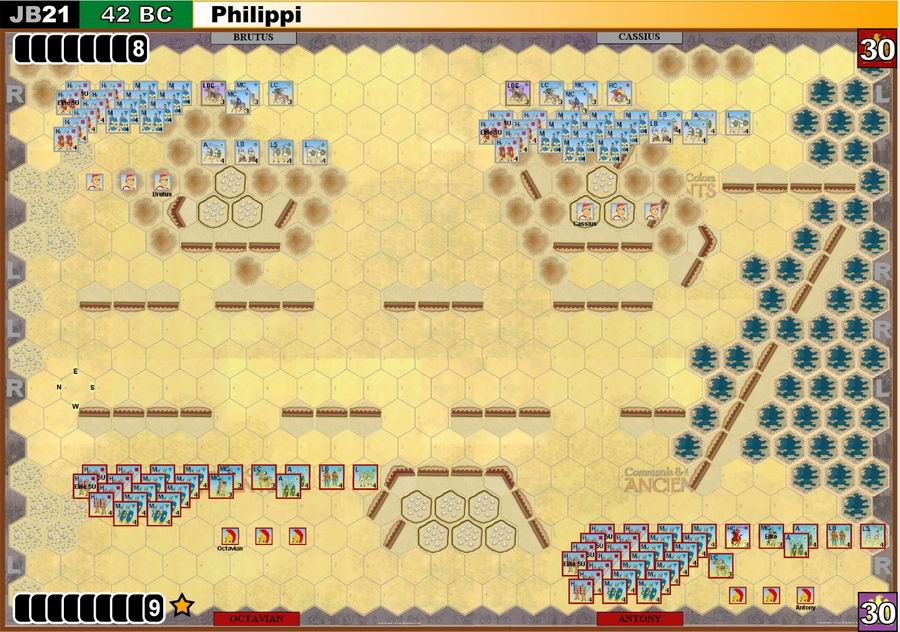
Philippi 42 BC
The last of the Romans
Antony and Octavian vs. the Assassins of Caesar: 1st Battle of Philippi 42 BC
{attachments}
Roman vs Roman
Historical Background
“Brutus wept over the dead body of Cassius and called him the last of the Romans, meaning that his equal in virtue would never exist again”… (Appian of Alexandria from his work ‘Civil Wars’ Book IV Chapter 114)
“ In this way by boldly taking risks and by fighting two infantry battles (1st & 2nd Philippi), Octavian and Antony brought this great conflict, which resembled no other before it, to a successful conclusion. For Roman armies of such size and quality on each side had never previously been matched in battle; they had not been recruited by the normal levy, but selected for their excellence; they were no tiros, but long trained; and they were turned against fellow Romans, not people of other races and tongues. They spoke a single language, shared a single technique of fighting, and their training and endurance were similar. For these reasons it was very hard for each to defeat the other.
Never have such drive and such bravery been displayed in war, and these by men who were fellow citizens, relatives, and companions in arms. The proof of this is that if you take both battles into account the number of the dead appears to have been no smaller even on the victorious side.” (Appian of Alexandria Book IV Chapter 137)
Scenario Note: This fateful battle between Romans is fought out on the ‘uber-epic’ scale with four command & colors mapboards butted together—It was likely the largest land battle in Greco-Roman times with two consolidated forces each containing about a 100,000 men clashing in bloody conflict. In game terms over 50 units plus six Leaders will represent a contending side.
Historical Background: (Below is the full account of 1st Philippi by Appian of Alexandria written in the early 2nd Century AD from his work ‘Civil Wars’).
[§107] Brutus and Cassius were satisfied with the position and proceeded to fortify their camps, but Antony moved his army rapidly, wishing to anticipate the enemy in occupying Amphipolis as an advantageous position for the battle. When he found it already fortified by Norbanus he was delighted. Leaving his supplies there and one legion, under the command of Pinarius, he advanced with the greatest boldness and encamped in the plain at a distance of only 1½ kilometer from the enemy, and straightway the superiority of the enemy's situation and the inferiority of his own became evident. The former were on elevated ground, the latter on the plain; the former procured fuel from the mountains, the latter from the marsh; the former obtained water from a river, the latter from wells freshly dug; the former drew their supplies from Thasos, requiring carriage of only a few kilometers, while the latter was 65 kilometers from Amphipolis. Still it seems that Antony was compelled to do as he did, for there was no other hill, and the rest of the plain, lying in a sort of hollow, was liable to inundation at times from the river; for which reason also the fountains of water were found fresh and abundant in the wells that were dug there. Antony's audacity, although he was driven to it by necessity, confounded the enemy when they saw him pitch his camp so near them and in such a contemptuous manner as soon as he arrived. He raised numerous towers and
fortified himself on all sides with ditches, wall, and palisade. The enemy also completed their fortification wherever their work was defective. Cassius, observing that Antony's advance was reckless, extended his fortification at the only place where it was still wanting, from the camp to the marsh, a space which had been overlooked on account of its narrowness, so that there was now nothing unfortified except the cliffs on Brutus' flank and the marsh on that of Cassius and the sea lying against the marsh. In the center everything was intercepted by ditch, palisade, wall, and gates.
[§108] In this way both sides had fortified themselves, in the meantime making trial of each other by cavalry skirmishes only. When they had done all that they intended and Octavian had arrived (for, although he was not yet strong enough for a battle, he could be carried along the ranks reclining in a litter), he and Antony prepared for battle forthwith. Brutus and Cassius also drew out their forces on their higher ground, but did not come down. They decided not to give battle, hoping to wear out the enemy by want of supplies.
There were nineteen legions of infantry on each side, but those of Brutus and Cassius lacked something of being full, while those of Octavian and Antony were complete. Of cavalry the latter had 13,000 and the former 20,000, including Thracians on both sides. Thus in the multitude of men, in the spirit and bravery of the commanders, and in arms and munitions, was beheld a most magnificent display on both sides; yet they did nothing for several days.
Brutus and Cassius did not wish to engage, but rather to continue wasting the enemy by lack of provisions, since they themselves had abundance from Asia, all transported by the sea from close at hand, all the enemy had nothing in abundance and nothing from their own territory. They could obtain nothing through merchants in Egypt, since that country was exhausted by famine, nor from Spain or Africa by reason of [Sextus] Pompeius, nor from Italy by reason of Murcus and Domitius. Macedonia and Thessaly, which were the only countries then supplying them, wouldn't suffice much longer.
[§109] Mindful chiefly of these facts Brutus and his generals protracted the war. Antony, fearful of the delay, resolved to force them to an engagement. He formed a plan of effecting a passage through the marsh secretly, if possible, in order to get in the enemy's rear without their knowledge, and cut off their avenue of supply from Thasos. So he arrayed his forces for battle with all the standards set each day, so that it might seem that his entire army was drawn up, while a part of his force was really working night and day making a narrow passage in the marsh, cutting down reeds, throwing up a causeway upon them, and flanking it with stone, so that the earth should not fall away, and bridging the deeper parts with piles, all in the profoundest silence. The reeds, which were still growing around his passage-way, prevented the enemy from seeing his work.
After working ten days in this manner he sent a column of troops by night suddenly, who occupied all the strong positions within his lines and built several redoubts at the same time. Cassius was amazed at the ingenuity as well as the secrecy of this work, and he formed the counter design of cutting Antony off from his redoubts. He carried a transverse wall across the whole marsh from his camp to the sea, cutting and bridging in the same manner as Antony had done, and setting up the palisade on the top of his mounds, thus intercepting the passage made by Antony, so that those inside could not escape to him, nor he render assistance to them.
[§110] When Antony saw this about noon, instantly, with rage and fury, he turned his own army, which was facing in another direction, and led it against the cross-fortification of Cassius between his camp and the marsh. He carried tools and ladders intending to take it by storm and force his way into Cassius' camp.
While he was making this audacious charge, obliquely and up hill, across the space that separated the two armies, the soldiers of Brutus were provoked at the insolence of the enemy in dashing boldly athwart their front while they stood there armed. So they charged on their own account, without any order from their officers, and killed with much slaughter (as natural in a flank attack) all they came up with. The battle once begun they charged upon the army of Octavian, also, which was drawn up opposite, put it to flight, pursued it to the camp which Antony and Octavian had in common, and captured it. Octavian himself was not there, having been warned in a dream to beware of that day, as he has himself written in his Memoirs.
[§111] When Antony saw that battle was joined he was delighted because he had forced it, for he had been in trouble about his supplies he judged it inadvisable to turn again toward the plain, lest in making the evolution his ranks should be thrown into disorder. So he continued his charge, as he had begun it, on the run, and advanced under a shower of missiles, and forced his way till he struck the troop of Cassius which had not moved from its assigned position and which was amazed at this unexpected audacity. He courageously broke this advance guard and dashed against the fortification that ran between the marsh and the camp, demolished the palisade, filled up the ditch, undermined the works, and killed the men at the gates, disregarding the missiles hurled from the wall, until he had forced an entrance through the gates, and others had made breaches in the fortification, and still others had climbed up on the débris. All this was done so swiftly that those who had just now captured the fortification met Cassius' men, who had been at work in the marsh, coming to the assistance of their friends, and, with a powerful charge, put them to flight, drove them into the marsh, and then at once wheeled against the camp of Cassius itself. These were only the men who had scaled the fortification with Antony, the remainder being engaged in conflict with the enemy on the other side of the wall.
[§112] As the camp was in a strong position it was guarded by only a few men, for which reason Antony easily overcame them. Cassius' soldiers outside the camp were already being beaten, and when they saw that the camp was taken they scattered in disorderly flight. The victory was complete and alike on either side, Brutus defeating the enemy's left wing and taking their camp, while Antony overcame Cassius and ravaged his camp with irresistible courage. There was great slaughter on both sides, but by reason of the extent of the plain and the clouds of dust they were ignorant of each other's fate. When they learned the facts they recalled their scattered forces. Those who returned resembled porters rather than soldiers, and did not at once perceive each other nor see anything clearly. Otherwise either party would have flung down their burdens and fiercely attacked the others carrying off plunder in this disorderly fashion. According to conjecture the
number of killed on the side of Cassius, including slave shield-bearers, was about 9,000, and on the side of Octavian double that number.
[§113] When Cassius was driven out of his fortifications and no longer had even a camp to go to, he hurried up the hill to Philippi and took a survey of the situation. As he could not see accurately on account of the dust, nor could he see everything, but only that his own camp was captured, he ordered Pindarus, his shield-bearer, to fall upon him and kill him. While Pindarus still delayed a messenger ran up and said that Brutus had been victorious on the other wing, and was ravaging the enemy's camp. Cassius merely answered, "Tell him that I pray his victory may be complete." Then, turning to Pindarus, he said, "What are you waiting for? Why do you not deliver me from my shame?" Then, as he presented his throat, Pindarus slew him.
This is one account of the death of Cassius. Others say that as some horsemen were approaching, bringing the good news from Brutus, he took them for enemies and sent Titinius to find out exactly; that the horsemen pressed around Titinius joyfully as a friend of Cassius, and at the same time uttered loud hurrahs; that Cassius, thinking that Titinius had fallen into the hands of enemies, said, "Have I waited to see my friend torn from me?" and that he withdrew to a tent with Pindarus, and Pindarus was never seen afterward. For this reason some persons think that he killed Cassius without orders.
Thus Cassius ended his life on his birthday, on which, as it happened, the battle was fought, and Titinius killed himself because he had been too late.
[§114] Brutus wept over the dead body of Cassius and called him the last of the Romans, meaning that his equal in virtue would never exist again. He reproached him for haste and precipitancy, but at the same time he esteemed him happy because he was freed from cares and troubles, "which," he said, "are leading Brutus, whither, ah, whither?"
He delivered the corpse to friends to be buried secretly lest the army should be moved to tears at the sight; and himself passed the whole night, without food and without care for his own person, restoring order in Cassius' army. In the morning the enemy drew up their army in order of battle, so that they might not seem to have been beaten. Brutus, perceiving their design, exclaimed, "Let us arm also and make believe that we have suffered defeat." So he put his forces in line, and the enemy withdrew. Brutus said to his friends, jestingly, "They challenged us when they thought we were tired out, but they dared not put us to the test."
(Note: Brutus would soon commit suicide himself after the bloody 2nd Battle of Philippi a few weeks later in the wake of the virtual collapse of his remaining forces)
(The above selection is from Livius.org website)
War Council
Each Side Starts with one Line Command Card rest are randomly picked,
Assassin (or ‘Liberator’) Armies of Brutus & Cassius - Grand Total: 51 units + 6 Leaders
Leaders: Brutus & Cassius
Command: 8 Cards (use Epic Ancients Command cards Rules)
Triumvir Armies of Octavian & Antony - Grand Total: 54 units + 6 Leaders
Leaders: Octavian & Antony
Command: 9 Cards (use Epic Ancients Command cards Rules)
Move First ![]()
Victory
30 Banners.
Players score Banners as follows:
1 Banner per enemy unit or Legate Leader eliminated
2 Banners per enemy named Leader (Octivian, Antony, Brutus, Cassius) eliminated
1 Banner if an enemy named Leader (see line above) evades off the map.
1 Banner per enemy Camp hextile removed by occupation (see terrain special rules)
½ Banner per enemy “Camp Rampart” tiles removed by occupation (see terrain special rules), --Camp Rampart tiles are noted in the setup and are made up of all noted & associated Camp Rampart hexes (see terrain setup) located only within 1 or 2 hexes of their particular Camp Tiles.
1 Banner for the Assassins for removing each Triumvir Rampart Tile by occupation located on the Cassius’ Map (these are in hexes A3, B2, C2 on the Cassius’ Map).
1 Banner for the Triumvirs for removing each Assassin Rampart Tile on the left side of Cassius’ camp by occupation (these are in hexes C6 & B6 on the Cassius’ Mapboard)
No Banners are received for the removal of Rampart Tiles of Rampart classes that are not specifically listed above (for example the Front-line Ramparts on both sides or Antony’s Triumvir Ramparts going into the swamp that are located on the Antony mapboard and any other Ramparts not associated with a camp or not listed above do not count for Banners if removed)
Special Rules
The “Marian” Command Card Decks
Historical Note: Combat in the 1st Century BC between Roman Legions was somewhat different than the wars between civilized states in the 3rd Century BC. There was less room for combined arms tactics and maneuver, and battles probably tended to be more of the nature of hand to hand full bore slugfests.
It is suggested that the Players play with two Command card Decks—Each Player draws from one deck only, so therefore the two decks are never combined during play. Also the number of cards in each deck is reduced to 52 Cards as noted below.
This particular scenario utilizes different sets of Command Card Decks than the original C & C Ancients Deck. Eight (8) Cards are removed from the original deck leaving 52 Cards for scenario play. These new decks are called the “Marian Decks”, named after Caesar’s uncle Gaius Marius, a reorganizer of the Roman Legions in circa 105-103BC (several years before Caesar was born) to meet the challenges of the Germanic Tribal invasions that threatened the Roman Imperial Republic of the time.
The following eight cards are removed before play and put aside to create each of the Marian Decks:
X4 “Order Light troops”, x1 “I Am Spartacus”, x2 “Move-Fire-Move”, x1 “Mounted Charge”---note that one Mounted Charge” card is still retained in each deck.
Special Command Rules:
All Leaders may cancel a retreat or a sword hit if present with the unit. Units on both sides involved in close combat with the support of a Leader may only count one helmet hit amongst those rolled to inflict a hit on an opposing unit unless that Leader is Anthony in which case up to two helmet hits are counted.
Only the named Leaders (Brutus, Octavian, Antony, and Cassius) can support a unit involved in close combat or battle-back in an adjacent hex. The Legate Leaders can only support or benefit a unit they are stacked with in such close-combat situations.
Units and the Rally Card: No unit can be rallied to beyond its strength at the start of the scenario. If a Player rolls “swords” when attempting to rally he may freely chose which unit gets a block back.
Line Command Cards: No more than ten foot units can be ordered by play of a single Line Command Card in the Philippi scenario.
Legionary Infantry Rules:
The following types of infantry units in the game on BOTH sides are assumed to be Roman Legionaries: Heavy Infantry, and Medium Infantry. ALL of these units are considered to be Roman Legionary Infantry.
Roman Pilum:
Each Roman Legionary Infantry unit starts with a Pilum Marker. The Pilum is a one-time use weapon that is generally fired right before a Roman Legionary unit attacks in close-combat or is itself attacked by the enemy in close-combat. Once the pilum is fired (or lost see below) –the Pilum marker is removed from the Roman unit to indicate that the pilum has been expended and the unit may not throw Pilum for the rest of the battle.
Just before a Roman unit with pilum is attacked or is itself attacked by the enemy for the very first time in the battle in close-combat it throws its pilum—roll one die and apply normal hits for swords, color, or a Flag/retreat hit Afterwards remove the Pilum marker. The act of throwing the pilum is not considered to be part of the Close-Combat—so any result of the pilum throw is resolved before the Close-combat. If two Roman Legionary Infantry units that have not thrown pilum yet engage the attacker resolves his pilum throw first. An attached Leader may use his special ability to cancel a “swords” hit that was inflicted via a pilum hit (see special Command rules) on the unit he is stacked with.
Roman Legionary units, adjacent to the enemy, that have not expended their Pilum may also be ordered to throw Pilum if the card “Darken the Sky” is played by their commanding player. The Player picks one adjacent enemy unit and throws two dice –apply the results just as one would before close combat—and remove the Pilum Marker.
Roman Relief Moves & Cohort Maneuvers:
Adjacent and on the same side Roman Legionary Infantry, instead of moving, may switch places in a “Relief/Cohort Maneuver”. Relief/Cohort Maneuvers may only be conducted through the play of Section cards ONLY. Instead of ordering one unit via a section card, the controlling Player may order a pair of adjacent Legionary Infantry units to switch hexes—at least one of the units switching places must not be adjacent to an enemy unit. A unit that switched places via the Relief/Cohort Maneuver into a hex adjacent to the enemy may close combat in the same player-turn.
Julian Legions: Legionary units on both sides can use Julian Legion movement rules. Do Not use the Marian Legion rules found in Expansion #2, as those features are taken into account more accurately via the above pilum and other rules.
Elite Legionary Infantry: Certain units in each army are designated in the army lists as Elite Heavy Infantry—they start the game with five blocks. They are considered to be the
highly experienced veterans of combat against barbarians and/or the prior civil wars—therefore if ordered via a line command or ‘heavy troops’ cards they may move up to two hexes terrain permitting and close combat.
Outflanking---This is an easy way of introducing facing and flanks to the game with little fuss—it can be retrofitted to other scenarios where appropriate:
A unit is said to be “Outflanked” if it is surrounded in all six adjacent hexes by either enemy units, or hexes adjacent to an enemy unit. The presence of friendly units or impassable terrain does not negate an “Outflanked” situation in any way. Units on the board edges (and not surrounded by six adjacent hexes) cannot be “Outflanked”.
Effects of being Outflanked: “Outflanked” units when battling back roll only half the normal number of dice they would be normally entitled to rounded up—to a maximum of only two dice—“Outflanked” units when battling back never hit on helmet rolls even if supported by a leader. A unit’s “Outflanked” situation is judged at the instant it battles back.
Special Retreat Rules for Uber-Epic Scale:
All Foot units in the game, including legionary units, must retreat 2 hexes per Flag result taken if possible. If a full 2 hex retreat cannot be taken the foot unit may make a 1 hex retreat to satisfy the very first Flag result taken as a retreat. Foot units that are unable to retreat to satisfy a Flag result lose 1 block and remain in the last hex they retreated into (i.e. they don’t lose 1 block per hex not retreated—they merely lose 1 block per Flag result not properly satisfied via retreat).
All Cavalry units in the game, regardless of type, must retreat 3 hexes per Flag result taken if possible. If a full 3 hex retreat cannot be taken the cavalry unit may make a 2 hex retreat to satisfy the very first Flag result taken as a retreat. Cavalry units that are unable to retreat to satisfy a Flag result lose 1 block and remain in the last hex they retreated into (i.e. they don’t lose 1 block per hex not retreated—they merely lose 1 block per Flag result not properly satisfied via retreat).
Special Terrain Rules: (Note the change in the treatment of hills outlined below also there is changes to several other terrain rules)
Crags: Crag Hexes are impassable they represent ravines and cliffs on the north side of the battleground.
Level 1 Hill Elevations: The map now, in effect, has contour lines of hexes showing different elevations. Basically there are two Terrain elevations in the scenario: Level 0: which includes all clear, swamp, and broken terrain on the map. Level 1: which includes all Level 1 Hills. Note: The Camp/Rampart tiles are a special separate case which are handled by the rules detailed below.
Elevation effect on close-combat and battle-back: If a unit is close-combating or battling-back against a unit at a higher elevation (or level) the “normal” maximum dice that unit may use is minus one (-1) normal.
If a unit is close-combating or battling-back against a unit at a lower elevation (or level) the “normal” maximum dice is used. If both units are on the same level and there is no other terrain considerations the units would use their standard dice as dictated by the rulebook and these scenario rules.
Camp and Rampart: General Rules
These contain modifications of the normal terrain rules—
Camp & Rampart Tiles: The initial Camp/Rampart Tiles only benefit their initial owners. If these hexes are entered by enemy units the Camp/Rampart tile is removed from the map, and Banners are scored if applicable (see Victory rules)— Camp/Rampart tiles are replaced in some cases if an Assassin one, with the appropriate Level 1 Hill tile as required. Camp/Rampart Tiles always block line of sight.
Rampart Tiles in Close-Combat/Battle-Back are treated per the normal updated rulebook rules. Camp Tiles in the scenario provide one extra dice if a foot unit battles-back (or does a first strike)from a camp tile—it provides no other benefits or liabilities to units stacked on the tile in any other type of combat.
.The Triumvir Camp/Rampart Tiles become clear terrain whenever they are removed since they were built on a lower level plain and are therefore considered at Level 0.
Assassin Rampart Tiles also become clear terrain unless they are associated with a particular army camp—in that case only these become Level 1 Hill tiles. All Assassin Camp tiles always convert to Level 1 Hill tiles if captured by the Triumvirs.
Elevation and Close-Combat (& battle-back) into or out of intact Camp/Rampart Tiles:
Never considers the underlying elevation of the works when calculating the dice used in the combat. Only use the underlying elevation rules detailed above once the works are removed by enemy occupation.
Swamp Hex General Rules:
Don’t use the marsh hex rules detailed in Expansion #2—do use the rules below only.
Foot units must stop when they enter a swamp hex and may only enter a swamp hex when ordered from a starting hex directly adjacent to the swamp hex moved to. Mounted units and Leaders moving alone pay 2 MP for only the first swamp hex entered during that move. Close-combat and Battle-Backs into or out of a swamp hex is at a “normal” 3 dice maximum (with any of the normal + for cards). Swamps do not block line of sight. Units located in swamps do not count for ‘support’ for preventing retreat by adjacent units and cannot receive support themselves from adjacent units when in a swamp hex. Cavalry units in swamp hexes may not evade if attacked in close-combat.
“The Last of the Romans”-The Cassius Suicide Watch
If Cassius is alone in a hex without a friendly unit present, and enemy units enter a hex via an ordered or momentum move one or two hexes away roll one dice to see if he commits suicide. On a roll of ‘Swords’ Casius has himself offed and is eliminated from play. The Triumvirs score 2 Banners.
Optional Rule: Adding War Machines to the Basic 2-Player Philippi Scenario:
I have left War Machines out of the basic scenario—likely the Roman sides involved had few machines as their Legions, even the veteran Legions of this era, tended to be somewhat threadbare units incorporated into what amounted to private armies. Certainly no war machines are mentioned in accounts of the battle—it is possible, however, that the Triumvirs and Assassins had some machines guarding their ramparts and camps. Incorporate the War Machines as follows as an optional rule:
Each side gets four (4) Heavy War Machine units—two per army. Set the Machines up in any friendly camp or rampart hex on the appropriate Mapboard quadrant for that army. War Machines may not be set up in or move or retreat into hexes adjacent to swamp hexes. Heavy War Machines in the scenario have a range of only four hexes maximum. War Machines can also be added into the 4-Player scenario detailed below.
The Four Player Uber-Epic Scenario:
General: In the Four Player game –each player takes the role of one of the four named Roman plutocrat/noble army commanders involved in this epic battle. Each acts as a co-commander with his historical partner, but their victory or loss in the battle is figured separately. It is possible for an overall side to lose the battle, but for a player on the losing side to win his part of the battle and the scenario in spite of that outcome. The battle still ends when the combined score of one side’s commanders reaches 30 Banners.
Marian Command Card Deck Modifications: Use the Marian Decks detailed above for the two-player game(one deck per contending side), but additionally remove the two “Outflanked”cards, and the two “Coordinated Attack” Cards from each deck. The modified Marian decks will now have 48 cards each. Line Commands still move a maximum of ten connected foot units.
Player Hands: Each Player in the four-player version has his own hand of command cards—Brutus and Cassius each have 5 cards. Antony has 6 cards and Octavian has only 4 cards. All cards are randomly picked. On each joint Player turn each allied player plays one card to move/order units of his own army only. At the end of each joint turn each of the allied players replaces the card just played from their hands from their Marian draw deck to bring their hands up to the initial hand sizes. Their initial hand sizes are, of course, also the command limits for that particular individual component army. Units from different allied armies cannot be activated by play of the same Command Card. All units activated by a particular Command Card must be from the same army. The Player commanding that army determines which units get activated from that card . There are no Field General/Army Card limits as to cards played in a section.
Victory: Each Player scores banners based on the actions of his personal army in garnering that side’s Banners. A Player receives Banners if units of his army were instrumental in securing the Banner in question. The Player controls the ordering and combats of his army units with the cards played from his hand. Once the battle is over count the number of Banners each player personally garnered with his army—that Player is the overall winner of the scenario. If the named Leader representing the player has been eliminated he subtracts 2 Banners from his personal total before the winner and any 2nd or 3rd place finishes are figured. If a player is on the side that collectively won the overall battle by reaching the combined 30 Banners level first he adds 2 Banners to his personal total before the winner and any finishers are figured.
Loaning units, Leaders & units & Trading Cards: A player with units in the Center area may lend units in that area adjacent to his co-commander’s units/leaders. They join the co-commander’s army for the rest of the scenario unless voluntarily lent back by the new owner. Any loan of units is announced at the end of their joint player-turn and takes effect immediately. The players on a single side can lend no more than two units back & forth per joint player-turn. Units with a Leader attached may not be lent. If a Leader via Movement or Evasion ends up attached to a unit from the other allied army—that unit then immediately joins the army that the newly attached Leader is part of.
Trading Cards: If the two co-commanders agree (or even if they disagree see below)-- at the end of their joint player-turn, after the new cards are drawn, they may decide privately to trade cards between their hands. A Player may give up a maximum of one card to his co-commander and must receive back one card from his co-commander in exchange. Only a single pair of cards can be exchanged in this manner per own joint turn-
one from each player. The Players can agree on the cards to be exchanged or one Player may put forth one card and his partner must provide him with one card in return from his hand. Generally, if cooperating, the players would be trading cards they are not personally in a position to use with each other, as needed, during the course of play.
Precedence: The two players, if they cannot agree between themselves as to who moves first (they in effect move together) and who does all his combats first in their joint player-turn must roll a normal six-sided die between themselves to determine who moves or combats first. High roller goes first in these joint activities. A given joint Player-turn might see two such rolls—first to see which army’s ordered units Move First ![]() . Second how combat is sequenced between the two allied forces. These activities can alternately be conducted at the same time if the inter-actions & orders of the two allied armies do not effect the possible reasonable outcomes of the game activities in question.
. Second how combat is sequenced between the two allied forces. These activities can alternately be conducted at the same time if the inter-actions & orders of the two allied armies do not effect the possible reasonable outcomes of the game activities in question.
Card Discard Option in the 4-Player Game: A Player in the 4-Player game may decide during his joint player-turn to discard three cards from his hand and draw three new cards from the draw deck in lieu of playing a card from his hand normally to order units. If this option is taken he does nothing that player-turn with his component army units/leaders on the map. This option is not available if the named leader representing the player is not on the map. A player may exercise this option a maximum of three times per game and not on consecutive own joint player-turns and also not during the first three joint player-turns for his side in the scenario.
Note: 4-Player Changes from the 2-Player Epic Ancients rules: Field General Initiative and the other Field General/Army Commands features of the standard Epic Scale Ancients rules are not utilized in the Four-Player game—since each Player/co-commander now has his own hand of cards to play to control & order his own army in much the same fashion as the normal C&C Ancients scale game. However the First Strike Card does provide +2 Dice to the unit utilizing it just as in Epic Scale Ancients.
Mapboard Configuration and Junction Hexrow Setup:
In Uber-Epic Philippi two complete epic-scale Command & Colors play areas are utilized, a total of four mapboards, to reach an ultimate total map that sizes out at 19 hexes deep and 25 or 26 hexes wide. In addition the players have to create Junction Hexrow 25 hexes long to join the two epic scale maps along their lengths.
Creating & Orienting the Uber-Epic Player Areas:
Step 1: The Assassin Player Places one set of epic scale mapboards (i.e. two mapboards) in front of himself. The Mapboard to his left will contain the location of Cassius’ camp
(Cassius’ Mapboard), the Mapboard to the right is the location of Brutus’ camp (Brutus’ Mapboard). These two Senators of Rome each commanded their own private armies that collectively opposed those of the Triumvirs Antony and Octavian. Similarly the Triumvir Player sitting opposite his Assassin opponent places one additional epic-scale map set in front of him abutted along its length (and slightly overlapping on the edges) with the Assassin mapboards. The Mapboard to the Triumvir left is Octavian’s Mapboard, the Mapboard to the right the location of Antony’s forces (Antony’s Mapboard). The two men each also commanded their own private armies that collectively opposed those of the Assassins (or ‘Liberators’ as Cassius and Brutus styled themselves). Unlike the Assassins the two Triumvirs domiciled their forces in a single joint camp (per Appian) located, for game purposes, in the approximate middle of their Mapboards.
Step 2: Take a Command and Colors Paper map and cut out neatly one hexrow of 13 hexes and another hexrow of 12 hexes. These two hexrows are placed together in the space between the two slightly overlapped epic map areas to create a Junction Hexrow 25 hexes long between the two epic scale (Assassin and Triumvir) map areas.
Step 3 Label the Junction Hexrow hexes from the Assassin left to right as: Z1, Z2, Z3, Z4 etc. through to Z25.---They don’t actually have to be marked that way—This numbering can be used as just a mental aid so the players can visualize the setup detailed below. Hexes Z1 to Z8 are part of the Assassin Left/Triumvir Right Area. Hexes Z18 to Z25 are part of the Assassin Right/Triumvir Left Area, and the remainder Z9 to Z17 are the Center Area for both players.
Step 4: The numbering/letter system used for the epic scale map hexes for purposes of the setup detailed below is almost exactly similar to that of the original smaller single paper maps issued by GMT. Row “A” on the Assassin mapboards (those of Cassius/Brutus) directly abuts that of Row “Z” of the cutout paper Junction Hexrow and Row A is numbered A1 to A26. The mapedge hexrow closest to the Assassin player is Row “I” of the Assassin mapboards and it is numbered left to right I1 to I26 representing the back baseline hexrow that the Assassin units and Leaders retreat/evade towards. All numbering on each of the two epic scale play areas is done left to right down each hexrow in relation to the seating of the Player on that side of the boards. Examples: Hexrow “A” for the Assassins is numbered left to right from A1 to A26. Hex A1 in that row on the Assassin mapboards is adjacent to hex Z1 of the Junction Hexrow. Hex A2 on the Assassin mapboards is adjacent to hexes Z1 and Z2 of the Junction Hexrow. Hex A26 on the Assassin mapboards is adjacent to hex Z25 of the Junction Hexrow. And so forth. Hexes A1 to A13 are on the Cassius’ Mapboard. Hexes A14 to A26 on Brutus’
Similarly the hex numbering on the Triumvir mapboards is also done left to right. Hex A1 on the Triumvir mapboards (those of Octavian/Antony) is adjacent to hex Z25 on the Junction Hexrow. Hex A25 on the Triumvir mapboards is adjacent to hexes Z1 and Z2 of the Junction Hexrow. A1 to A13 are on the Octavian Mapboard. Hexes A14 to A26 on Antony’s. Row “I” of the Triumvir Mapboards, the row closest to the Triumvir player, is referenced left to right I1 to I26 and represents the back baseline hexrow that the Triumvir units and Leaders retreat/evade towards in the scenario.
The other hexrows in each of the opposing epic scale play areas goes back in depth from the Row As next to the Junction Hexrow on each side back in Alphabetical order “B to H” back to the baseline hexrows (the row I’s closest each player) just like the original C & C maps and is numbered 1 to 25 (or 1 to 26 depending on the hexrow) from that player’s vantage left to right.
Step 5 Directions and The Compass Rose: The geographical Direction to the right of the Assassin Player and to the left of the Triumvir is due North. The Direction to the left of the Assassin Player and to the right of the Triumvir Player where the swamps are located is due South. The Triumvir Player faces East in relation to where he sits—the Assassin Player faces West. So the hexagonal directional compass rose for each hex would be as in the following example: The Direction Rose in Hex Z2 on the Junction Hexrow would be like this North(N) would be into the adjacent Hex Z3, South(S) would be into adjacent Hex Z1. Northeast(NE) would be to Hex A3 on the Assassin map. Southeast(SE) to Hex A2 on the Assassin map. Northwest(NW) to Hex A24 on the Triumvir map. And finally Southwest(SW) to Hex A25 on the Triumvir map. The directions are noted in this manner in the Terrain setup to indicate which ways and into which adjacent hexes the ‘teeth’ of the rampart hex tiles face. Compass Directions are also noted in the Compass Rose Notes in the setup for Octavian’s Mapboard Terrain below.
Terrain Set-up: Note that the Terrain set-up is detailed below by Assassin/Triumvir Mapboard or quadrant of the total play area. The set-up of the Triumvir joint camp is detailed in a separate sub-section. The Junction Hexrow (row Z) Terrain is also listed separately afterwards at the end. It is suggested that the players use forest hexes to represent the swamp hexes and that they buy additional sets of terrain hextiles from GMT games or construct their own. One can also use hextiles from other Richard Borg games like ‘Battle Cry’ & Memoir ‘44 etc.. There is A LOT of terrain hextiles in the game since both sides were heavily dug in before the battle. Also see the Special Terrain rules listed in the Scenario rules below. Note that there are two Terrain Levels—Level 1 and Level 0—these are explained in the Special Terrain rules section.
Terrain Setup Triumvir Left Mapboard (Octavian’s Mapboard—located opposite Brutus):
Crags (impassable): A1, E1, F1, G1
Broken Terrain: I1, G2, F2
Front Line Triumvir Rampart: C3, C4, C5, C6, C9, C10, C11 (all face SE/NE):
Hex B2 Compass Rose Notes: The Directions from Hex B2 on Octavian’s Mapboard are as follows—North (N) is into hex B1—A2 is Northeast (NE), A3 Southeast (SE), B3 South (S), C3 Southwest (SW) C2 is Northwest (NW).
Terrain Setup Triumvir Right Mapboard (Antony’s Mapboard—located opposite Cassius):
Front Line Triumvir Rampart: C14, C15, C16, C19, C20 (all face SE/NE)
Anthony’s Triumvir Ramparts into the swamp: A23, B22, C22, D21, E21 (all face N/NE)
Swamp Hexes: A21, A22, A24, A25, A26, B21, B23, B24, B25, C21, C23, C24, C25, C26, D20, D22, D23, D24, D25, E24, E25, E26, F25, G26
Terrain Set-up of the Triumvir Joint Camp in the Middle of their Mapboards:
Triumvir Camp Hexes: G13, G14, G15, F12, F13, F14 See lines below for associated Triumvir Camp Ramparts:
Triumvir Camp Rampart hexes (located around the Camp): E12 (3 hexside N/NE/SE)
Triumvir Camp Rampart hexes (cont.): E15 (3 hexside S/NE/SE), F11 (N/NE), F15 (S/SE)
G11 (N/NE) G16 (S/SE) E13 (NE/SE) E14 (NE/SE)
Terrain Setup Assassin Left Mapboard (Cassius’ Mapboard—located opposite Antony):
Front Line Assassin Rampart (all face SW/NW): A13, A10, A9, A8,
Side Assassin Rampart: C6 (3 hexside faces S/SW/SE), B6 (2 hexside faces S/SW)
Counter-dug Assassin Rampart into the swamp: (all face SW/NW): E2, E3, E4, E5
Swamp Hexes: I1, H1, H2, G1, G2, G3, F1, F2, E1, D1, D2, C1, C3, B1, B3, B4, A1, A2, A4
Level 1 Hill Hexes: I5, I6, I7, G8, G9, G10, G11, F7, F9, F10, F11, E7, E8, E10, E12, D6, D10, D11, C7, C11, B10 (x21 Level 1 Hill Hexes total)
Cassius’ Camp Hexes: D8, D9, E9---See lines below for associated Cassius Camp Rampart hexes:
Cassius’ Camp Rampart hexes (located around the Camp): C8, C9, C10 (all face NW/SW)
Cassius’ Camp Rampart hexes (cont.): D7 (face S/SW) E11 (face N/NW) F8 (S/SW)
Triumvir Rampart (Antony’s outflanking works in the swamp area): A3, B2, C2 (face N/NE)
Terrain Setup Assassin Right Mapboard (Brutus’ Mapboard—located opposite Octavian):
Crags (impassable): A26, C26, D25, E25, E26
Broken Terrain: C25, F24
Front Line Assassin Rampart (all face SW/NW) A24, A23, A22, A20, A19, A18, A15, A14
Level 1 Hill Hexes: I25, I26, H25, G20, G21, G22, H20, F17, F18, F19, F20, F21, E17, E18, E19, E21, E22, E23, D17, D22, C18, C22, B19 (x23 Level 1 Hill hexes total)
Brutus’ Camp Hexes: E20, D20, D19---See lines below for associated Brutus Camp Rampart hexes:
Brutus’ Camp Rampart hexes (located around the Camp): D18 (face S/SW) D21 (face N/NW/NE)
Brutus’ Camp Rampart hexes (cont.): C21, C20, C19 (all face NW/SW)
Row Z Junction Hexrow Terrain Set-up:
Swamp Hexes: Z1, Z2, Z3, Z4—All the rest of the Z Junction Hexrow is Clear Terrain
Unit and Leader Initial Set-up for “The Last of the Romans”: 1st Philippi 42 BC
(Use Red Blocks for the Triumvirs, Gray Blocks for the Assassins, it is recommended that the players have two or three sets of everything or use blocks from other sets—for example Blue-Greek blocks for the Triumvirs and the Carthaginian & Eastern Kingdom Blocks for the Assassins)
The Philippi Scenario uses a version of free set-up within certain designated limits for all four Roman armies involved in the battle. Each opposing force (the Assassins vs. the Triumvirs) is divided into two separate armies. The Assassin side features Cassius’ and Brutus’ armies. The Triumvir side has Antony’s and Octavian’s armies. The armies are set-up in the following order—Cassius’ first followed by Antony’s, Octavian’s, and lastly Brutus’ army. The set-up below is detailed in that order along with the army lists
for each army. The Triumvir side moves first. A modified version of the Epic scale rules is utilized for 2-Player card play in the scenario. The division between the two armies on each side is ignored after the initial set-up. Effectively, for rules purposes in a two-player game, during the playing out of the battle scenario the armies on each side are treated as a single force so there is no need to distinguish which unit or leader belonged originally to which individual army on a side once the Epic scale battle between the Triumvirs and Assassins commences. The four-player optional rules below require the players to distinguish between which units belong to what allied army, and each player has his own hand of cards to move his own units as a variant on the standard Epic Ancients rules.
Cassius’ Assassin Army List: x27 units & x3 Leaders Total
X2 Elite Heavy Infantry (5 Blocks each-See Legionary special rules below)
X4 Heavy Infantry (See Legionary special rules below)
X11 Medium Infantry (See Legionary special rules below)
X1 Light Horse Archer Cavalry
X1 Heavy Cavalry
X2 Medium Cavalry
X1 Light Cavalry
X2 Auxillia
X2 Light Archers
X1 Light Infantry
X3 Leaders (Cassius and two legates)
Cassius’ Army Set-up: All units/leaders must set-up in hexes completely on the Casssius Mapboard only as follows:
Cassius Leader Unit—Set up on or adjacent to one of his camp hexes in a hex not containing another friendly unit—he sets up alone.
Within one hex of F2: x4 Heavy Infantry & x1 Legate
Within one hex of F4: x4 Medium Infantry
Within one hex of E6: x2 Elite Heavy Infantry
Within one hex of Cassius’ Camp hextiles: x2 Medium Infantry
Within one hex of C7: x2 Medium Infantry
All 5 units of Cassius Cavalry: In hexrows D through G only within 2 hexes of any Cassius Camp hex
Anywhere on Cassius’ Mapboard not in or adjacent to a swamp Hex: x3 Medium Infantry,
x2 Light Archers, x2 Auxillia, x1 Light Infantry, x1 Legate
Antony’s Triumvir Army List: x31 units and x3 Leaders Total
X4 Elite Heavy Infantry (5 Blocks each-See Legionary special rules below)
X6 Heavy Infantry (See Legionary special rules below)
X12 Medium Infantry (See Legionary special rules below)
X1 Heavy Cavalry
X1 Elite Medium Cavalry (4 Blocks)
X2 Medium Cavalry
X1 Light Cavalry
X2 Auxillia
X1 Light Archers
X1 Light Slingers
X3 Leaders (Antony and two legates)
Antony’s Army Set-up: Note that this army sets up fairly freely.
All of Antony’s foot units/leaders, including Antony himself, may set-up in or adjacent to any Triumvir Rampart or Camp Hextile and in whole or partial hexes on the Antony Mapboard only. They may also set-up on or adjacent to the three Triumvir Ramparts (A3, B2, C2) located on the Cassius map. No Antony foot unit/leader, however may start the game adjacent to an Assassin unit. Hexes A3, B2, C2 on the Cassius map (those that are Triumvir ramparts) must each start the game occupied by an Antony Legionary unit. Note that Antony’s foot units/leaders, within the above limits, may also setup initially on several swamp hexes on the “Z” Junction Hexrow (specifically hexes Z2, Z3, & Z4 are the ones within these limits).
Antony’s Cavalry (all 5 units) set up in any whole hex on the Antony Mapboard in Hexrows G & H only, and must be at least 3 hexes or more from any Triumvir Camp hex.
Octavian’s Triumvir Army List x23 units and x3 Leaders Total
X2 Elite Heavy Infantry (5 Blocks each-See Legionary special rules below)
X4 Heavy Infantry (See Legionary special rules below)
X10 Medium Infantry (See Legionary special rules below)
X2 Medium Cavalry
X1 Light Cavalry
X2 Auxillia
X1 Light Archers
X1 Light Infantry
X3 Leaders (Octavian and two legates)
Octavian’s Army Set-up: All units/leaders must set-up in hexes completely on the Octivian Mapboard only as follows:
Octivian Sets up in hex F12 without a unit with him—he is alone
Hexrow “C”: x4 Medium Infantry, x1 Auxillia, x1 Light Archers, x1 Light Infantry, x1 Heavy Infantry x1 Legate
Hexrow “E”: x2 Heavy Infantry, x2 Elite Heavy Infantry, x3 Medium Infantry, x1 Legate
Hexrow “F” (but not in F12): x1 Heavy Infantry, x3 Medium Infantry, x1 Auxillia
Hexrows “G”and/or H and at least 3 hexes or more from a Triumvir Camp hex: x2 Medium Cavalry & x1 Light Cavalry
Brutus’ Assassin Army List: x24 Units and x3 Leaders Total
X2 Elite Heavy Infantry (5 Blocks each-See Legionary special rules below)
X6 Heavy Infantry (See Legionary special rules below)
X8 Medium Infantry (See Legionary special rules below)
X1 Light Horse Archer Cavalry
X2 Medium Cavalry
X1 Light Cavalry
X1 Auxillia
X1 Light Archers
X1 Light Slingers
X1 Light Infantry
X3 Leaders (Brutus and two legates)
Brutus’Army Set-up: All units/leaders must set-up in hexes completely on the Brutus Mapboard only as follows:
Hexrow “A”: x4 Medium Infantry, x2 Heavy Infantry, x2 Elite Heavy Infantry, x1 Legate
Hexrow “B”: x1 Light Archers, x2 Heavy Infantry
Within one hex of a Brutus Camp hex: x2 Medium Infantry and the Brutus Leader
In any complete hex on the Brutus Mapboard—x1 Auxillia, x1 Light Slingers, x1 Light Infantry, and x1 Legate
Within one hex of C18: x2 Heavy Infantry, Within one hex of C16: x2 Medium Infantry
On hexrows “C’ to “G” within 2 hexes of a Brutus Camp hex: X2 Medium Cavalry
X1 Light Cavalry X1 Light Horse Archer Cavalry.
“The Last of the Romans”: History & The 1st Battle of Philippi 42BC (From Wikpedia)
The First Battle of Philippi
Antony offered battle several times, but the Liberators were not lured to leave their defensive stand. Thus, Antony tried to secretly outflank the Liberator's position through the marshes in the south. With a lot of effort he was able to cut a passage through the marshes, throwing up a causeway upon them. This manoeuvre was finally noticed by Cassius who tried a countermove by moving part of his army south into the marshes and making a transverse dam, trying to cut-off the outstretched Antony’s right wing. This brought a general battle on October 3, 42 BC.
First Battle of Philippi
Antony ordered a charge against Cassius, aiming at the fortifications between Cassius camp and the marshes. At the same time, Brutus soldiers, provoked by the triumvir’s army, rushed against Octavian’s army, without waiting for the order of attack (given with the watchword "Liberty"). This surprise assault had complete success: Octavian’s troops were put to flight and pursued up to their camp, which was captured by Brutus’ men, led by Marcus Valerius Messalla Corvinus. Three of Octavian’s legionary standards were also taken, a clear sign of disbandment. Octavian was not found in his tent: his couch was pierced and cut to pieces. Most ancient historians say that he had been warned in a dream to beware of that day, as he had himself written in his Memoirs. Pliny bluntly reports that Octavian went hiding into a marsh.
However, on the other side of the via Egnatia, Antony was able to storm Cassius’ fortifications, demolishing the palisade and filling up the ditch. Then he easily took Cassius’ camp, which was defended by only a few men. It seems that part of Cassius’ army had advanced south: when these men tried to come back they were easily repulsed by Antony. Apparently the battle had ended in a draw. Cassius had lost 9,000 men, while Octavian had about 18,000 casualties. However, the battlefield was very large and clouds of dust made it impossible to make a clear assessment of the outcome of the battle, so both parts were ignorant of each other's fate. Cassius moved to the top of a hill, but could not see well what was happening on Brutus’ side. Believing that he had suffered a crushing defeat he ordered his freedman Pindarus to kill him. Brutus mourned over Cassius’ body, calling him "the last of the Romans". However, he avoided a public funeral, fearing its negative effects on the army morale.
The Opposing Forces At 1st Philippi
The Triumvirs' army included nineteen legions (other legions had been left behind). The sources report specifically the name of only one legion (IIII legion), but other legions present included the VI, VII, VIII, X Equestris, XII, III, XXVI, XXVIII, XXIX, and XXX, since their veterans participated in the land settlements after the battle. Appian reports that the triumvirs’ legions were almost at full-ranks. Furthermore, they had a large allied cavalry force….
The Liberators' army had seventeen legions (eight with Brutus and nine with Cassius, while other two legions were with the fleet). Only two of the legions were at full ranks, but the army was reinforced by a levies from the Eastern allied kingdoms. Appian reports that the army mustered a total of about 80,000 foot-soldiers. Allied cavalry included a total of 17,000 horsemen, including 5000 bowmen mounted in the Eastern fashion. This army included the old Caesarian’s legions present in the East (probably with XXVII, XXXVI, XXXVII, XXXI and XXXIII legions), thus most of his legionnaires were former Caesarean veterans. However, at least the XXXVI legion consisted of old Pompeian veterans, enrolled in Caesar's army after the battle of Pharsalus. The loyalty of the soldiers who were supposed to fight against Caesar’s heir was a delicate issue for the Liberators. It is important to emphasize that the name "Octavian" was never used by contemporaries: he was simply known as Caius Iulius Caesar. Cassius tried in all ways to reinforce the soldiers’ loyalty both with strong speeches ("Let it give no one any concern that he has been one of Caesar's soldiers. We were not his soldiers then, but our country's") and with a gift of 1,500 denari for each legionnaire and 7,500 for each centurion.
Although ancient sources do not report the total numbers of men of the two armies, it seems that they had a similar strength (modern historians put the total at about 100,000 men on each side)
History & The Second Battle of Philippi: The Death of Brutus & After:(From Wikpedia)
The Second Battle of Philippi
On the same day of the first battle of Philippi the Republican fleet, patrolling the Ionian Sea was able to intercept and destroy the triumvirs reinforcements (two legions and other troops and supplies led by Domitius Calvinus). Thus, the strategic position of Antony and Octavian became quite serious, since the already depleted regions of Macedonia and Thessaly were unable to supply their army for long, while Brutus could easily receive supplies from the sea. The triumvirs had to send a legio] south to Achaia to collect more supplies. The morale of the troops was boosted by the promise of further 5,000 denarii for each soldier and 25,000 for each centurion.
On the other side, however, the Liberators’ army was left without his best strategic mind. Brutus had less military experience than Cassius and, even worse, he could not obtain the same sort of respect from his allies and his soldiers, although after the battle he offered another gift of 1,000 denarii for each soldier.
In the next three weeks, Antony was able to slowly advance his forces south of Brutus’s army, fortifying a hill close to the former Cassius’ camp, which had been left unguarded by Brutus.
Second Battle of Philippi
To avoid being outflanked Brutus was compelled to extend his line to the south, parallel to the via Egnatia, building several fortified posts. Brutus defensive position was still secure, holding the high ground with a safe line of communication with the sea and he still wanted to keep the original plan of avoiding an open engagement while waiting for his naval superiority to wear out the enemy. Unfortunately, most of his officers and soldiers were tired of the delaying tactics and demanded another attempt at an open battle. Probably both Brutus and his officers feared the risk of having their soldiers deserting to the enemy if they did not keep their ascendancy on the troops. Plutarch also reports that Brutus had not received news of Domitius Calvinus' defeat in the Ionian Sea. Thus, when some of the eastern allies and mercenaries started deserting, Brutus was forced to attack on the afternoon of October 23. As he said "I seem to carry on war like Pompey the Great, not so much commanding now as commanded." The battle resulted in close combat between two armies of well-trained veterans. Arrows or javelins were largely ignored and the soldiers packed into solid ranks fought face-to-face with their swords, and the slaughter was terrible. In the end, Brutus’ attack was repulsed, and his soldiers routed in confusion, their ranks broken. Octavian's soldiers were able to capture the gates of Brutus’ camp before the routing army could reach this defensive position. Thus, Brutus’ army could not reform making the triumvirs’ victory complete. Brutus was able to retreat into the nearby hills with the equivalent of only 4 legions. Seeing that surrender and capture where inevitable he committed suicide the next day. The total casualties for the second battle of Philippi were not reported, but the close quarters fighting likely resulted in heavy losses for both sides.
Aftermath
Plutarch reports that Antony covered Brutus' body with a purple garment (or his expensive scarlet cloak see below) as a sign of respect: they had been friends. He remembered that Brutus had placed as a condition for his joining the plot to assassinate Caesar that the life of Antony should be spared. Many other young Roman aristocrats lost their life in the battle or committed suicide after the defeat, including the son of great orator Hortensius, and the son of Cato the younger and Marcus Livius Drusus Claudianus (the father of Livia, who will become Octavian’s wife). Porcia, Brutus’ wife, also killed herself by swallowing a red-hot coal when she received news of the defeat. Some of the nobles who were able to escape negotiated their surrender to Antony and entered his
service (among them Marcus Calpurnius Bibulus and Marcus Valerius Messalla Corvinus). Apparently, the nobles did not want to deal with the young and merciless Octavian.
The remains of the Liberators’ army were rounded up and roughly 14,000 men were enrolled into the triumvirs army. Old veterans were discharged back to Italy, but some of the veterans remained in the town of Philippi, which became a Roman colony (Colonia Victrix Philippensium).
Antony remained in the East, while Octavian returned to Italy, with the difficult task of finding the land to settle a large number of veterans. Despite the fact the Sextus Pompeius was controlling Sicily and Domitius Ahenobarbus still commanded the republican fleet, the republican resistance had been definitely crushed at Philippi.
The Battle of Philippi probably also marked the highest point of Antony's career: at that time he was the most famous Roman general and the senior partner of the Second Triumvirate. Antonys life was defined in this moment!
Quotes
Plutarch reports the famous Brutus’ vision of a ghost a few months before the battle. One night he saw a huge and shadowy form appearing in front of him; when he calmly asked, "What and whence art thou?" it answered "I am thy evil genius, Brutus: we shall meet again at Philippi." He met again the ghost the night before the battle. This episode is one of the most famous in Shakespeare’s play Julius Caesar.
Plutarch also reports the last word of Brutus, quoted by a Greek tragedy "O wretched Virtue, thou wert but a name, and yet I worshipped thee as real indeed; but now, it seems, thou were but fortune's slave."
Augustus’ own version of the Battle of Philippi: "I sent into exile the murders of my father, punishing their crimes with regular tribunals, afterwards, when they made war to the Republic I twice defeated them in battle". Qui parentem meum [interfecer]un[t eo]s in exilium expuli iudiciis legitimis ultus eorum [fa]cin[us, e]t postea bellum inferentis rei publicae vici b[is a]cie. Res Gestae 2.
Historical Note: The Final Act of the Battles of Philippi:
“As he stood over Brutus’s body, Antony uttered a few words of reproach for the fate of his brother Gaius, whom Brutus had put to death in Macedonia in revenge for the murder of Cicero. But he declared that Hortensius was more to blame for this action than Brutus and gave orders for him to be executed over his brother’s tomb. Then he threw his own scarlet cloak, which was of great value, over Brutus’s body and commanded one of his freedmen to make himself responsible for its burial. When he discovered later that this man had never burned the cloak with Brutus’s body and had stolen most of the money which should have been devoted to the funeral, he had him put to death” (from Chapter 22 of Plutarch’s Life of Antony).