Midnight assault on the contravallation
This is the centrepiece of this series and was always going to be the most complicated and the greatest deviation from standard C&C:A play. This is the one scenario where I was forced to create a new special rule, that for the entrenchments fronting the contravallation, because I could find nothing in previous scenarios that would cover it. Caesar describes the ditch and various mantraps in some detail and I originally had a couple of lines of defense works here with complicated rules which were unnecessarily elaborate. I’m really pleased with the single line of entrenchments now that abstract the entire line of outer defenses, with simple rules for slowing movement and causing damage, as they did in the real battle. A couple of gaps have been left in the entrenchments because I like the idea of impetuous bands of warriors charging the wall. In story terms these could be gaps left by Romans for their foragers or sections filled by the Gauls with fascines. The Scalable City Walls rules are certainly very complicated but I went with them because they meant I didn’t have to come up with a new, unfamiliar special rule and they just make this scenario work. They allow a small number of defenders to hold off a horde, until reinforcements arrive. I went with Leadership cards ordering reinforcements because once again it is a familiar mechanic, having precedent in other scenarios. With a Command of 6 the Romans should almost certainly have drawn into one when they need it, but timing the arrival of these reinforcements is the critical issue. Once the Gauls get a “beachhead” on the wall, the Romans are in trouble if they don’t get reinforcements there……mistime their arrival or get the section wrong and things could get very ugly for Caesar’s army. I thought a long time about whether or not to attach Antony and Trebonius to cavalry units because of the serious limitation that cavalry have with Scalable City Walls. In the end I decided to go the historical route (they were both cavalry commanders), knowing that the disadvantages would be outweighed by the increased mobility it would give the leaders behind the wall and access to Mounted Charge and Order Mounted. Of course, Caesar on Heavy Infantry is a potent one unit relief force on his own. Once again, I decided not to include rules for decreased night time visibility, partly to keep things simple but also because it seems that the Romans at least were firing into massed ranks of Gauls and could hardly miss. Finally, this is the one scenario of the group that I feel might benefit from an Epic upgrade…….the multisection ordering options of Epic would allow the Gauls to simultaneously attack the whole length of the defense works and greatly enhance the historical simulation…….a project for another time (more on Alesia Design Notes HERE).
Historical Background
The day after losing the cavalry battle on the plain, Commius prepared siege equipment and launched a major night assault on the western wall of the contravallation, while Vercingetorix’s forces simultaneously sallied from the town to attack the circumvallation.
“The Roman troops moved up to the posts previously allotted to them at the entrenchments and kept the Gauls at a distance with slingstones, bullets, large stones and stakes which were placed at regular intervals along the rampart, while the artillery pelted them with missiles. It was too dark to see and the casualties were heavy on both sides. The generals Mark Antony and Gaius Trebonius, who had been detailed for the defence of this particular sector, reinforced the points where they knew the troops were hard pressed with men brought up from the redoubts well behind the fighting line………when [the Gauls] came nearer they suddenly found themselves pierced by the goads or tumbled into the pits and impaled themselves, while others were killed by heavy siege spears discharged from the ramparts and towers. Their losses were everywhere heavy and when dawn came they had failed to penetrate the defences at any point. Afraid, therefore, of having their right flank turned by an attack from the camps on higher ground, they fell back upon their remaining troops. The besieged lost much time in bringing out the implements that Vercingetorix had prepared for the sortie and in filling up the first stretches of trench, and before they reached the main fortifications heard of the retreat of the relief force, so they returned to the town without effecting anything.” – Caesar, Commentarii de Bello Gallico
The stage is set. The battle lines are drawn and you are in command. Can you change history?
War Council
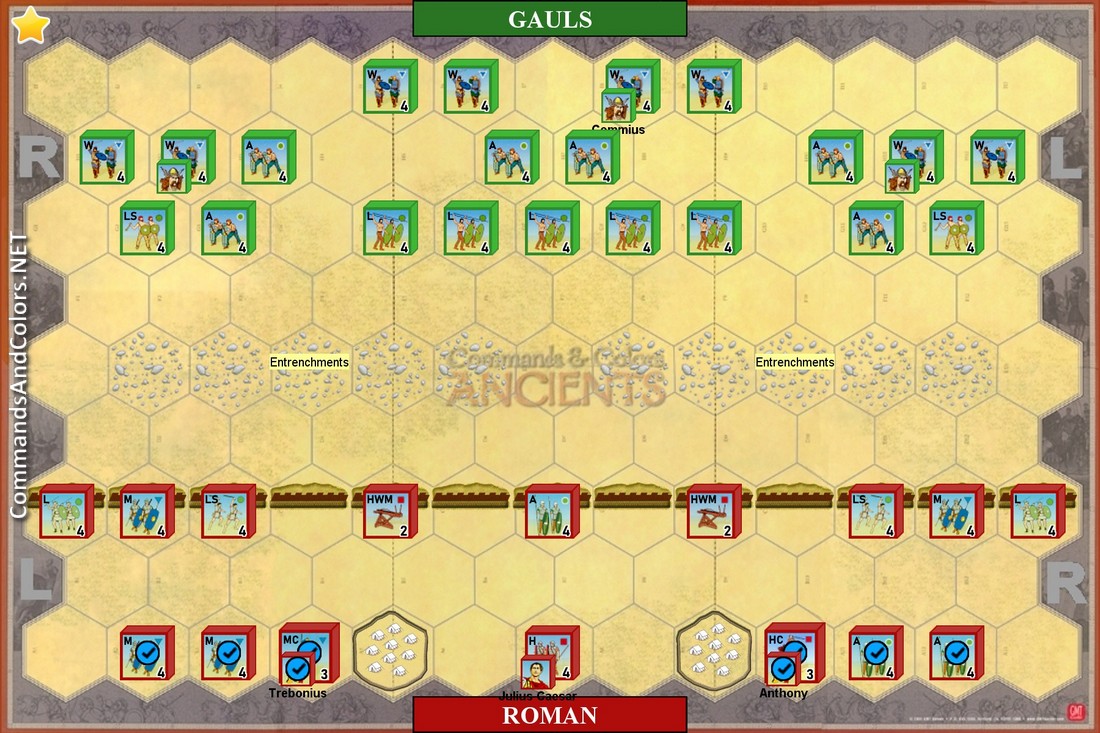
Gallic Army
Leader: Commius
Take 5 Command Cards ![]()
![]()
![]()
![]()
![]()
Move First ![]()
Roman Army
Leader: Julius Caesar
Take 6 Command Cards ![]()
![]()
![]()
![]()
![]()
![]()
Victory
7 Banners
Special Rules
The Julius Caesar Rule and the Julian Legions rule are in effect.
All Rampart hexes are considered Scalable City Wall hexes. Note that while Scalable City Wall hexes are normally impassable to Heavy War Machines, as a special case two of the Roman War Machines start on the wall in this scenario but may not move onto another City Wall hex or back onto their starting hex if they move off.
The Broken Ground hexes represent the line of Roman entrenchments, a deep ditch fronted by a line of hidden mantraps. An ordered and moving unit or leader must stop when it enters an entrenchment hex and may not move again that turn. Retreating and evading units and leaders crossing an entrenchment hex complete their full movement. Every time a moving, retreating or evading unit or leader enters an entrenchment hex it rolls two dice and takes one hit for each Sword rolled. Entrenchment hexes do not affect combat or block line of sight.
When a Gallic unit occupies a Fortified Camp hex at the start of the Gallic player's turn, remove the Camp tile and the Gallic player collects a Victory Banner that cannot be lost.
The units with Antony and Trebonius, marked with yellow icons, start off the map and represent two separate relief forces that may enter the battle by play of separate Leadership cards. If a section Leadership card is played, the leader’s unit must enter on the Roman baseline in that section and all other units in the relieving force must enter on adjacent linked hexes. If a Leadership Any Section card is played the units may enter on adjacent linked baseline hexes in a section of the player's choice. These units may move their full movement on the turn they enter play, with the starting baseline hex considered to be the first hex of movement.
[Use a Hill tile in addition to the Broken Ground tiles to complete the line of entrenchments]
CLICK HERE to Download Vassal .SAV files about Alesia scenario