Historical Overview
After an exhausting march and a night of skirmishing with the Federal vanguard, it seemed as though the Texans were finally going to get their first hot meal in weeks. However, at 05:30 the soldiers were ordered to fall in, the Federal forces were approaching. Hancock’s Corps, 1st of the Army of the Potomac, had punched through the front of Lawton’s brigade and advanced without opposition.
The Texans double-timed it up to the front and saw a line of Federal rifles wearing uniforms they had never seen before and sporting a strange hat with a black feather. One of the Confederate troops remarked that they were the same men from Wisconsin that had wiped out several regiments with a bayonet charge a few days earlier. They called themselves the Iron Brigade after that.
The 2nd and 6th Regiments of Wisconsin were at the front of the Iron Brigade. After moving through a small wood they entered a cornfield and were immediately confronted by a charge led by the Texans.
The federal troops prepared to meet the Army of North Virginia’s shock force, the Texas Brigade.
The stage is set, the battle lines are drawn, and you are in command. The rest is history.

Union Player
• John B. Hood
• 6 command cards
• (Optional 5 tactician cards)
• You move first.![]()
![]()
![]()
![]()
![]()
![]()
| |
|
|
|
| 12 | 0 | 1 | 3 |
Confederate Player
• Abner Doubleday
• 2/4 command cards*, see special rules "Surprise"
• (Optional 3 tactician cards)![]()
![]()
![]()
![]()
| 8 | 0 | 0 | 3 |
Victory
8 Banners
- Dunker Church is a temporary victory objective hex (Turn Start) for the US player.
- The Cornfield is a temporary majority victory objective hex (Turn Start) for both sides, worth 1VP for the US player and 2 VP for the CS player.
Special Rules
• Surprise: The Confederate charge took the Federal vanguard by surprise. The Union player starts with 2 command cards, draw 2 command cards after 1st turn and 2 after 2nd turn, to get the final hand limit of 4 command cards.
• Prior Losses: Phelps’ brigade had suffered casualties in their fight against Lawton’s Confederate brigade. Before game start, roll for every INF in Phelp´s Brigade 1 die. If a INF / XSW symbol is rolled, remove 1 figure from this unit.
• General HOOD: The brave Confederate general ran across the battlefield spurring on the men of his division. An infantry unit with attached "Hood", may move 1 additional hex and still battle, if eligble of terrain. This additional hex is cumulative to any other command cards (e.g. Force March).
• 2nd USSS: The Berdan Sharpshooters inflicted numerous casualties among the Confederate officers. If the US player plays a "Sharpshooter" card, he may roll twice. He can repeat a roll/miss on the same General or he may roll on two different Generals.
• Federal Reserves: The whole I Corps was used for the attack. Hooker sent out regiment after regiment to try to break the enemy front. At the beginning of each Federal turn, roll 1 die. If an INF symbol is rolled, you may place one of the reinforcements Infantry units on any of the described hexes. If a FLAG symbol is rolled, you may setup General Hartsuff in any of the described hexes.
Historical Overview
Sherman had avoided frontal atacks during his Atlanta campaign, but the Confederates were theatening his supply line by holding the railroad north of Atlanta. He decided to dislodge Johnston’s army, which had developed stout earthworks and breastworks all along their lines.
While Sherman feigned an attack on Big Kennesaw, on the Confederates’ right flank, he ordered attacks south of Little Kennesaw. The attacks targeted salients along the Confederate line.
The assaults at a place that became known as the “Dead Angle” were desperate uphill attacksby Union forces against the well fortified rebel positions. Despite the heat, and a blizzard of shot and shell, Brig. Gen. Daniel McCook lead his men all the way to the rebel works, where he stood and yelled at the “traitors” to surrender, before he was shot down.
To papaphrase Sam Watkins, a soldier from Tennessee: “I heard a roar, felt a flash of fire, and saw my friend, William, grab the muzzle of a Yankee gun, receiving the whole contents in his hand and arm, and mortally wounding him. He died for me. In saving my life, he lost his own. ”
The assaults failed, but a few days later, Johnston moved his army out to check Sherman’s flanking movement north of Big Kennesaw Mountain.
The hill became known as “Cheatham Hill”, after it’s defender, Maj. Gen. Benjamin Cheatham.
The stage is set, the battle lines are drawn, and you are in command. The rest is history.
|
|
Set-Up Order
|
Confederate Army
Joseph E. Johnston
5 Command Cards![]()
![]()
![]()
![]()
![]()
 |
 |
 |
 |
| 10 | -- | 2 | 2 |
Union Army
William T. Sherman
5 command cards
Moves first![]()
![]()
![]()
![]()
![]()
 |
 |
||
| 10 | -- | 2 | 2 |
Victory
6 Banners
Special Rules
Ward Creek is fordable
Historical Overview
Sheridan suggested to Grant that if his corp was free to operate independently from the army, he could “thrash hell out of” Jeb Stuart’s cavalry. Grant believed him, and on May 9th, Sheridan’s cavalry corp rode out; ostesibly to cut confederate supply lines, but their real mission was to challenge Stuart to a cavalry duel.
Stuart’s 4,500 troopers moved to intercept Sheridan, and on May 11th they met near Yellow Tavern, an abandoned inn 6 miles north of Richmond. Stuart was outnumbered, and Sheridan’s men were armed with Spencer repeating carbines, giving them a firepower advantage over Stuart’s men. Sheridan had also taken care not to exhaust his horses, while Stuart had been pushing his, to move between Sheridan’s columns and Richmond.
Stuart’s men found high ground above Turner’s Run, straddling a fork in the road. They dismounted, and prepared an ambush, as their light artillery was being placed on the hills.
When the Union cavalry ran into Stuart’s trap they probed his line, attacked the left flank, then hit the center of his line, then attacked his right. Stuart’s men fought bravely, and continued to, even after Stuart was mortally wounded, but they lost the day.
The loss of a the battle, and Jeb Stuart, weakened the Confederate cavalry, but did not totally destroy it. After the battle, Maj. Gen. Wade Hampton took command of Stuart’s depleted corp.
The stage is set, the battle lines are drawn, and you are in command. The rest is history.
|
|
Set-Up Order
|
Confederate Army
J.E.B. Stuart
5 Command cards
Moves first![]()
![]()
![]()
![]()
![]()
|
|
|
|
| 5 | 6 | 2 | 2 |
Union Army
Philip Sheridan
5 Command Cards![]()
![]()
![]()
![]()
![]()
|
|
||
| 8 | 6 | 3 | 2 |
Victory
5 Banners
Special Rules
Turner Creek is fordable
Artillery units are "Horse Cavalry" and can move 1 and battle, or move 2
Infantry units are "Dismounted Cavalry" and can move 1-2 and battle.
"Hit and Run" cards command 1 in each section, or all in 1 section
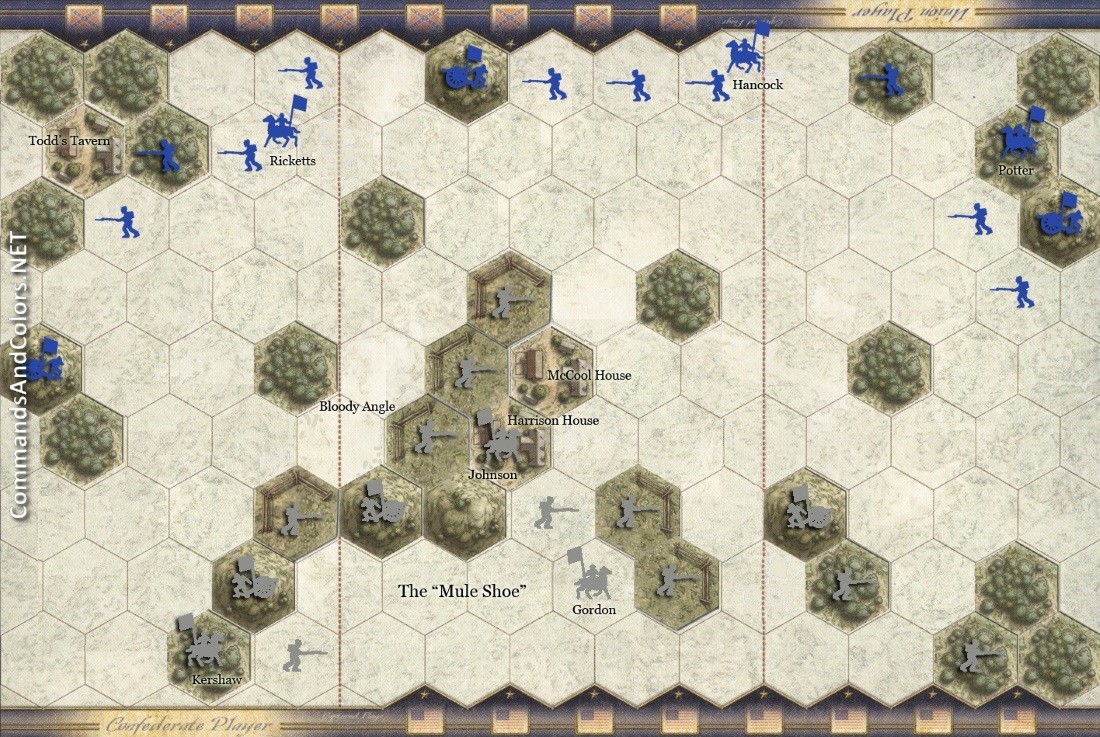
Historical Overview After the costly battle of the Wilderness, Grant began to move the Army of the Potomac southeast. Grant and Lee raced toward Spotsylvania Courthouse. Lee arrived first, and set up defensive positions on rolling hills that formed a salient along the Confederate line that became known as the “Mule Shoe”. At dawn on the 12th, Hancock’s men attacked the center of the salient and broke the Confederate line, but in the confusion, weren’t able to capitalize on the breakthrough, when J.B. Gordon and his men moved forward to stop the Union advance, regaining their positions. Burnside’s men also attacked at dawn on the east side of the salient to support Hancock, but were not able to break through.
Throughout the day fierce fighting took place at an angle in the earthworks on the west side of the salient that became known as the “Bloody Angle”.
After almost 24 hours of continuous fighting, Lee pulled his forces back to a new line of defensive works, along the base of the “Mule Shoe”, that his engineers had frantically built that afternoon.
The stage is set, the battle lines are drawn, and you are in command. The rest is history.
|
|
Set-Up Order
|
Confederate Army
R. E. Lee
Command Cards - 5![]()
![]()
![]()
![]()
![]()
|
|
|
|
| 10 | -- | 3 | 3 |
Union Army
U. S. Grant
Command Cards - 5
Move First![]()
![]()
![]()
![]()
![]()
|
|
||
| 10 | -- | 3 | 3 |
Victory
6 Banners
Special Rules
None
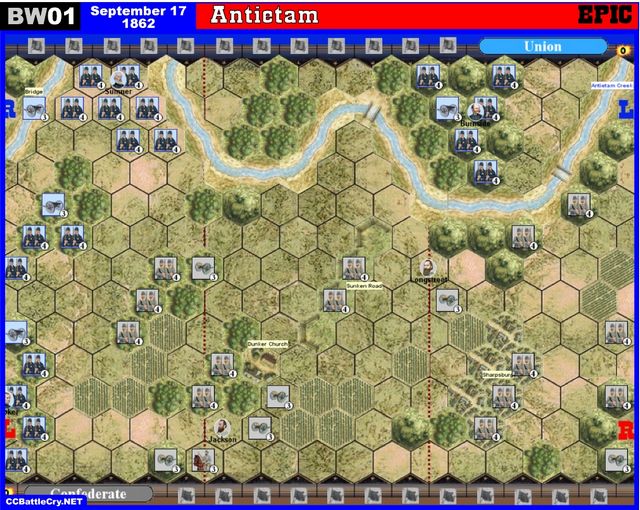
Historical Overview
Having gained a victory at Second Bull Run, Lee struck north toward Maryland. This would enable him to keep the initiative, supply his army from the rich farmlands, and keep the campaign out of Confederate territory. McClellan had over 70,000 troops in the farmland around Sharpsburg. They would greatly outnumber Lee’s army of 35,000. McClellan deployed three corps on his right, another was to engage the Confederates on his left, while two others covered the center and formed the reserve. Lee deployed Jackson on his left flank, with Longstreet covering the center and right flank. Lee hoped to be supported by A. P. Hill’s division marching up from Harper’s Ferry.
The attacks against the Confederate left flank were poorly coordinated. The fighting in the woods and cornfields around Dunker Church was particularly bloody. Casualties had also been heavy along the line of the sunken road, dubbed “Bloody Lane” by those who fought there.
On the Confederate right flank, Burnside finally moved forward. At the height of this crisis, Hill’s division arrived and crashed into Burnside’s formation and forced him to retreat.
With Lee’s left and center sorely punished, McClellan had an opportunity to destroy Lee’s army. McClellan, despite having two fresh corps, chose not to attack further. The following day, Lee’s army remained in place, but McClellan was not inclined to renew the fighting, and Lee was able to withdraw his army across the Potomac. While seen as a Union victory, McClellan had failed to destroy Lee’s army.
The stage is set, the battle lines are drawn, and you are in command. The rest is history.
|
|
Set-Up Order
|
Union Army
• George B. McCellan
• Take 4 command cards
• You move first.![]()
![]()
![]()
![]()
|
 |
 |
|
| 19 | - | 4 | 3 |
Confederate Army
• Robert E. Lee
• Take 5 command cards.![]()
![]()
![]()
![]()
![]()
|
|
|
|
| 14 | 1 | 6 | 2 |
Victory
12 Flags
Special Rules
Sunken Road (represented by fence tiles): Apply the general rules of fences except battle.
Battle: When attacking units on a sunken road hex, reduce the battle dice by 2 for attacks crossing the protected hexsides.
Antietam Creek is impassable, except at the bridge hexes.
Breakthrough Map rules
One (or two Standard Card decks) and modified Rules similar Memoir44 Breakthrough.
Some cards allows additonal units anywhere on the board to move, but only to move, not battle.
These cards shows the "on the move" lettering and the number of additional units, which may be ordered,
Attack cards = "+1 on the move",
Probe cards = "+2 on the move",
Scout cards = "+2 on the move".
On the Move may be ordered in ANY section of the battlefield. They move as normal, but may not battle this turn.
Historical Overview
Having gained a victory at Second Bull Run, Lee struck north toward Maryland. This would enable him to keep the initiative, supply his army from the rich farmlands, and keep the campaign out of Confederate territory.
McClellan had over 70,000 troops in the farmland around Sharpsburg. They would greatly outnumber Lee’s army of 35,000. McClellan deployed three corps on his right, another was to engage the Confederates on his left, while two others covered the center and formed the reserve. Lee deployed Jackson on his left flank, with Longstreet covering the center and right flank.
Lee hoped to be supported by A. P. Hill’s division marching up from Harper’s Ferry.
The attacks against the Confederate left flank were poorly coordinated. The fighting in the woods and cornfields around Dunker Church was particularly bloody. Casualties had also been heavy along the line of the sunken road, dubbed “Bloody Lane” by those who fought there. On the Confederate right flank, Burnside finally moved forward. At the height of this crisis, Hill’s division arrived and crashed into Burnside’s formation and forced him to retreat.
With Lee’s left and center sorely punished, McClellan had an opportunity to destroy Lee’s army. McClellan, despite having two fresh corps, chose not to attack further. The following day, Lee’s army remained in place, but McClellan was not inclined to renew the fighting, and Lee was able to withdraw his army across the Potomac. While seen as a Union victory, McClellan had failed to destroy Lee’s army
The stage is set, the battle lines are drawn, and you are in command. The rest is history.
|
|
Set-Up Order
|
Union Army
George B. McClellan
8 Command cards
Move first![]()
![]()
![]()
![]()
![]()
![]()
![]()
![]()
|
|
|
|
| 20 | - | 4 | 3 |
Confederate Army
Robert E. Lee
10 Command cards![]()
![]()
![]()
![]()
![]()
![]()
![]()
![]()
![]()
![]()
|
|
|
|
| 17 | 1 | 5 | 2 |
Victory
12 Flags
Special Rules
• The fence tiles in the center section represent the sunken road. A unit battling across a fence hexside reduces its battle dice by 2.
• Antietam Creek is impassable, except at the bridge hex.
Modified Epic Rules
1. You may play one ARMY card or 1-3 field cards.
2. Counter Attack may be counter an played ARMY or Field card of your opponent.
3. Some field cards, which allows you order units in 2 or 3 sections, counts as 2 or 3 played cards.
These cards are noticed as Field 2 or Field 3 cards.
4. Each section may get only a field card.
5. After turn, you may draw 2 cards (observe hand limit)
6. If you play at least one Scout card, you may draw 3 cards and keep 2 (observe limit of hands)
7. A field commanders, which get no card, are allowed to make a INI roll. Roll one die and order a unit, which symbol is shown. A flag forces one of your units to retreat. If a XSW is rolled, one unit loose one figure.
Modified Tactic Cards:
- Assault: up to 6 units in section
- Force March: up to 6 units in section
- Rally: Roll 1 die for each command card you hold (including the played rally).
For all symbols, a block of this unit symbol is recovered, in any/different section(s).