Strategy notes on playing C&C:A with a Command of 4 (with apologies to Sun Tzu for the dreadful pun)
Most published C&C:A scenarios feature asymmetry to represent the tactical divide between historical winners and losers. There are many tools the designers use to do this but one of the most important is a disparity in hand size, or Command. To my mind a differential in hand size in C&C:A simulates a very specific aspect of a battle, being the difference in quality of leadership between the two armies. Often this represents a known difference in experience or tactical acumen between the opposing generals but may also represent less tangible factors that influence an overall commander’s ability to effectively order troops, such as logistical limitations, troop training, fitness and morale, subordinate officer quality and loyalty or any of the countless other variables that stand between the commander’s formulation of a strategy and its outcome on the battlefield. Typically for C&C:A, these are all neatly rolled into a simple and elegant mechanic that quickly establishes which leader has less command resources than his opponent…..and the greater the historical disparity in these resources, the greater the differential in hand size.
Outside of unusual circumstances, such as the Lake Trasimenus surprise attack, Command in C&C:A ranges from 4 to 6. While I can’t quote probability, I find that a hand of 4 seems to be the real threshold for Command hardship. A Command of 5 against 6 and you’re still moving and grooving, but a Command of 4 versus 5 or 6 and you’re definitely starting on the back foot.
One thing I really appreciate about C&C:A is the careful thought and playtesting that has clearly gone into the published scenarios. Even in the most desperate of mismatches, the historical loser is invariably given an in, some small edge that they can use to pull off an unlikely victory. The trick is finding that edge and then exploiting it. I know that there are many C&C:A players (I’m one of them) who really relish the challenge of playing the underdog. I also believe that success in these matches is not always about victory. Sometimes turning what should be a shameful capitulation into an exciting, close fought defeat can be just as rewarding, particularly if you’re swapping sides and counting total banners…..but even then a win is possible in almost any scenario and there’s never a reason not to die trying.
So you’re stuck with a hand of 4, just because you lost the most important roll of the game when you diced off for sides at Cannae, and apparently it’s your unenviable task to prove that little wooden Varro isn’t the incompetent waste of toga cloth that his historical counterpart was. The real Varro lost the battle and you’re also expected to lose, so what’s the point of trying? The point is that you are not the historical Varro and you can overcome the odds to achieve what is offered at the end of every Order of Battle…..the opportunity to change history.
I believe there is a real art to playing with a Command of 4. It’s true that there are battles you will never have a hope of winning because of the uncertainty inherent in dice rolls and card draw, but there are things you can do to maximise your chances of performing well when you find yourself stuck on the lowest rung of the Command ladder. The purpose of this article is to outline the basic principles of playing with a small hand. At the end I’ll illustrate how these apply to two scenarios. As always, a player’s challenges will vary with different scenarios and different tactical circumstances, but in my experience I’ve found this approach to apply pretty generally and stand me in good stead in most situations.
Experienced players will certainly be well aware of all the points I’ll raise, but I hope they will provide some direction for newer players who can’t see the enjoyment or tactical opportunities in playing the historical whipping boys.
I’ll divide the plan into four basic principles (the four “p”’s): posture, preparation, patience and preservation.
Posture
This is the most important principle. Although there is no overt assignment of attacker and defender roles in C&C:A, Command 4 should consider himself on the defense. This doesn’t mean taking an entirely passive role, but rather assuming an approach where the enemy initiates action and he reacts. This is the safest and most reliable option for a general with limited Command.
The most common mistake I see newer players making in this situation is to push forward and play aggressively, as they would normally do with a larger hand. Occasionaly the cards, dice and opponent will conspire to allow this approach to succeed……but the majority of times it will result in disaster. A successful attack requires orders to advance, engage and then follow through or withdraw if things go badly, and barring extraordinary circumstances a player with a hand of 4 will not have the cards to do this……and his opponent will have the cards to make him pay.
So a wise player sits tight and lets the enemy come to him, and the enemy with a higher Command will. His advantage lies in his superior hand and in using it to press before Command 4 can get himself organised and settled. Sitting tight doesn’t mean doing nothing, however, and Command 4 will have some opportunity to prepare and conserve resources before the enemy makes contact.
While this principle is generally true, there are some specific scenarios where an expectant approach obviously won’t work. Carrhae from Expansion 4 is a prime example. Faced with a whole host of range 3 Light Bow Cavalry who can whittle down his forces at distance before the Cataphracts charge in, Crassus must push forward as soon as possible with any of the 4 cards available to him if he doesn’t want to be quaffing gold come sundown.
Preparation
This could just as well be titled “positioning”. It’s rare that an army will start with all units ideally placed to receive the enemy and there will always be some time for Command 4 to rearrange his forces. It all depends on the situation but the usual basic principles apply; getting lights ahead to screen, pulling isolated units into supported positions, moving leaders to border hexes (particularly important when ordering options are so limited), creating clusters of important units adjacent to those leaders, shielding vulnerable or key units and getting appropriate units (Auxilia!) into terrain. A lot to do with limited time and ordering options but it’s a matter of prioritising and what cards are available to meet those priorities.
Patience
While there is usually a whole bunch of interesting preliminary maneuvering and skirmishing in a C&C:A battle, they are usually decided by the key moments when multiple units engage in close combat. If he is well set up, Command 4 wants the enemy to engage, preferably overextending and exposing units in the process. It’s what he’s waiting for. In general, if I have key units supported and adjacent to leaders, I would prefer to be attacked first. It can go badly, and catastrophically so, if the enemy rolls well and eliminates multiple units but this uncertainty is one of the great tensions of the game. It’s all about playing the odds and if Command 4 holds his nerve at the critical time, wears the initial assault and has the right card to respond, he will get battle back and follow up attack, meaning roughly double the dice of the enemy.
Once set up, another important lesson is to avoid being drawn from those positions unnecessarily. The trick is not to be fooled into reacting too early. A good attacker facing a well positioned Command 4 knows the danger and will attempt to draw him out with feints. The most common ploys will be sending in Lights to pester with ranged attacks or to advance close combat units to within striking distance. Ranged attacks rarely win banners by themselves and Command 4 wants the enemy to initiate close combat, so neither of these feints should tempt him from his positions. If enemy skirmishers are causing too much attrition, he can interpose his own Lights or make an advance with close combat units to drive them off if that doesn’t leave him exposed to nearby enemy close combat units and if he has a card to order them back into the line next turn. The other reason for Command 4 to come out to fight is if the attacker has rashly exposed himself by pushing forward vulnerable unsupported units but it’s very important he ensures that this isn’t a ploy to expose him to a counterattack by more dangerous enemy units within range, because he’s unlikely to have the resources to recover.
And under no circumstances should Command 4 be lured out of terrain that gives him advantage until nearing the end game. Keep those Auxilia in the hills!
Lights and cavalry do deserve a special mention. Command 4 can possibly afford to push them forward to harry the enemy because their ability to evade essentialy gives them an extra move, almost like an extra ordering option, which is a very useful bonus when he has so few available to him……..but a word of caution. Command 4 still needs a backup card available to order evaders again when he pushes them forward because a canny enemy will know how limited his ordering options are and can call his bluff by moving close combat units adjacent to them and not attacking, denying them the evade…..if Command 4 can’t order them away next turn, the enemy will then probably have the orders required to surround and eliminate them.
Preservation
Probably more accurately titled “Conservation” but that doesn’t start with a “p”. There are two aspects to this, conservation of units and conservation of cards.
All units have an important role in a C&C:A army and all are potential banners for the enemy, but there are usually key units that will decide the outcome of a battle at that decisive moment of engagement of multiple close combat units. Most often these key units are the Medium and Heavy main line infantry, but this will vary with different armies and battles. If Command 4 is waiting to receive the enemy attack, he wants his key close combat units at full strength when it hits the fan. He should do whatever he can to shield them from enemy ranged attacks and other dangers such as Mounted Charging Elephants. Hiding them behind terrain or Light units is a vital part of his preparation. While Lights are important, and a banner for the enemy is a banner no matter which unit was destroyed, the individual blocks on a Light are not as important as they are on a main line unit hoping to survive the first clash of arms. Lights won’t be as likely to engage in close combat, are easier to order as there are more cards in the deck which do so, are less vulnerable as they are able to evade (with the exception of Auxilia) and they have greater mobility to get out of the way when they are depleted and their job is done. And of course, if they camp out front and take fire they can also return it.
Hand management is a difficult proposition for Command 4 because he doesn’t have much of a hand to manage. I was discussing this with a mate the other day and jokingly said it was easier to play with a hand of 4 because you have less to choose from, but more seriously that the decisions you make are more critical, and I think this is true. One important aspect of general hand management is holding onto key cards you will need at decisive points in the game but this is a very difficult thing for Command 4…….hold onto one good card from the start and he’s effectively playing with a hand of 3. Nevertheless, I think there are a few cards which are potential keepers for Command 4:
Mounted Charge and Double Time – just as these are vital finishers for a general formulating an attack, they are potential winners for a Command 4 defender, as the increased mobility they grant can allow Command 4 to bring units into close combat that the enemy thought were out of range when he first engaged, and with extra dice for Mounted Charge.
Leadership cards – useful for early rearranging of your lines but very important for ordering your key blocks of units at the time of engagement if you’ve set them up well.
Clash of Shields – I’m not usually thrilled to see this pop into my hand but it’s a potential winner for a Command 4 waiting for an enemy assault to break on his shield wall.
Move Fire Move - great escape card for the depleted Lights that have been screening the key combat units, particularly if they are under threat of being pinned against their own lines (Order Light Troops also works for this).
To give a practical illustration of some of these principles I’ll discuss how they can be applied to two of the published scenarios.
BAGRADAS (Command: Carthage 6 – Rome 4)

The major land battle of the First Punic War was the first example to spring to mind because I had the opportunity to replay it from both sides recently and it’s also the first 6-4 scenario a new player encounters when working their way through the base game battles.
This one looks bad for Rome. There are a lot of frightening looking high impact units on the Carthaginian side, particularly the Elephants and Warriors, they outnumber the Romans in Heavy Infantry and cavalry and have a 3-2 leader advantage. All this before you take into consideration their Command of 6.
However, it’s not as lopsided as it first appears. Rome has more ranged attack units than Carthage, and outgunning the enemy is good for a Command 4 defender. The Roman forces are also formed up in a cohesive line with all units supported…..perhaps not arranged quite how I’d like but it certainly makes Regulus’ job easier. By contrast, the Carthaginian forces are all over the shop…..infantry split up and Heavies camped on the baseline behind Elephants. In fact, they’re so far away, it’s unlikely that the full Carthaginian Heavy complement will feature in the battle, so I would ignore them. Regulus is going to be dealing with enemy Lights, cavalry, Warriors and hopefully Elephants. The lines are also quite far part so he will have plenty of opportunity to prepare while Xanthippus gets his mess sorted out.
One important problem to address is that two Roman leaders cannot cover the whole line. I would get my leaders to the border hexes right in front of them, preferably on Auxilia, then abandon the centre, forming infantry clusters around them. The Lights can take the centre……pushing them forward is not a bad idea if it can be done safely, because threatening Elephants with blocked retreat paths will certainly make Carthage commit his own Lights to screen them, wasting his orders and drawing them away from Rome’s infantry clusters. Under no circumstances would I bring the cavalry out to play when the Carthaginian cavalry advance……they are outnumbered and leaderless and will be destroyed. They should be kept tucked away and supported and reserved for cutting off retreat paths when the real action starts.
When playing Rome in this scenario, I’m actually usually very happy to see the Elephants come forward. Inevitably a Mounted Charge will follow and they could certainly do some serious damage but if I’m well set up with supported infantry clusters adjacent to leaders, I’ll almost certainly score three banners and be able to recover, no matter what havoc the Elephants have wreaked. Faced with a strong Roman setup, a clever Carthaginian general won’t commit the Elephants until late, if at all, so I’ll be able to ignore them.
On the subject of Mounted Charge, as a hand management issue for the Roman, I’d drop it as early as possible when it can do no harm. It will only be useful later as a devastating Counterattack opportunity for the Carthaginian.
ABRITTUS (Command: Goths 5 - Rome 4)
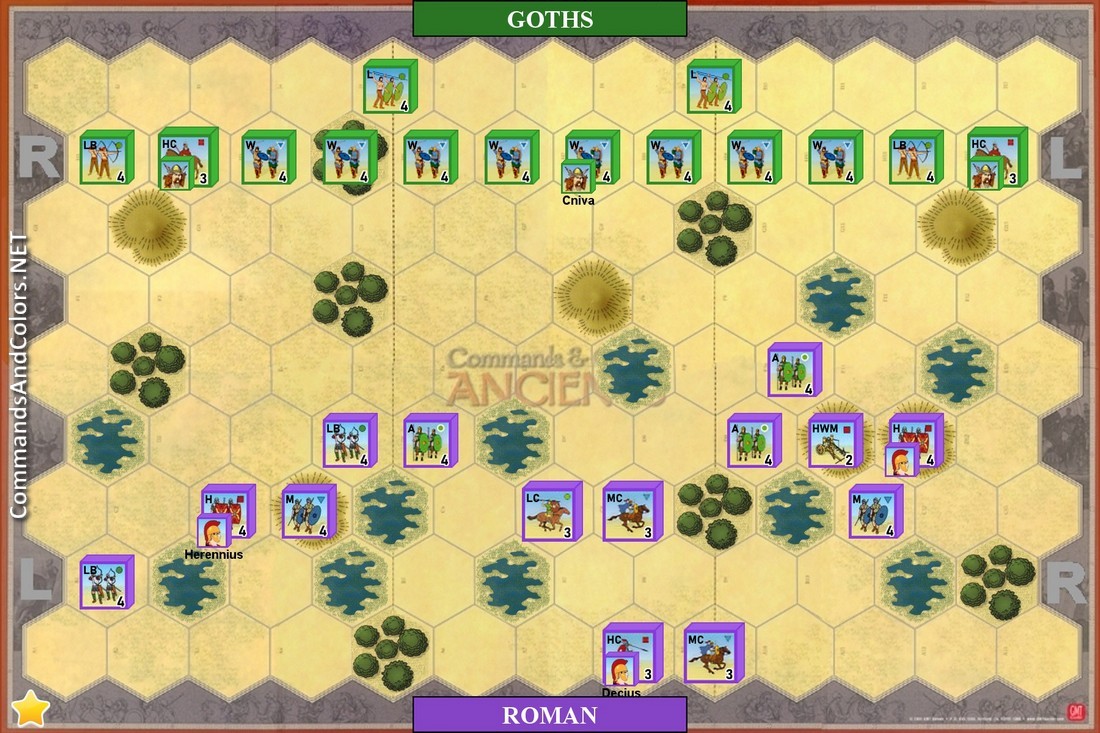
I’ve chosen Abrittus as the second example as it couldn’t be more different to Bagradas and it’s a fascinating scenario, one of my favourite from Expansion 4.
Here the situation is essentialy the reverse of Bagradas, with the Goths well lined up and supported and the Roman lines widely divided and a real dog’s breakfast…and with a hand of 4 to sort it out! Those Goth Warriors are very mobile and thrive on broken enemy lines. You have to predict they will exploit the situation and dictate the flow of battle with their hand advantage. Double Time is likely to be a key card for the Goths in determining where the action happens. Rome has to play defensively here.
I think the minor edge Rome has in this one is the terrain, which dominates the battlefield and is essentially a third player in the scenario. Forest and Marsh are the enemies of mobile units and hills are the friends of Auxilia. Used wisely and creatively, a well positioned Roman can channel the Goths and force them to attack where the legions have the upper hand. It’s also worth noting that while the Goths have a couple of bowmen, the Romans have a significant advantage in ranged attacks, with Imperial Legions meaning all Roman units bar the Heavy and Medium Cavalry are shooters, plus they have a War Machine to deliver distant death…….once again, good for a Command 4 defender to have ranged attack dominance, but particularly good against Warriors who aren’t quite as dangerous and ugly with that first block removed.
So how does Decius deal with this? Because of the mobility of the Goths it’s a race against time but it is doable. No point in trying to form a line, it’s not going to happen……but the principles still apply here. Rome needs to form separate clusters of units around leaders in positions well defended by terrain. The fact that they have three leaders this time, one in each section, makes this achievable.
The units that need to be preserved at full strength until the Warriors charge are the Heavy and Medium infantry. They form the stable core around which Rome can win this one and I would be very careful to keep them screened until they’re needed for the main event.
Rome is in good shape on the left. The Goths have a nuisance bowman but the Romans have two and should be able to win the ranged battle and screen with them effectively. The infantry cluster setup is easy here…..Auxilia onto the hill with the Heavy and Medium in the hexes behind (Medium in the marsh is not ideal but no Warrior can charge him there). Waves of Warriors will break on this formation, barring unlucky rolls.
The right is more difficult for Rome. Ideally they would usually want to hold that double hill with their Auxilia and the Heavy and Medium behind but that Goth bowman is a fly in the ointment because he can sit back out of their range and inflict slow attrition until the Warriors are ready to move in and take the hills themselves against the depleted Auxilia, inflicting bonus close combat with dice advantage against the units behind. The War Machine doesn’t help here……..because of its block disadvantage it will lose in the exchange of fire with the Goth bowman, and it has a tendency to disappear when close combat happens. So what does Decius do here? My cautious approach would be to retire that flank towards the forest border hex and form a cluster around it, with either the War Machine stationed there with double section ordering options, or an Auxilia with leader attached, remembering that they have some protection from enemy fire there. In fact, this is one rare circumstance where I might drop Double Time early as a repositioning card, which would get the War Machine into the forest immediately and deny the Goths a useful Counterattack opportunity. Another possible use of Double Time early is to push for the single hill right in front of the Goth bowman and Heavy Cavalry, creating a high flank. A ballsy move that could go terribly wrong, and you’d have to have the right cards to follow up, but Auxilia stationed on that hill, with strong infantry and leader support, would really give the Goths something to worry about.
The centre is awkward because the cavalry are just as hampered by terrain as the Goths are. My inclination would be to get them formed up, sheltered behind the marshes, then use them as a relief force for whichever flank was threatened. I also think there is a strong case for detaching Decius and getting him to whichever flank is most vulnerable for extra leader support.
That’s it. Longer than I’d planned but hopefully useful to some. Thanks to all who made it this far and I’d welcome comments and questions.
Brent.