Interceptor2 (Jan 25, 2009)
This is a really good mission. I had read on these forums that many people thought this mission was too tough for the British, and I think historically, this mission was a German victory. For those learning the game, however, this is not a good scenario to start with in my opinion. Elevated terrain and AT guns play a big role in this scenario, and I would highly recommend that less experienced players are familiar with the basic rules of movement and attack before tackling this scenario.
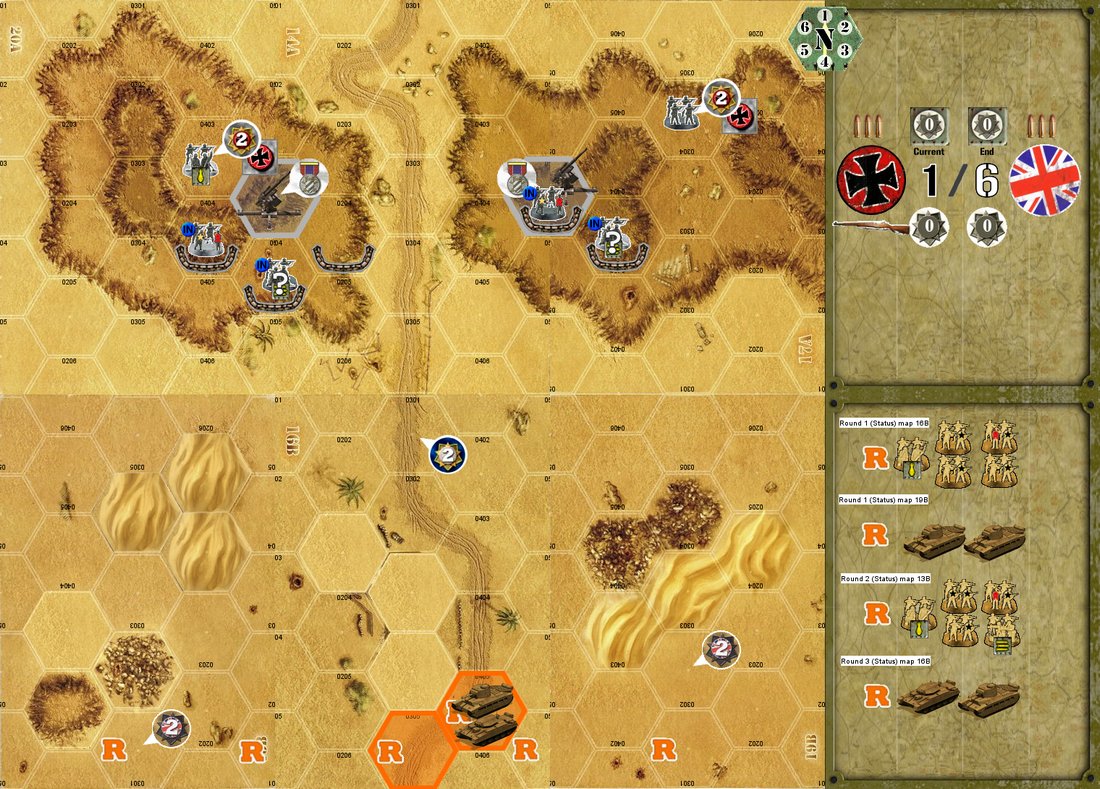
Having said that, as I set-up the battlefield I first looked at the terrain. Basically what you have in this scenario is the Germans heavily entrenched in some mountainous terrain. The AT guns are in fixed positions on the high ground and they cannot be attacked. Almost all of the German units start as concealed. This really helps the Germans since, if they stay hidden, the British cannot attack them until they are almost on top of them. This translates into the British having to move across the open desert toward the mountains while taking fire from the AT guns. Remember, a concealed German squad can fire an AT gun without being revealed.
Putting myself in the position of a British officer, I looked at the stats of the German 88mm AT guns...these are nasty buggers. They have a range of 9 (I think), meaning they can reach out and touch the British almost anywhere on the board. They also have a massive damage of 13 attack dice against vehicles. Bloody hell!
For the British, my strategy was to move quick. The terrain in this scenario can be your ally if you understand it and use it properly. You have got to get your tanks in and adjacent to the base of the mountains as quickly as possible. At the base of the mountains there are blind spots where your tanks can hide out of LOS of the AT guns.
If you look at how your forces are distributed, you will see that basically you should have some reinforcements move toward the AT gun on mapboard 20A and the other groups move toward the AT gun on mapbprad 17A (and part of 14A). Simply have all your reinforcements that enter to the east move toward the AT gun on mapboard 17A and all your reinforcements that enter on the west move toward the AT gun on mapboard 20A. Most tanks enter centrally, on the roadway on mapboard 16B. Usually you get two tanks per turn during the first two status phases. I just split these, so one tank went with the reinforcements to the east and one went with the reinforcements to the west.
Note that on the west of the battlefield, on mapboard 13B, there is a lone hill. I started by driving a slower Matilda in behind this hill to be out of LOS of the AT gun on mapboard 20A. Note, however, that from this position, a tank could be vulnerable to fire from the AT gun located on mapboard 17A. Try and suppress the squad operating this gun. I had a faster Crusader try to drive up as close to the mountains to the east of the pass as quickly as I could. A Crusader cannot reach these mountains in one turn, however, and my first Crusader was lightly damaged by a shot from the AT gun on mapboard 17A.
This was my general strategy of advance, but it's tough. The AT guns are merciless, but there are only two of them, meaning once they have taken their shot, they are done for that action phase (unless the German use a strategy card that allows them to remove an activation token from a unit). As I advanced my tanks in this fashion, I lost three, straight out, to shots from AT guns. I put my AT guns in op fire mode, and as soon as a tank reinforcement started to move, I fired. When you're rolling 13 attack dice, it's easy to get more than four hits against a vehicle, even with the Matilda's thick armor rating of 7.
Still, you don't need to get all your tanks to the mountains to win...you just have to capture the AT guns. I started moving my infantry once I had them. My Germans had their concealed machine gunners in op fire mode, and these were tough on advancing infantry. Use the terrain for cover (i.e. dunes and rough terrain). Suppress the German machine gunners with your mortars. Once you can get a tank atop a hill, you're golden. I found the German troops packed closely together. I was able to pin a squad or two by driving through their hex, and I could blast away at other units. I was also able to reveal other concealed units. Also, from the elevated terrain, it is easy to blast across the pass to suppress the crew firing the other AT gun...but be careful to not let them get off a shot at you first.
I took heavy losses, but ultimately, this is how I overtook the AT guns. The British just have to move and use the terrain to hide and for whatever cover they can squeeze out of it. They might get some bad dice rolls and lose more tanks than I did. I think I lost three of six...half my tanks. For the Germans, the only reasonable strategy I see is for them to stay right where they are...hidden in the hills and blasting away at the British. For the Germans to leave the hills, they are giving up all of their advantages. This might mean that in the first couple rounds of the game, the Germans just sit there after firing their AT guns. Wait for the enemy to come to you, and then crush them. When the British tanks start to roll, blast them with AT guns, and when the tanks and troops get close, open up with op fire.
I think the Desert Tactics deck provides the best cards for both nations in this scenario. The Germans Morale II deck was helpful as well. I was hoping to use my British Artillery Deck to suppress the AT guns more, but the whole game I couldn't establish contact, so the artillery cards I selected didn't do me any good. I think the British must also realize that initially, they shouldn't even bother trying to win initiative. The Germans will have four command points from almost the first round. Later, as British reinforcements begin to arrive, they can take the neutral command objective in the middle of the battlefield, and the British command objective to the west. They can use regular infantry to grab these, but the points they gain from these objective should be spent on using strategy cards instead of on initiative, in my opinion.
This is a great, challenging mission.