Victory Results:
 31 %
Record a victory for BOTTOM ARMY  69 %
Total plays 196 - Last reported by LtCol_Theodora_Fusilier on 2024-04-09 23:24:39

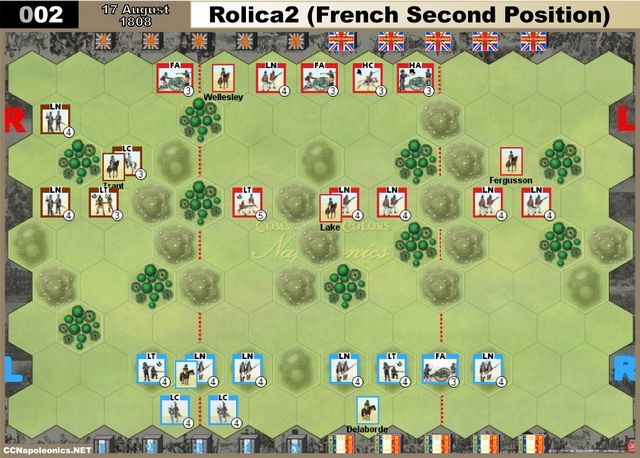
ROLIÇA (French Second Position) - 17 August 1808

Historical Background
Delaborde expertly withdrew his force near Roliça to a second defensive position before the British flanking columns could encircle him. The new position was extremely strong and could only be reached frontally by four rugged gullies.
Wellesley quickly repositioned his forces to repeat his double envelopment for his afternoon attack, but his plan was preempted when the Lieutenant-Colonel Lake of the 29th Worcestershire Regiment prematurely forced his way up one of the central gullies. Wellesley chose to support Lake’s effort and the entire British army surged forward. The French battalions advanced to meet the British before they could emerge from the gullies, but were repulsed. De Laborde once again drew off his troops in good order.
Ultimately Roliça was an indecisive action. Although Delaborde did slow the British advance, Wellesley forced him to retreat before he was reinforced.
The stage is set. The battle lines are drawn and you are in command. Can you change history?


Set-Up Order

Forest 10
Hill 12
HillRugged 13


Battle Notes

British Army
• Commander: Wellesley
• 6 Command Cards
• Optional 5 Tactician Cards
• Move First

Line Infantry Light Infantry Heavy Cavalry Foot Artillery Horse Artillery Leader   Line Infantry Light Infantry Light Cavalry Leader
5 1 1 2 1 3   2 1 1 1

French Army
• Commander: Delaborde
• 5 Command Cards
• Optional 4 Tactician Cards

Line Infantry Light Infantry Light Cavalry Foot Artillery Leader
4 2 2 1 2


Victory
5 Banners

Special Rules
none.

Log in to comment

The Iron Duck replied the topic:
8 months 4 weeks ago
A tough one for both sides. I played the French in this scenario. After moving one of my light cavalry units to guard my left flank I waited the allied force to reach my lines. When the Portuguese units moved closer I sallied forth with a light infantry and line infantry to take them on. Supported by my light cavalry I destroyed two Portuguese units; light infantry and Cavalry to the cost on one of my own units (a rally card helped prolong the life of my light infantry unit - though it was finally destroyed by Portuguese infantry supported by British foot artillery). Having given the the Portuguese a bloody nose I withdrew my surviving cavalry and infantry to the hill-line. On my right the British infantry units supported by horse artillery had advanced to threaten my flank. I used my artillery to thin the red ranks then after reorganising my lines to strengthen my right I launched an infantry unit in a bayonet charge to destroy one British inf unit. The remaining British unit battered badly withdrew with Fergusson with close support from the British Horse artillery. While all this drama on the flanks was going on the British units in the centre led by Wellesley who was attached to the heavy cavalry unit had been advancing and now, having weakened my centre to support the actions on my flanks, I paid the price. I sent forward a light infantry unit to stall the British attack but it was forced into square by the British heavy dragoons and was annihilated by Wellesley's combined force. I was now taking casualties and after I tried to move a light cavalry unit across to support a planned assault on my right flank, the British heavy dragoons intercepted and wiped it out but took casualties in the process. The score was now four to the British and three to my gallant French. By now the Portuguese and British artillery on my left were advancing and my left and centre were crumbling. But all hope was not lost. I had a grand manoeuvre card and spotted an opportunity on my right flank to snatch victory from the jaws of defeat. I shifted my remaining units to engage the weak British infantry and the horse artillery while keeping my last intact light cavalry unit to take on Wellesley's remaining heavy cavalry that was now down to one base. The attack went in and despite some damage done by the British horse artillery I destroyed the remaining British infantry unit on my right and finished off the weakened British heavy cavalry with my intrepid chasseurs. Wellesley survived his leader casualty check to bitterly witness defeat. Vive le Emperour! Quack Quack.
Mark-McG replied the topic:
2 years 8 months ago
fixed
airjudden replied the topic:
2 years 8 months ago
Your Battle Notes shows setup shows 5 French Line and 1 Light.
However, there are 4 line and 2 light. It shows that in the setup on the map.
Burnabybob replied the topic:
3 years 3 months ago
I just played this game as the British. I had planned to be patient and move slowly towards the French position, only attacking when my artillery was in range. I had planned to wait until I had a forward reserve, grand maneuver, or artillery card. But the French were more aggressive than I anticipated, and before I new it I was engaged in all sectors. The saying "the plan doesn't usually survive first contact with the enemy" came to mind. Anyway, I never did get any of those cards I was hoping for, my right flank was immobilized, as all my cards were left flank or center, and I ended up losing 5-3. I do think I was a bit too aggressive with my heavy cavalry, which I used to charge the hill with the aim of taking out his artillery, but I ended up losing the hc instead on a tough die roll. I also needed to protect my forces better, and lost a 2 strength line infantry unit to a French line infantry melee attack. Despite those mistakes, I thought I played a decent game on the whole.
Pevans replied the topic:
3 years 4 months ago
This was a re-match of last week's game, with Evert taking the defending French this time.
I started by moving up the British forces that start at the rear, shifting the horse artillery onto my left to join Fergusson's troops. The French artillery shelled the line infantry with Lake and manoeuvred their cavalry into better positions. A Rally card restored Lake's troops to full health only for one French cavalry unit to charge them. I eschewed the opportunity to form square, forcing the cavalry to retreat with my battle back and then eliminating it on my turn when both line infantry could shoot at it.
This was with the first of my three (!) Forced March cards. The next two allowed my centre to get to grips with the French troops on the hills, punching a hole in their lines and Wellesley leading a unit on to the hills. Evert came back with Give Them the Cold Steel and killed Sir Arthur! That's a big change to history. It took the score to 3:3.
An Assault Centre let me continue the attack, Lake now leading, and move up the British heavy cavalry. However, the arrival of the remaining French cavalry cleared the British off the hills to make the score 3:4.
Evert then charged my heavy cavalry with his light horsemen. French cavalry roll four dice: no hits. British cavalry battle back with four dice: four hits! That's 4:4.
Feeling cocky, the heavy cavalry continued by attacking the French line on the hills and were lucky to survive, though they did force one unit into square. A Forward card let me get Fergusson's troops into range of the French right flank and move the Portuguese - the first time I ordered units on the British right. In the centre, it let me get the cavalry out of line of sight and a fine volley from the only British infantry left in the centre (light infantry in the woods) finished off the battered French line standing in square on the hill. 5:4 to the British.
Pevans replied the topic:
3 years 4 months ago
Second game in introducing Evert to C&C: Napoleonics had to be scenario 2. And it was my turn to be French.
Evert started by moving up the British units from the rear, while I shelled whatever moved into range of the French artillery - I even got a shot at Wellesley at one point.
However, he didn't have enough cards in any section to mount a continuing attack. Hence, the advanced British units in each valley took heavy fire from the French on their line of hills.
Evert used a "Bayonet Charge" to engage the French line, but could only do so piecemeal. This attack was beaten off with French units damaged, but not eliminated, making the score 3:0 to the French.
A couple of "Take Command" cards let me launch an attack on the battered Portuguese units on the British right with the French light cavalry, supported by infantry. The Portuguese light cavalry counter-attacked, but paid the price and my cavalry then finished off a battered Portuguese light infantry, despite it being in square.
That was a 5:0 win and a big relief after my thrashing last time. But Evert wants a re-match...
NightOwl3 replied the topic:
3 years 7 months ago
Allies attacked ad hoc and did little damage to the French. Mountains made any concerted effort difficult. French win 5-2.
LNAGary replied the topic:
7 years 6 months ago
From the battles I've seen, the allies win if:

- They take their time to gather their troops on the wings and stay cautious in the center, so that a bayonet charge won't immediately give the French an advantage (except turn 1, can't do much about it);
- They apply pressure so that the French player cannot be everywhere and then attack at a point/points where the French player is the weakest;
- They usually aim for both objective hexes so that the French player has to stretch his defence no matter what.

Edit: oops this question was 6 years ago! Had seen this map in the "latest scenario" so I incorrectly assumed that it meant somebody had posted on it recently.
Chris-Roper replied the topic:
13 years 2 months ago

Stormkahn wrote: For those of you who've played this scenario and won as the Allies I'd be very interested to know how you did it?


Here is the session report I posted on the Geek

Cheers
Chris
Stormkahn replied the topic:
13 years 2 months ago
I've played the scenario as both sides, I wouldn't say that either game was unbalanced in terms of dice/card draws, we can't even point to certain plays being particulary bad.

In the 1st game, I was the French, the Allies made a well organised attack on his left wing, he didn't run out of cards. I stop him there and counter attacked to grab several points. He had the same issues in the center and right.

In the 2nd game, different opponent, I was the Allies. In trying to learn from the previous game I tried attacking from 2-3 fronts at the same time and to limit the prospects of the French counter attack. It just ran out of steam and never recovered.

The common denominator for both of these was the minimal use of Allied cavalry and artillery.

I think that next time it'll be softly softly move everything up whilst building a hand so that when the time comes pretty much everything goes in at the same en masse.

ATM it "feels" like it's a scenario that punishes the Allies for any mistake but I admit we need to work through it a few more times with different approaches.


cheers,

Dave.
Bayernkini replied the topic:
13 years 2 months ago
Best would be, observe/play some games against experience players on vassal ;)

Sure, you need good cards/dice to win on both sides,
but most mistakes which less experience players do,
is to believe, with every played command card you must order and move forward :whistle:
Stormkahn replied the topic:
13 years 2 months ago
For those of you who've played this scenario and won as the Allies I'd be very interested to know how you did it? Was it close? :unsure:

Thus far I've been through it twice, as both sides. In both games it was a landslide win for the French. In both games the allied artillery and cavalry hardly moved. In both cases the Allied infantry was fed peicemeal into the fight. :ohmy:

I have some ideas but was interested to learn how others have got on.

Cheers,

Dave.

Recently Played

Map NamePlayed onUser
314 Eggmühl - Day 2 Alteglofsheim (22 April 1809) 2024-04-19 16:42:27 RiverWanderer
001 Roliça (French First Position) (17 August 1808) 2024-04-18 23:46:35 LtCol_Theodora_Fusilier
EPIC07 Bussaco (27 September 1810) 2024-04-18 11:13:19 GG
009 Combat at Redinha (12 March 1811) 2024-04-18 03:07:01 LtCol_Theodora_Fusilier
419 Plancenoit (18 June 1815) 2024-04-18 02:26:08 Jamon79
107 Alcañiz (23 May 1809) 2024-04-18 01:42:45 Richards
008 Bussaco (Ney's Assault) (27 September 1810) 2024-04-17 19:25:13 LtCol_Theodora_Fusilier
007 Bussaco (Reyner's Assault) (27 September 1810) 2024-04-17 19:25:08 LtCol_Theodora_Fusilier
006 River Coa (24 July 1810) 2024-04-16 19:01:13 LtCol_Theodora_Fusilier
202 Golymin (26 December 1806) 2024-04-15 21:29:47 LtCol_Theodora_Fusilier