Venta del Pozo - 23 October 1812
Historical Background
Joseph Souham's Army of Portugal forced Wellington to abandon the Siege of Burgos. After a pursuit which included the Battle of Venta del Pozo, he pressed the Anglo-Portuguese back to Salamanca : one of the most desperate cavalry fights took place at Venta Del Pozo.
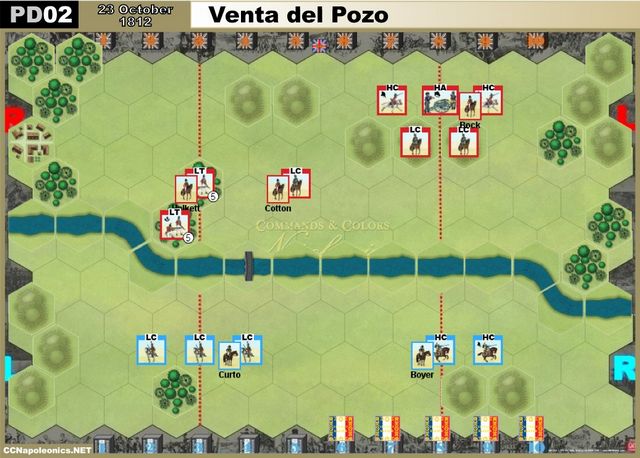
Wellington, moving his principal force towards a line in the rear, ordered the brigades of Anson and Halkett to remain in front until they should be driven in by the enemy. Halkett placed his light infantry brigade (1st and 2nd KGL) behind a brook, on whose bushy banks a part of his battalions were concealed. The cavalry was in front.
He planned to ambush the French advanced guard. Anson's cavalry would file across the bridge and presumably the French would follow. After some French squadrons crossed, Ramsay's six cannons would open fire and Bock's KGL heavy dragoons (1st and 2nd) would charge them.
The plan miscarried when Anson's brigade turned the wrong direction after it crossed the span. The light dragoons stopped right in the way, blocking both Ramsay's guns and Bock's intended charge zone : by some mistake the heavy brigade had not received orders to charge until the French had crossed the bridge.
The two German battalions in ambuscade now threw in a heavy fire, and were ordered to draw back. After a few minutes, Boyer's dragoons, which had crossed the stream bed to one flank, swarmed into the melee. The British cavalry retreated in considerable disorder.
The French pursuit soon ran into Halkett's two battalions, formed in square and the KGL infantry held firm. The French subsequently charged the two battalions in succession, but they managed to hold off the French horsemen and escape intact. The British troops moved and reached the position of the army at Torquemada.
Note : the two KGL German battalions wore the "Venta del Pozo" battle honour until 1918 (source : Wikipedia).
The stage is set. The battle lines are drawn and you are in command. Can you change history?
|
|
Set-Up Order
|
Battle Notes
British Army
• Commander : Cotton
• 5 Command Cards![]()
![]()
![]()
![]()
![]()
 |
 |
 |
 |
|
| 2 | 3 | 2 | 1 | 3 |
French Army
• Commander : Boyer
• 4 Command Cards
• Move First![]()
![]()
![]()
![]()
![]()
 |
 |
|
| 3 | 2 | 2 |
Victory
5 Banners
Special Rules
As this is a Rearguard Skirmish action, the British player may escape his troops through the British banner : each unit (not Leader) leaving the board by this hex counts then as a victory banner. This is allowed only AFTER than, at least, one unit in each camp as been eliminated.
The River is fordable.