Historical Overview
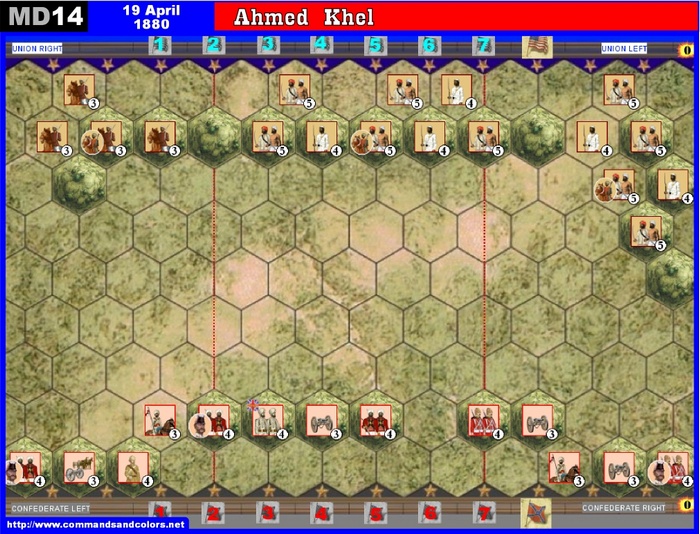
The Battle of Ahmed Khel was fought between the British Empire with its British and Indian armies and the Afghans on the road between Kandahar and Kabul on 19 April 1880 in what now is the country of Afghanistan. The battle ended in a British victory. This battle occurred during General Donald Stewart's march from Kandahar to Ghazni, then on to Kabul.
More informations on Wikipedia.
The stage is set, the battle lines are drawn, and you are in command. The rest is history.
|
|
Set-Up Order
|
British Troops
General Sir Donald Stewart
6 Command cards![]()
![]()
![]()
![]()
![]()
![]()
 |
 |
 |
 |
| XX | XX | XX | XX |
Afghan Tribes
Unknown Tribal Leaders
6 Command cards
Move first![]()
![]()
![]()
![]()
![]()
![]()
 |
 |
||
| XX | XX | XX | XX |
Victory
7 Banners
Special Rules
- Cross sabers hits only in melee
British Army:
- British Gurkhas: The british unit on the center-left (with british badge) are Gurkhas. They may ignore 1 flag and ignores terrain battle restrictions in close combat.
- Horse Artillery: The british horse artillery may move 0-1 and battles with 4-3-2-1 or move 2 and no battle.
- British Rifles: The british unit on the left (single picture unit) with 3 figures battles 2-2-2-2. If they don’t move, they also hit on XSW.
Afghan Army:
- Tribes with swords: - Strength 5 figures - Move 0-1 and battle 3-2-1 OR move 2 without battle
- Tribes with muskets: - Strength 4 figures - Move 1 and battle 3-2-1 OR don´t move and battle 4-3-2-1
Historical Overview
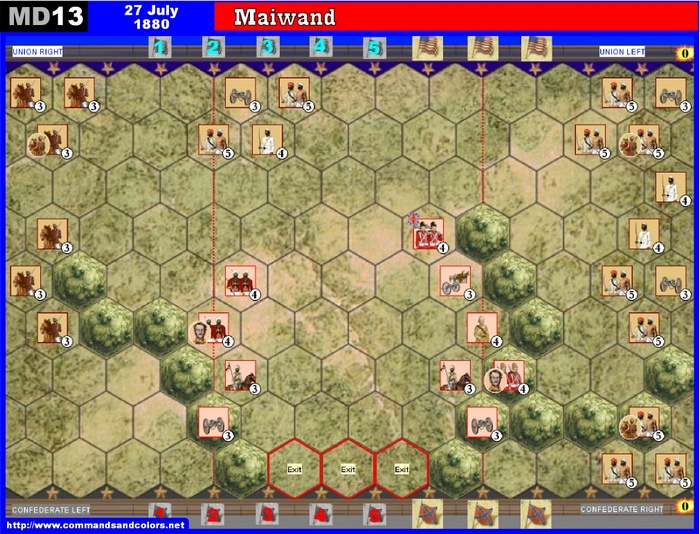
The Battle of Maiwand on 27 July 1880 was one of the principal battles of the Second Anglo-Afghan War. Under the leadership of Ayub Khan, the Afghans defeated two brigades of British and Indian troops under Brigadier-General George Burrows, though at a high price: between 2,050 and 2,750 Afghan warriors were killed, and probably about 1,500 wounded. British and Indian forces suffered 969 soldiers killed and 177 wounded.
More informations on Wikipedia.
The stage is set, the battle lines are drawn, and you are in command. The rest is history.
|
|
Set-Up Order
|
British Troops
Brigadier General Burrows
6 Command cards
Move First![]()
![]()
![]()
![]()
![]()
![]()
|
|
|
|
| XX | XX | XX | XX |
Afghan Tribes
Ayub Khan
6 Command cards![]()
![]()
![]()
![]()
![]()
![]()
|
|
||
| XX | XX | XX | XX |
Victory
5 Banners
- Each ordered british unit, which left their edge through on one of the 3 red marked hexes, counts as 1 VP for the British player (LDR don’t count in this case as VP).
Special Rules
- Cross sabers hits only in melee
- Ravine: the hill tiles represent ravine terrain. A unit, which moves from a non ravine tile, on or off a ravine hex, must stop. Moving from a ravine hex to another, don’t stop moving. Ravine hex don’t block LOS.
British Army:
- British Engineers: The british unit on the left (with shovels and badge) are Engineers. They ignores terrain battle restrictions in close combat. Instead of battling, they may built a fieldwork in her own or an adjacent hex or may built a bridge on a river hex. They can upgrade this fieldwork in a further turn to an entrenchment.
- British Rifles: The british unit on the right (single picture unit) with 3 figures battles 2-2-2-2. If they don’t move, they also hit on XSW.
- Horse Artillery: The british horse artillery may move 0-1 and battles with 4-3-2-1 or move 2 and no battle.
Afghan Army:
- Tribes with swords: - Strength 5 figures - Move 0-1 and battle 3-2-1 OR move 2 without battle
- Tribes with muskets: - Strength 4 figures - Move 1 and battle 3-2-1 OR don´t move and battle 4-3-2-1
Historical Overview
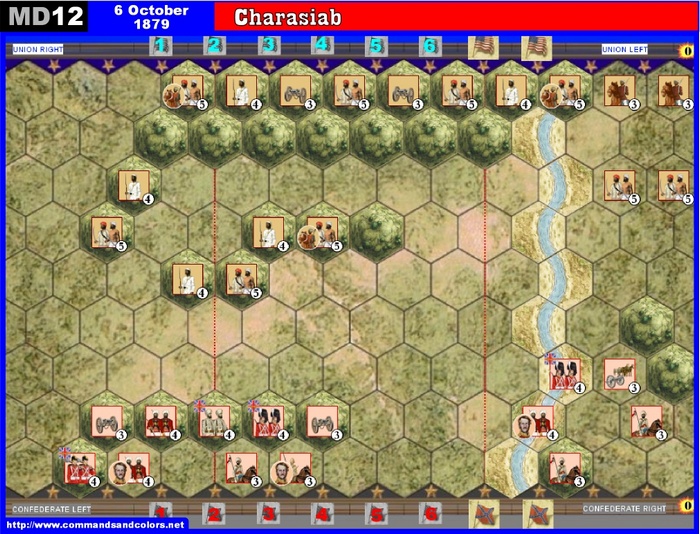
The Battle of Charasiab was fought during the Second Anglo-Afghan War, between British and Indian troops against Afghan forces. The British were led by Major-General Sir Frederick Roberts, then commander of the Kabul Field Force, and the Afghans by Nek Mohammed Khan, Governor of Kabul and uncle of Yakub Khan, the former Amir. Having driven the Afghans from the hills surrounding Charasiab, the British were able to resume their advance on Kabul.
More informations on Wikipedia
The stage is set, the battle lines are drawn, and you are in command. The rest is history.
|
|
Set-Up Order
|
British Troops
General Frederick Roberts
6 Command cards
Move First![]()
![]()
![]()
![]()
![]()
![]()
|
|
|
|
| XX | XX | XX | XX |
Afghan Tribes
Nek Mohammed Khan
5 Command cards![]()
![]()
![]()
![]()
![]()
|
|
||
| XX | XX | XX | XX |
Victory
6 Banners
Special Rules
- Cross sabers hits only in melee
British Army:
- British Highlanders: The 2 british redcoat INF units (with bearskin hats and badge) may ignore 1 flag and hits also on XSW in range combat.
- British Gurkhas: The british-indian unit on the left (with badge) are Gurkhas. They may ignore 1 flag and ignores terrain battle restrictions in close combat.
- British Engineers: The british unit on the left (with shovels and badge) are Engineers. They ignores terrain battle restrictions in close combat. Instead of battling, they may built a fieldwork in her own or an adjacent hex or may built a bridge on a river hex. They can upgrade this fieldwork in a further turn to an entrenchment.
- Horse Artillery: The british horse artillery may move 0-1 and battles with 4-3-2-1 or move 2 and no battle.
Afghan Army:
- Tribes with swords: - Strength 5 figures - Move 0-1 and battle 3-2-1 OR move 2 without battle
- Tribes with muskets: - Strength 4 figures - Move 1 and battle 3-2-1 OR don´t move and battle 4-3-2-1
Historical Overview
More informations on Britishbattles.com
The stage is set, the battle lines are drawn, and you are in command. The rest is history.
|
|
Set-Up Order
|
British Troops
Brigadier General Gough
6 Command cards
Move First![]()
![]()
![]()
![]()
![]()
![]()
|
|
|
|
| XX | XX | XX | XX |
Afghan Tribes
Unknown Tribal Leaders
5 Command cards![]()
![]()
![]()
![]()
![]()
|
|
||
| XX | XX | XX | XX |
Victory
6 Banners
Special Rules
- Cross sabers hits only in melee
British Army:
- British Gurkhas: The british unit on the left are Gurkhas. They may ignore 1 flag and ignores terrain battle restrictions in close combat.
- Horse Artillery: The british horse artillery may move 0-1 and battles with 4-3-2-1 or move 2 and no battle.
- British Rifles: The british unit on the far left (single picture unit) with 3 figures battles 2-2-2-2. If they don’t move, they also hit on XSW and ignore all terrain modifications.
Afghan Army:
- Tribes with swords: - Strength 5 figures - Move 0-1 and battle 3-2-1 OR move 2 without battle
- Tribes with muskets: - Strength 4 figures - Move 1 and battle 3-2-1 OR don´t move and battle 4-3-2-1
Historical Overview
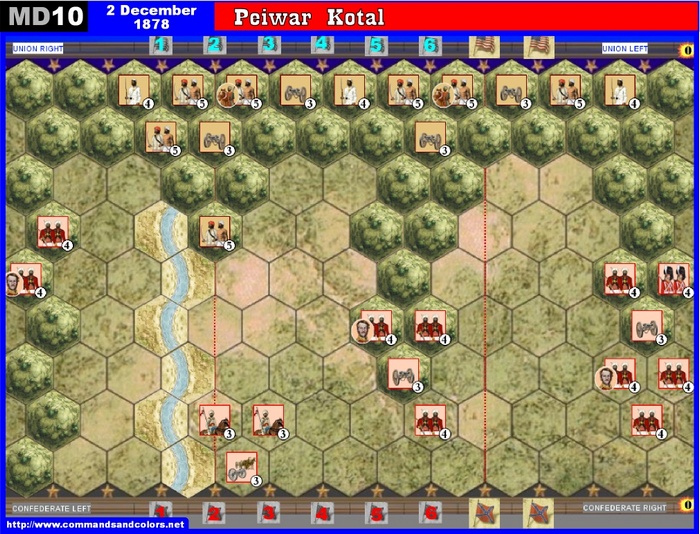
The Battle of Peiwar Kotal was fought on 28–29 November 1878 between British forces under Sir Frederick Roberts and Afghan forces under Karim Khan, during the opening stages of the Second Anglo-Afghan War. The British were victorious, and seized the strategic Peiwar Kotal Pass leading into Afghanistan.
More Informations see Wikipedia.
The stage is set, the battle lines are drawn, and you are in command. The rest is history.
|
|
Set-Up Order
|
British Troops
General Frederick Roberts
6 Command cards
Move First![]()
![]()
![]()
![]()
![]()
![]()
|
|
|
|
| XX | XX | XX | XX |
Afghan Tribes
Karim Khan
4 Command cards![]()
![]()
![]()
![]()
|
|
||
| XX | XX | XX | XX |
Victory
6 Banners
Special Rules
- Cross sabers hits only in melee
- For each destroyed Afghan ART, the Afghan player loose a command card, up to limit 2. The Afghan player choose one random card to discard from his hand.
British Army:
- British Highlanders: The british redcoat with bearskin at the right flank may ignore 1 flag and hits also on XSW .
- Horse Artillery: The british horse artillery may move 0-1 and battles with 4-3-2-1 or move 2 and no battle.
Afghan Army:
- Tribes with swords: - Strength 5 figures - Move 0-1 and battle 3-2-1 OR move 2 without battle
- Tribes with muskets: - Strength 4 figures - Move 1 and battle 3-2-1 OR don´t move and battle 4-3-2-1
Historical Overview
The Battle of Ali Masjid, which took place on 21 November 1878, was the opening battle in the Second Anglo-Afghan War between the British forces, under Lieutenant-General Sir Samuel James Browne, and the Afghan forces, under Ghulam Haider Khan. The perceived offence of an Afghan general's refusal to allow a British envoy entrance to the country was used as an excuse to attack the fortress of Ali Masjid, as the opening battle in the war. Despite numerous setbacks, including half the troops getting lost or delayed and missing the battle entirely, the British were lucky that the Afghans abandoned their position overnight.
More Informations see Wikipedia.
The stage is set, the battle lines are drawn, and you are in command. The rest is history.
|
|
Set-Up Order
|
British Troops
Sir Samuel J. Browne
5 Command cards
Move First![]()
![]()
![]()
![]()
![]()
|
|
|
|
| XX | XX | XX | XX |
Afghan Tribes
Ghulam Haider Khan, Mir Akhor
5 Command cards![]()
![]()
![]()
![]()
![]()
|
|
||
| XX | XX | XX | XX |
Victory
6 Banners
Special Rules
- Cross sabers hits only in melee
British Army:
- British units battles with the normal BC rules.
Afghan Army:
- Tribes with swords: Strength 5 figures - Move 0-1 and battle 3-2-1 OR move 2 without battle
- Tribes with muskets: Strength 4 figures - Move 1 and battle 3-2-1 OR don´t move and battle 4-3-2-1
- Afghan artillery: Afghan artillery may move OR battles with 4-3-2-1 (represent the wrong ammo, which they used)