Historical Overview
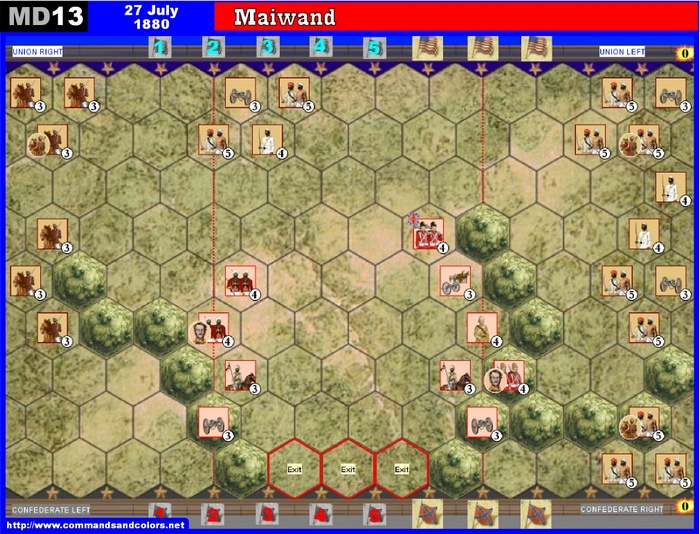
The Battle of Maiwand on 27 July 1880 was one of the principal battles of the Second Anglo-Afghan War. Under the leadership of Ayub Khan, the Afghans defeated two brigades of British and Indian troops under Brigadier-General George Burrows, though at a high price: between 2,050 and 2,750 Afghan warriors were killed, and probably about 1,500 wounded. British and Indian forces suffered 969 soldiers killed and 177 wounded.
More informations on Wikipedia.
The stage is set, the battle lines are drawn, and you are in command. The rest is history.
|
|
Set-Up Order
|
British Troops
Brigadier General Burrows
6 Command cards
Move First![]()
![]()
![]()
![]()
![]()
![]()
 |
 |
 |
 |
| XX | XX | XX | XX |
Afghan Tribes
Ayub Khan
6 Command cards![]()
![]()
![]()
![]()
![]()
![]()
 |
 |
||
| XX | XX | XX | XX |
Victory
5 Banners
- Each ordered british unit, which left their edge through on one of the 3 red marked hexes, counts as 1 VP for the British player (LDR don’t count in this case as VP).
Special Rules
- Cross sabers hits only in melee
- Ravine: the hill tiles represent ravine terrain. A unit, which moves from a non ravine tile, on or off a ravine hex, must stop. Moving from a ravine hex to another, don’t stop moving. Ravine hex don’t block LOS.
British Army:
- British Engineers: The british unit on the left (with shovels and badge) are Engineers. They ignores terrain battle restrictions in close combat. Instead of battling, they may built a fieldwork in her own or an adjacent hex or may built a bridge on a river hex. They can upgrade this fieldwork in a further turn to an entrenchment.
- British Rifles: The british unit on the right (single picture unit) with 3 figures battles 2-2-2-2. If they don’t move, they also hit on XSW.
- Horse Artillery: The british horse artillery may move 0-1 and battles with 4-3-2-1 or move 2 and no battle.
Afghan Army:
- Tribes with swords: - Strength 5 figures - Move 0-1 and battle 3-2-1 OR move 2 without battle
- Tribes with muskets: - Strength 4 figures - Move 1 and battle 3-2-1 OR don´t move and battle 4-3-2-1