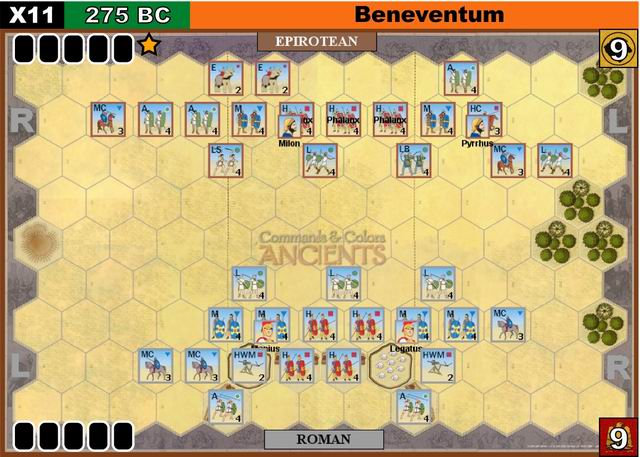
Beneventum: 275BC (The Main Battle)
Pyrrhus Against Rome III
Epirotes vs Romans
Historical Background:
“Pyrrhus endeavored by a circuit to make a night attack on his opponent…but during the march he was obliged to make through thickly wooded country, the torches of his guides gave out, and the column lost its way. In consequence …it was broad day when he reached the vicinity of the Roman camp. The consul Manius came out to meet him, and, attacking the van as it debouched from the hills, threw it into confusion and cut out a number of prisoners and elephants. But Pyrrhus withdrew, made his way into the plain, deployed into line and confronted Manius. The contest was obstinate. Manius appears to have had the better of the phalanx; but the elephants again came into play and by a well-timed advance forced the legion back to the trenches of the camp. Here, however, Manius ordered out the entire reserve left within the walls, which charging unexpectedly upon the elephants drove them back. These, as so often happened in olden warfare, turned from their foes upon their friends, completing a destruction already begun. Pyrrhus was defeated with an enormous loss in killed, thirteen hundred prisoners and eight elephants captured. He fled to Tarentum, whence soon he sailed for Epirus, leaving Milon in command. This lieutenant managed to hold on till Pyrrhus died in 272 BC when he surrendered with the promise of free exit.”
(The above was from T.A. Dodge’s 1891 masterwork Hannibal p.118-119)
War Council:
Epirotean/Allied Army:
Leader: Pyrrhus
5 Command Cards ![]()
![]()
![]()
![]()
![]() (one Line Command Card plus four random draws)
(one Line Command Card plus four random draws)
Move First ![]()
Roman Army
Leaders: Consul Manius
5 Command Cards ![]()
![]()
![]()
![]()
![]() (All random draws)
(All random draws)
Victory:
Victory goes to the first side to reach 9 Banners—Romans get two banners for eliminating Pyrrhus—The Epirotean/Allied Player gets one banner each time one of his units enters a rampart or Roman camp terrain tile—upon the Epirots entering a hex with such a tile remove that terrain tile and score the banner.
Scenario Special Rules:
1) All Epirot Heavy Infantry are considered to be Phalanx Infantry. Phalanx Infantry operates under a set of special rules as follows in a) through e) below.
a) Clear Terrain Combat Bonus: When involved in Close Combat with an enemy Infantry unit, a Phalanx Infantry that still has three or four blocks on map receives an extra (+1) dice if both of the involved opposing units are in clear hex with no terrain tile present. This is both for any initial Close Combat Attack, and also when Battling Back (but see exception in d) below). The bonus does not apply to any Momentum Combat.
b) Phalanx Infantry cannot utilize “double time” Movement or Order activation per the Double Time card. Phalanx Infantry may not be ordered at all by play of a Double Time Card.
c) Phalanx Infantry may not engage in Close Combat if they have just moved before combat their maximum of one hex, unless the move was into one of the two hexes toward their “front” (i.e.: “front” as in towards the initial setup position of the opposing army) of the moving Phalanx Infantry unit, and that moving Phalanx unit than proceeds to engage in close combat with an enemy unit in one of its “front” two hexes in the new hex it moved to. Phalanx Infantry may engage in normal Momentum Movement and Momentum Combat regardless of the direction of the combat—although without the Phalanx Clear terrain Combat bonus if involved in Momentum Combat (see a) above). Note: Non-moving Ordered Phalanx units may always engage in Close Combat.
d) Phalanx infantry units that “Battle Back” at enemy units located in hexes other than the “front hexes” roll a maximum of three dice (and even this could be reduced further by terrain factors).
e) Phalanx Infantry units located in clear terrain that also still have three or four blocks on map at the start of the close-combat or battle back ignore the first sword hit inflicted on them by an enemy unit attacking or battling back from a “front” hex. This advantage is also granted in any Momentum Combat.
Example of “Front” hexes: A Phalanx Infantry unit in hex H7 would have the following two hexes adjacent: G8 & G7 as its “front” hexes.
2) Leader Special Rules:
A Leader attached (stacked with) a friendly unit may cancel one sword hit on the unit in lieu of canceling a retreat hit. Pyrrhus can cancel both a retreat and a sword hit if present
A unit involved in close combat with the support of a Leader may only count one helmet hit amongst those rolled to inflict a hit on an opposing unit.
An Epirot unit in the same hex with Pyrrhus can count up to two helmets when inflicting hits rather than just one.
3) Epirotean Elephant Reserve Special Rules:
Once per game the Epirot side can declare before playing their card for their player-turn a special “Elephant Reserve Move”…The Epirot Player may immediately move any of his elephant units not adjacent to the enemy up to 4 hexes as if the elephants were making a normal move, however this move may not enter hexes adjacent to enemy units. After the “Elephant Reserve Move” he plays his card normally and may even have the elephants move again and have combat—being ordered via the card. The Elephant Reserve Move may not be executed during the first two Epirot turns of the game.
4) Roman War Machine Rules:
Roman War Machines have the following special characteristics:
a) They have no movement capability and if forced to retreat from the hex they start the game in they are eliminated.
b) Another Roman unit (and potentially a Roman Leader) may stack with a Roman War Machine in the same hex.
c) War Machines may not battle back or engage in close combat, but a Roman unit stacked with them certainly can. War Machines stacked with a unit and attacked in close combat are not affected by combat results while that unit is in the hex with them. Only the unit itself (and any stacked with leader) is potentially affected.
d) An order given to a unit stacked with a War Machine also orders the War Machine for
“free”.
e) War Machines, when ordered, may engage in missile combat only, at a range from one to three hexes—they are the only missile unit type that may fire when adjacent to an enemy unit. At one hex range to target two dice are rolled for the missile fire, which is conducted normally—at two to three hex range the War Machine rolls three
dice or four dice if the combat is that particular War Machine’s first shot at an Elephant unit in the scenario.
f) War Machine units may, in certain cases detailed below, fire “over” friendly adjacent units at enemy targets at a two or three hex range:
The War Machine unit in hex B5 may shoot over friendly units in: B4, C5, & C6
The War Machine unit in hex B8 may shoot over friendly units in: B9. C9, & C8